I figured I’d do one more article on scriptable emailing and show off my latest work, PHP function that leverages PHPMailer module to send email notifications from your PHP code. This function can be found in a wrapper PHP test page on my GitHub at https://github.com/siggib007/phptest/blob/master/phpmailer.php and you are welcome to use it if you want.
Full support for HTML email body that is RFC compliant, including a text only alternative
Be able to accept a large text block (formatted or not) that gets turned into an email attachment
Be able to accept an absolute path to a file that should be added as an attachment.
Does not trigger spam filters
The Script
Just like the python function, this PHP function accomplishes all these goals, although I only tested the file path thing on a Linux PHP server. As with the python function just grab this file from GitHub and copy the SendHTMLAttach function along with the StripHTML function. Anything outside of those functions is simply wire frame so the function can be tested, and something shows up on the web page.
How to use
Grab the file and place it on your PHP web server. I’m using docker to run my PHP server and if you clone the whole phptest repo you’ll have my docker-compose file and can just run it from there. If you rather not deal with docker and already have a PHP server ready to go just put phpmailer.php on that server. If you don’t want to deal with GitHub either just wget or curl this URL https://raw.githubusercontent.com/siggib007/phptest/master/phpmailer.php directly into your web directory.
You will also need to have PHPMailer installed on your box. The PHPMailer maintainers recommend you use composer to install it, but I don’t like to use composer as I like to keep dependencies to absolute minimum. I typically have zero dependencies, but occasionally I add one or two max. In these cases I manually install the required files. In this case I download https://github.com/PHPMailer/PHPMailer/archive/master.zip as instructed on https://github.com/PHPMailer/PHPMailer. You are also free to grab the PHPMailer directory from my phptest repo. Whichever route you choose just make sure you have the module on your server and the require statements in the function are adjusted so the script can find it.
Also make sure you are including the two use statement at the top of my test script.
Setup the following environment variables. I recommend you use Doppler for that for maximum security. See my article on docker and doppler for details on how to do that.
EMAILUSER: This the username the script should use when logging into the SNMP server
EMAILPWD: The password to use when logging into the SNMP server
EMAILSERVER: The FQDN of the SNMP server
EMAILPORT: The TCP port number that the SNMP connection should use
USESSL: Whether the SNMP server supports full SSL or TLS connections (True or False)
USESTARTTLS: If the server doesn’t support full connection security, can it switch to a secure connection post connection, known as StartTLS. (True or False)
This should also work if you just setup those appropriate environment variables. If you have another way to fetch these information, just make the appropriate changes in the test script. After you grabbed PHPMailer module and setup those variables you should be able to Load the page and have it send an email. Unless you are using MailTrap (see section, Testing with MailTrap, in article Emailing from python3 for details on MailTrap) or similar service, you won’t actually see any email unless you also change variable on line 130 in the script to be a real email address you can check.
Make sure the SMTP server you are sending through has the proper SPF/DMARC records to be authenticated as authorized to send email for the domain you are using in line 135 in variable $FromEmail. Otherwise the email will be considered spam by pretty much every email service out there. For example if you are sending through your Gmail account, this email address needs to be configured as a send-as email in your configuration. If you are using your work email service you may need to check with your email administrators, but it likely needs to be your work email domain. If you are running your own domains and email server or you are the email administrator, you most likely didn’t read anything beyond SPF/DMARC 😀
To use this in your own PHP do the following
copy SendHTMLAttach function along with the StripHTML function into your function library
Setup the above variables either through Secret Manager such as Doppler, environment variables or however you are used to configure such things.
Then call the SendHTMLAttach function with following arguments in this order, to skip an optional argument and include one later you either pass in an empty string or just put the comma.
Message Body in HTML format, as a simple string. Note: A string doesn’t have to have HTML formatting to be a valid HTML string. However <br> is required at the end of a line you want to break. Normal line breaks are not rendered in HTML, only the text only view.
Name and email that email should come from in the form of “Joe User |joe.user@example.com”
Name and email address to send the email to, in the form of “Joe User |joe.user@example.com”
Email Subject, as a simple string
[Optional] Filename you want the attachment, created from the string in next parameter, to have. The script will not create the attachment if you leave this off. It is up to you to make this filename appropriate for the content. If you generate a HTML attachment but name the file MyFile.txt the recipient will by default, just see the actual HTML, not the rendering as one might expect.
[Optional] Email Attachment in the form of a simple string. This would be the content of the attachment file, appropriately formatted for the intended file format. I assume this would be created by your script but could be read in from a file as well. Only text formats are supported, binary attachments have not been tested.
[Optional] List of custom headers to add to the email. Either supply a single header as a simple string in the format “name: value” or as an array of simple strings in that format. For example “X-Testing: This is my test header”.
See how I do this in my script by looking at how I create $arrname in the starting on line 127.
[Optional] Absolute path to a file on the php server you want to include as an attachment.
Here is an example of how you might call the send function assuming all the above have been assigned to appropriate variables.
I figured I’d write another article Secrets management to wrap up my evaluation efforts in this space. As I mentioned in my first article on secrets management I set out on this journey looking a solution that offered easy to use generic secrets management. In that article I also define what secrets management is, what sort of secrets we are talking about and why it’s important to manage your secrets. If you haven’t read my previous articles in this series, I recommend you check all of them out.
Like I said was looking for easy to use generic solution, so anything that specialized in specific language, product or vendor was excluded. So anything that specialized in AWS Keys, Docker secrets or NodeJS secrets for example were excluded from my evaluation. After some initial web research I had the following solutions to evaluate:
In following sections I will summarize what I found.
Solutions
AKEYLESS Secrets Manager
I found this to be a powerful and easy to use solution that will likely fit well larger organizations looking for a complete secrets and key management solution. Smaller orgs or orgs with fewer requirements may find this to be an overkill or simply too expensive. For more details see my article on this solution at https://infosechelp.net/secrets-management-a-key-less-edition/
Vault Project by HashiCorp
HashiCorp is a big name in this space, so I was expecting big things from them, expectations which turned out to be unfounded. Vault is available both as an enterprise edition and open-source community edition. Pricing is a bit unclear to me as it is quoted as $/hr., and I don’t understand how that works. I tried this out and found it extremely complex and confusing. I spent a better part of a day working with this and was able to create few secrets in the web UI using the default root admin token. I did not figure out how to create new accounts, nor could I figure out how to use their CLI option, let alone their API. Like I said only spent a better part of day on this, reading the documentations and messing around with it. If I had spent more time on it, I probably would have figured it all out. After banging my head against the vault for several hours I lost interest in trying to figure it out as I saw no compelling reason anyone would want to deploy this thing. Based on what I saw AKEYLESS Secrets Manager was a far superior product for those looking for large scale fully featured system in this space.
Beyond Trust
Beyond Trust is another big name in this space and you can tell by their web site just how big they think they are. Beyond some fast talking sales slicks their web site had nothing to offer except a “register to learn more” forms all dressed up with generic highfalutin sales talk. There is no pricing information, or self-service demo option, just “give us your phone number so we can subject you to high pressure sales tactics” and I aint playing that game. So since I had no way to get anything useful about their product without subjecting myself to a sales talk, I eliminated them from the process.
Conjur by CyberArk
Here is another big player in this space. Their website had the following claim:
SECRETS MANAGEMENT MADE SIMPLE
A seamless open-source interface to securely authenticate, control and audit non-human access across tools, applications, containers, and cloud environments via robust secrets management.
https://www.conjur.org/
I was not able to validate this claim. In fact I found it to be anything but simple. Even after spending couple of hours on trying to get this to work, I had failed to even create a single secret in it, so I gave up. I was following a “getting started” guide which dutifully stepped me through how to get started and I still failed to store a single secret. Based on that experience I would call this solution convoluted and complex.
Delinea
Another offering that was disqualified because everything leads to a register for a sales call form and as I said before I aint playing that game. Their website claims, “Privileged access just got more accessible” and once more I see nothing to confirm that, hiding behind a sales call does not make things more accessible.
Doppler
This is the first solution I evaluated and the subject of my first blog in this series. This is a fabulous secrets manager for someone that is looking for a simple to use secrets manger. It does one thing, and it does it extremely well. Actually it does two things and does them very well. Doppler is both a secrets and configuration manager. You can store all your project configuration in Doppler, both sensitive and non-sensitive, and organize them into projects, environments, and configurations. Check out the Secrets Management Article for more details.
DotEnv
Turns out this solution focuses on NodeJS, despite their rather grandeur claims on their web site about supporting everything in the world. When I talked to their support folks about how use it for python, the answer was along the lines of “well we are really just focusing on NodeJS right now, we hope to support everything soon.” So therefor I did not evaluate this as it did not meet my initial requirements of being generic.
Conclusion
In conclusion I found only two solutions out there I could validate were easy to use and offered generic support. Those two being Doppler and AKEYLESS.
A while back I wrote another article on secrets management and how all the other offerings in this space were horrible confusing and convoluted with the exception of Doppler. I do stand by that Doppler is exceptionally easy to use and understand. If you are a small dev shop, or just need a simple and easy to use secrets management solution, Doppler is absolutely the go to solution. I also love how you can setup different environment and different configurations and quickly switch between then to test your code with different configurations without doing anything with the code or the IDE, etc., just change the configuration of the Doppler CLI.
BTW if you’re not sure what kind of secrets we are talking about or why there might be need to manage them, check out that previous article as do I go over that there.
I did decide to take a second look at some of the other solution to see what I could figure out, what the level of effort was, the learning curve, feature set, etc. I decided to start with solution offered by AKEYLESS https://www.akeyless.io/.
What I found out is that I must have been in some sort of weird state of mind when I decided that AKEYLESS was confusion and hard to use, because that is not the case at all. It’s actually quite easy to use. It is without a doubt a more feature rich solution and with that comes certain level of complexity, but I think the team at AKEYLESS did an excellent job of simplifying that complexity and hiding it as much as possible.
There are never any one size fits all solution, regardless of what you are talking about, and this is no exception. There are some that will find this overly complex for their needs, and to them I recommend Doppler. There is a strong possibility there are even more folks that the AKEYLESS solution will check more boxes for them and be a better fit that something like Doppler. The thing that I’m personally missing in this that I love in Doppler, such as configuration management, can easily be solved in many other ways. In the end it comes down to what your requirements are, so I highly recommend you check out both options and decide which fits your needs the best.
I’m still testing and learning all the different things that AKEYLESS has to offer, after all there is a lot to explore and learn. That being said I’m impressed by what this thing seems to be able to do, looks like it is even a full featured privileged access management (PAM) solution which is something no security focused enterprise (or even medium sized company) should be without.
Here is what their website says:
Manage Your Secrets. At Infinite Scale. Unified Vault platform built to secure DevOps credentials and access to production resources across hybrid cloud and legacy environments.
https://www.akeyless.io/
I like how they even have a browser plugin to make it easy to fetch your secrets from their vault. They seem to have a much more robust access logs than Doppler does, which is a huge plus.
Their documentation at https://docs.akeyless.io/ is pretty decent, although maybe a bit too high-level in places. For example, their documentation on SAML and oAuth/JWT integrations are very cryptic, I don’t know if even SAML, oAuth and JWT experts understand it, although they probably have a good chance at deciphering it.
One thing I am extremely surprised and disappointed in is that they don’t support MFA, like at all. I find it absolutely unfathomable that such a promising system would purposely destroy their reputation with such blatant disregard for security. When I ask their support about this, I got nothing but gaslighting, double talk and misdirection. Makes me question everything they say about how secure their system is. For any secrets management platform, implementing MFA should be the absolutely first thing they should do, not something they do one day if they have time and resources. Requiring MFA for all email/password accounts for such a sensitive platform would even be a wise idea.
Walk-through
The Web UI
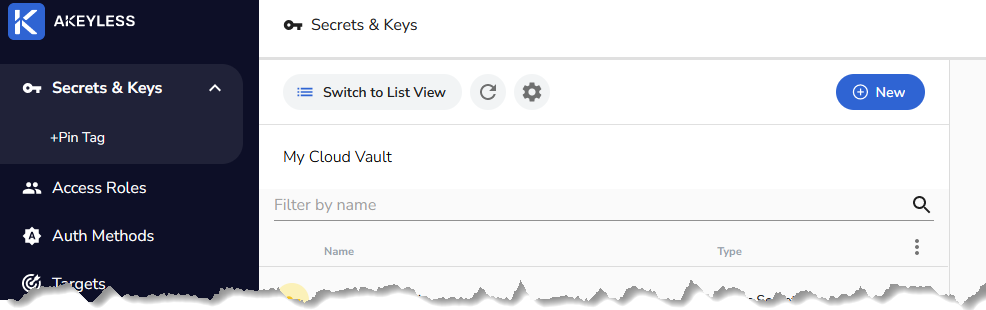
After you sign up and are signed into their web UI you should see something like this
If all you are planning to do is keeping simple static secrets in there you will rarely if ever need anything more than those three functions on the left. In fact you’ll spend 99% of your time in the Secrets & Keys option. You only need the other two if you want to setup API keys or get fancy with your access roles and auth methods. If you are fine with always authenticating via the email and password you setup during the signup, you will never need anything outside Secrets & Keys, which is selected by default and shown selected in this screenshot. So let’s start there by creating a static secret. It is called static secret to separate it from all the other type of secrets you could be saving here. Static secret is a type that rarely changes, and when it does you have to make sure it gets updated here, hence static.
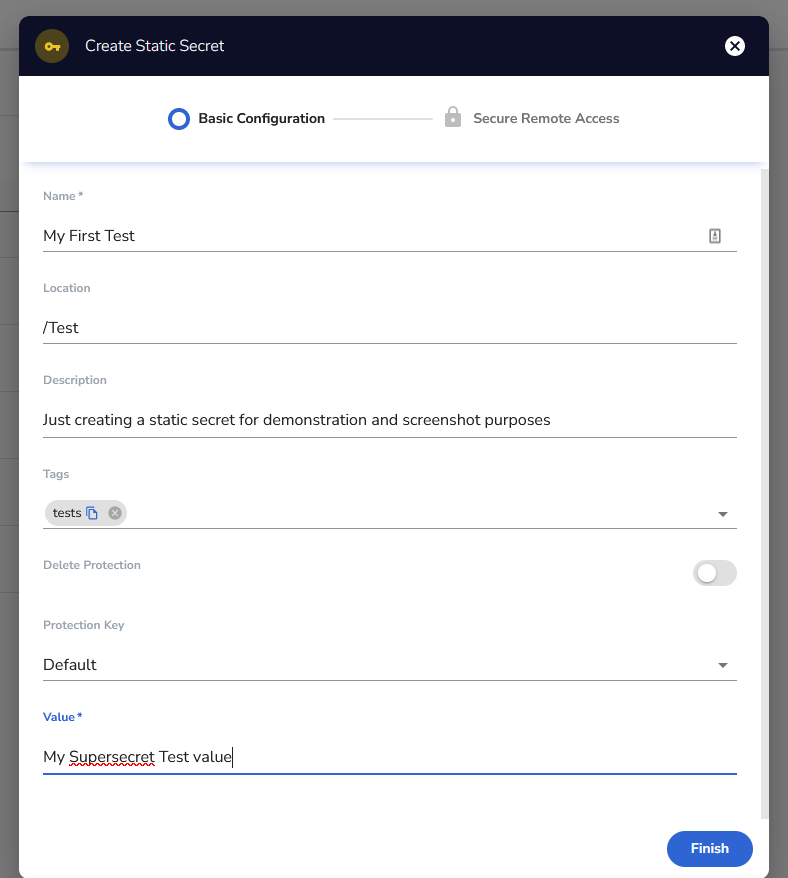
Click on that new button in the upper right corner of that screenshot and select static secret, then you should see something like this:
Fill it out per your need and click Finish. You can create multiple encryption keys using wide variety of algorithm, including:
AES128GCM
AES256GCM
AES128SIV
AES256SIV
RSA1024
RSA2048
See https://docs.akeyless.io/docs/encryption-keys for details. If you created different encryption keys you can select the key you want to use to encrypt this secret in the Protection Key field, otherwise just use the default. If you want to use a non-default key but haven’t created one, you want to close out of this screen and go back to the new key and select encryption key then DFC.
AKEYLESS uses folder structure just like the filesystem on Linux. So you get to decide if you want your secret in the root (/) or what sort of folder structure you want. This is what the location is all about. You just type out the path you want for this secret and any missing folders will be automatically created. The rest should be self-explanatory.
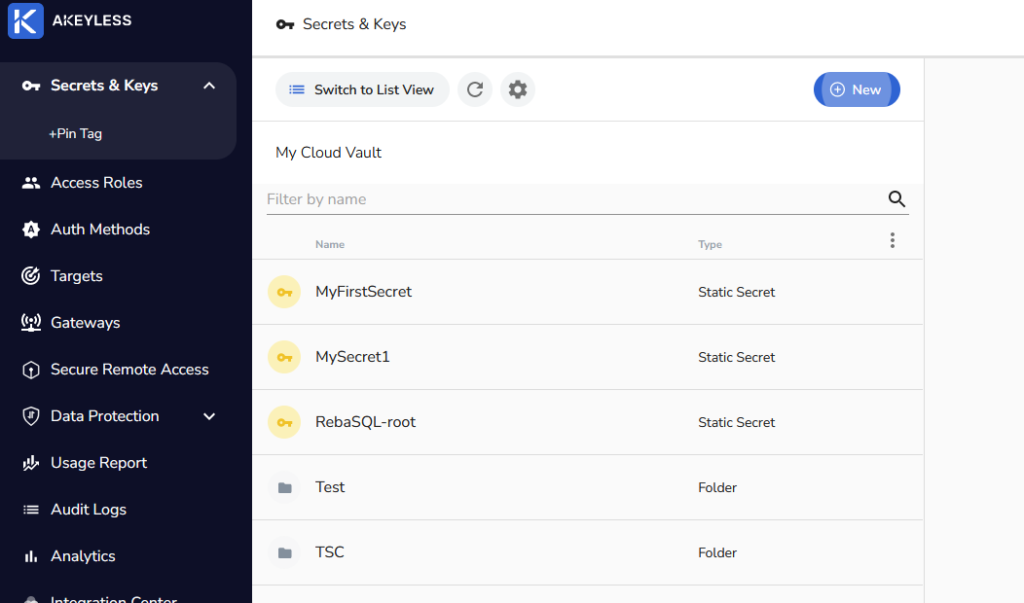
Here is what the screen looks like after I’ve created a few secrets and couple of folders.
Clicking into any one of those allows you to view the secret value and edit the other fields just like you would expect.
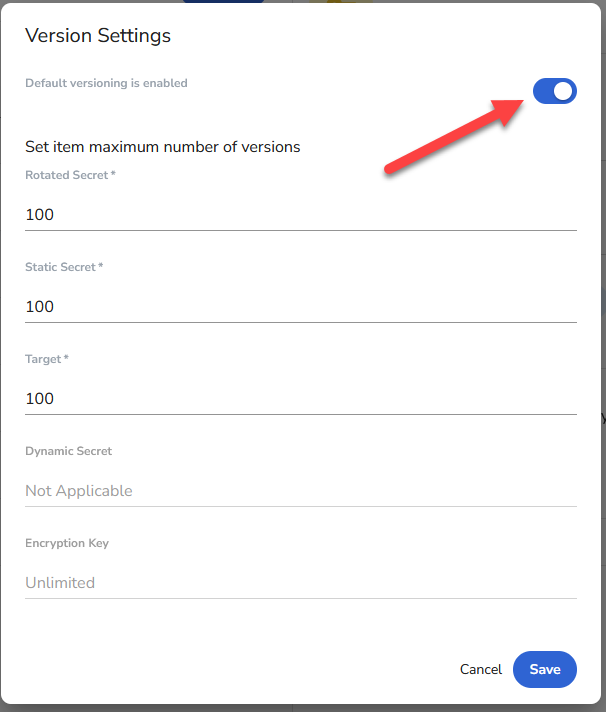
One thing to note is that while the system does provide for secret versioning, it appears to be disabled by default. You may want to turn that on so that if someone erroneously updates a secret you can roll it back. To do so find the gear icon in the screen above, it’s near the top and about center of the screenshot. When you click on that you should get an overlay like this
Make sure the toggle near the top is enable as shown here. Then you can adjust the maximum number of versions if you want or just click on save.
The CLI
Their documentation at https://docs.akeyless.io/docs/cli does a decent job stepping you through how to setup and use their CLI client. Reading the CLI reference guide it looks like you can do everything through the CLI you can in the web UI. Here is a small sample of what I figure is going to be the most useful to most. Also note that you always do akeyless -h to get a comprehensive list of available commands, then you can keep getting help by for example do akeyless update-secret-val -h to get details on what the options are for that command. The item name is usually -n or –name and refers to full name of the item, what you would call absolute path in Linux. For example “MySecret1” if it is in the root or “/Test/My First Test” if it is in the test folder. I’ve found that the leading / is optional.
Creating a new static secret
Here is how you create a new static secret from the CLI. It is called static secret because there are all sorts of secrets you could be saving here. Static secret is a type that rarely changes, and when it does you have to make sure it gets updated here, hence static. Thing to note here is that the CLI calls description metadata. When you supply metadata via the CLI it will show up the description field in the UI. Also don’t make the same mistake as I did the first time and forget the quotes around the description. Also the names are case sensitive, something I’ve messed up on as well.
C:\>akeyless create-secret -n AcliTest -v someclivalue -m “This is just a CLI test”
A new secret named AcliTest was successfully created
Viewing the secret value
Here is how you fetch the actual secret being stored
Here is how you update the item other than the value, for demonstration purposes I’ll update the description. Check out the help or the documentation on all the ways you can update the item with this command.
C:\>akeyless update-item -n AcliTest --new-metadata " This is a new comment/description/metadata "
{
  "updated": true
}
Viewing the item
This command will show you all sorts of details about the item
This command will describe all items, the output of this is very lengthy so I’m going to truncate it here after two lines, the output looks just like the output above except for all items chained together and not just one.
AKEYLESS offers SDKs for several languages, for others you need to use their REST API, check the documentation to see if your favorite language has an SDK. I’ll show you code for both. I’ll start with python SDK, then I’ll show PHP using REST API. Their python API guide can be found here https://docs.akeyless.io/docs/python-sdk-1 and their API reference here https://docs.akeyless.io/reference
Then here is a function that will take a list of secret names and fetch the corresponding secret values from AKEYLESS, and return a dictionary with the answers back to the caller
def FetchSecret(lstSecretNames):
  objConfig = akeyless.Configuration(host = "https://api.akeyless.io")
  objClient = akeyless.ApiClient(objConfig)
  objAPI = akeyless.V2Api(objClient)
  if os.getenv("AKEYLESS_ID") != "" and os.getenv("AKEYLESS_ID") is not None:
    strAccessID = os.getenv("AKEYLESS_ID")
  else:
    return "FATAL ERROR: No access ID provided"

  if os.getenv("AKEYLESS_KEY") != "" and os.getenv("AKEYLESS_KEY") is not None:
    strAccessKey = os.getenv("AKEYLESS_KEY")
  else:
    return "FATAL ERROR: No access key provided"

  objBody = akeyless.Auth(access_id=strAccessID, access_key=strAccessKey)
  objResponse = objAPI.auth(objBody)

  # if auth was successful, there should be a token
  objToken = objResponse.token
  objBody = akeyless.GetSecretValue(
      names=lstSecretNames, token=objToken)
  try:
    objResponse = objAPI.get_secret_value(objBody)
  except akeyless.exceptions.ApiException as err:
    return "Error occured during fetch: {}".format(err)

  return objResponse
Here is how I tested this function. Start by creating a list of secret names
Then I evaluate the response. I start by making sure I got a dictionary back, if not there was likely an error during processing and the error message is being returned as a string. Once I confirm the response is a dictionary, I assign each secret to a specific variable. In production it might be more efficient to just reference the secret directly from the dictionary, but this is testing so I figured this was more demonstrative. After I assigned each value to each own variable, I print the names, followed by the values. This sort of test is obviously done with bogus test values and not real valuable secrets. If what I am doing here seems weird, you are right, but this is just a weird way to demo this function.
if isinstance(dictSecrets,dict):
  strSecret1 = dictSecrets["MySecret1"]
  strSecret2 = dictSecrets["MyFirstSecret"]
  strSecret3 = dictSecrets["/TSC/AnotherTest2"]
  strSecret4 = dictSecrets["/Test/MyPathTest"]
else:
  print(dictSecrets)
  sys.exit(9)

print ("Fetched values for the following secrets")
i = 1
for strKey in dictSecrets.keys():
  print ("{}:{}".format(i,strKey))
  i += 1

print("\nValues\n1:{}\n2:{}\n3:{}\n4:{}\n".format(strSecret1,strSecret2,strSecret3,strSecret4))
This script has a function that accepts an array (php speak for a list) of secret names and fetches the secret for them. It then returns an associated array (php speak for a dictionary) back to the caller with the name value pairs. When you work with the API you first have to authenticate against the API end point which gives you a token. You then use that key when issuing commands. This is why you see two curl commands in this function.
Process and print out the response. Of course in reality you would never loop the through the secrets like that. You would just access the appropriate entry and use it. Then again this is just demonstrative and testing.
  print "<p>Here are the secret names and corrensponding values</p>\n";
  foreach ($arrSecretValues as $key => $value)
  {
    print "$key: $value <br>\n";
  }
Conclusion
As you see it is fairly simple and easy to use this solution for storing simple static secrets. Whether this is the right solution if that is all you are doing, I’ll let you be the judge of that.
As always feel free to reach out if there are any questions.
In this article I want to continue with the non-cybersecurity topic of sending notifications from your python3 scripts. Last time was sending slack messages, in this one I want to cover sending email messages.
Here are the features I wanted:
Configurable To, From and Subject
Configurable custom email headers
Full support for HTML email body that is RFC compliant, including a text only alternative
Be able to accept a large text block (formatted or not) that gets turned into an email attachment
Does not trigger spam filters
The Script
I’m happy to report that I now have a python function that does all that, and you are welcome to use it if you want.
Some of the functions in this script are simply to aid in the testing of the send function, for example the main function is strictly for testing purposes and has no purpose other than generate test data, compose the HTML body, and call the send function. Others like csv2array, array2html and array2MD could have production value but were created just to generate test data.
I highly recommend you have some sort of function for event logging, the SendHTMLEmail function expects a function called LogEntry to handle event logging. For testing purposes LogEntry function in my test script simply writes these messages to the console, you may want to do something more sophisticated.
The one other function in this script you absolutely must have, is the remove_tags function. If you want to run this script unchanged you also need to have a CSV file, in the same directory as the script, called URLResp.csv, which is semicolon separated, not comma separated. The file name and separator can be easily changed at the top of the main function. This CSV file contains the test data for the HTML table the script creates for the test email. The name of this CSV file is also used as the filename for the attachment, you can also easily pass a different file name when you call the SendHTMLEmailfunction in the main test function or whatever function you are calling it from.
Make sure you have the bs4 library installed prior to running this, as the remove_tags script depends on it. If you don’t have it installed execute pip install bs4 from the command prompt or console. You also need to make sure all the includes in my test scripts are in your script.
How to use
As-Is testing
If you simply want to test this script as-is, without changing anything in the script, you need to do the following:
Setup the following environment variables. I recommend you use Doppler for that for maximum security. See my article on Secrets Management for details on how to do that.
EMAILUSER: This the username the script should use when logging into the SNMP server
EMAILPWD: The password to use when logging into the SNMP server
EMAILSERVER: The FQDN of the SNMP server
EMAILPORT: The TCP port number that the SNMP connection should use
USESSL: Whether the SNMP server supports full SSL or TLS connections (True or False)
USESTARTTLS: If the server doesn’t support full connection security, can it switch to a secure connection post connection, known as StartTLS. (True or False)
Execute the script with python3 SendHTMLemail.py
If you are on Windows you need to use python or py, instead of python3. Basically execute this like all your other python scripts.
Unless you are using MailTrap (see next section, Testing with MailTrap) you won’t actually see any email unless you also change line 230 in the script to be a real email address you can check.
Production use
Start by taking care of the first four steps in the section As-Is testing above. As mentioned before, to use this in your production script you need to copy SendHTMLEmail function and the remove_tags function. Additionally you will want to have a LogEntry function that handles event logging the way you want to, or you can copy it from my file and simply write logs to the terminal.
Then your script needs to compose the message body and the attachment if you want to include one. Then you just call the SendHTMLEmail function with the following parameters in this order:
Email Subject, as a simple string
Message Body in HTML format, as a simple string. Note: A string doesn’t have to have HTML formatting to be a valid HTML string. However <br> is required at the end of a line you want to break. Normal line breaks are not rendered in HTML, only the text only view.
Name and email address to send the email to, in the form of “Joe User joe.user@example.com”
Name and email that email should come from in the form of “Joe User joe.user@example.com”.
Make sure the SMTP server you are sending through has the proper SPF/DMARC records to be authenticated as authorized to send email for the domain you are using. Otherwise the email will be considered spam by pretty much every email service out there. For example if you are sending through your Gmail account, this email address needs to be configured as a send-as email in your configuration. If you are using your work email service you may need to check with your email administrators, but it likely needs to be your work email domain. If you are running your own domains and email server or you are the email administrator, you most likely didn’t read anything beyond SPF/DMARC 😀
List of custom headers to add to the email. Each list element should be a simple string in the format of name: value pair. For example “X-Testing: This is my test header”.
See how I do this in my script by looking at how I create lstHeaders in the main function, starting on line 222.
Email Attachment in the form of a simple string. This would be the content of the attachment file, appropriately formatted for the intended file format. I assume this would be created by your script but could be read in from a file as well. Only text formats are supported, binary attachments have not been tested.
Filename you want the attachment to have, the script will not create the attachment if you leave this off. It is up to you to make this filename appropriate for the content. If you generate a HTML attachment but name the file MyFile.txt the recipient will by default, just see the actual HTML, not the rendering as one might expect.
Here is an example of how you might call the send function assuming all the above have been assigned to appropriate variables.
The function will return either the one-word string SUCCESS upon successful execution, or an error message, which you can then process and handle appropriately for your needs. See my script for an example of how I do this, function main starting on line 253.
You should now be in business, feel free to reach out if you have any questions. Now let’s talk about a great way to test that your script is generating an email that looks the way you want and is unlikely to be sent to the spam folder, etc.
Testing with MailTrap
During the development of this script I found a really cool test service that allowed me to confirm that the HTML was well formed, the custom headers were showing up, spam score was low, etc. Yes, I could have used Gmail for this but MailTrap made this task so much easier. It acts as an SMTP server with a nice web UI and while it receives emails just like a SMTP server it doesn’t do any relying. Regardless of what address is specified in the To field then email will be delivered to your MailTrap inbox, where can forward it someplace else if you are a paid user. I’m just a free user so I couldn’t test out that feature, or any of their other premium features. Also MailTrap doesn’t do any SPF/DMARC checks, so you don’t have to worry about your from address either to begin with. What I did is I tested everything else, then I set the from address to actual from address that belongs in my environment and sent through my production email service, with my Gmail account as the to address to confirm that it would pass SPF/DMARC.
Here are some screenshots for you from MailTrap to give you a better sense of what it gives you. Please note that I am in no way tied to them, nor do I get any compensation if you use them. I just like to share tools I find helpful.
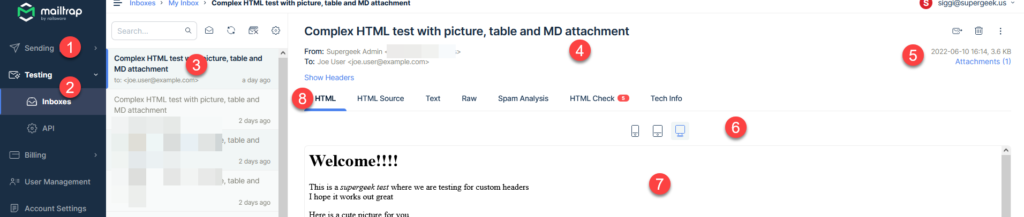
Main screen with HTML rendering
Notes:
Sending: This is a separate product you pay separately for and has nothing to do with email testing. This is intended for those that need to send out mass email marketing campaigns. This really confused me at first, which is why I am calling this out
Testing function is where you will be spending your time, specifically in the inboxes. As a free user you only have one inbox, paid users can have project specific inboxes and lot of other features I haven’t explored or tested.
This is your list of messages that have arrived in your inbox.
This is where all the basics show up: Subject, from, to, etc.
Date and size of the email as well as any attachments in the email
Choose the viewing simulation: cell phone, tablet, or computer
This is the body of your email. This view will change based on the chosen tab by #8. In this view HTML rendering is chosen.
What details you want to see, HTML rendering, HTML source, etc. Will cover this in more detail in a bit
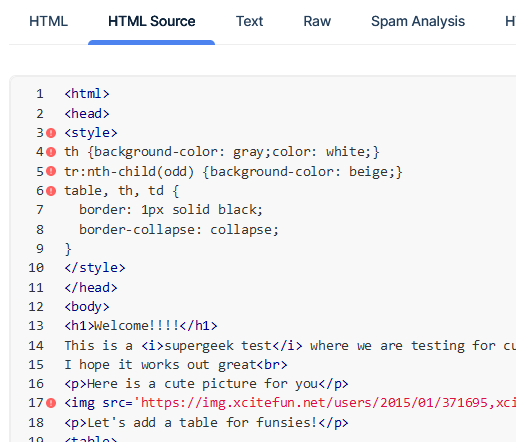
HTML Source
In this tab you can see how the HTML source came through in your email. The red dot next to a line indicates that this may not be correctly interpreted by everyone. Details on the HTML Check tab
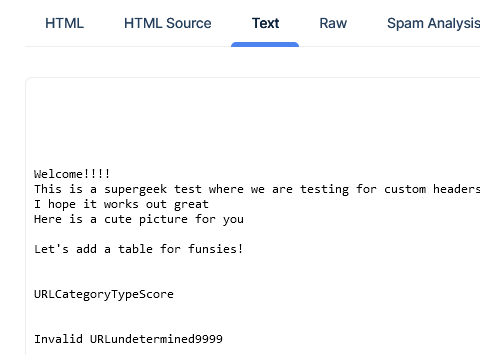
Text screen
If you provided an alternative text only body, which my script does by stripping out all HTML formatting, that text will show up on this tab.
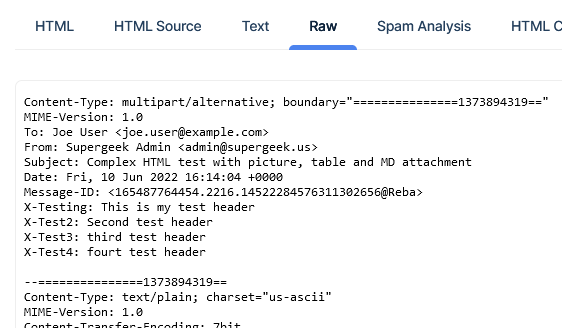
Raw Email
On this tab you can examine the raw email
Spam Analysis
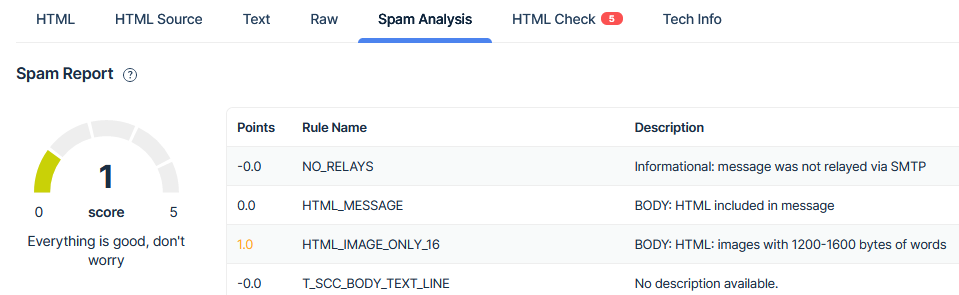
Here MailTrap will tell you how your email will be scored by leading spam detection engines. You can see that my test email is getting docked a point for having an unfavorable image to text ratio. You can see on the meter to the left that a score of 1 is nothing to worry about. If you are a perfectionist like me, you might be tempted to tweak your message in an attempt to get zero.
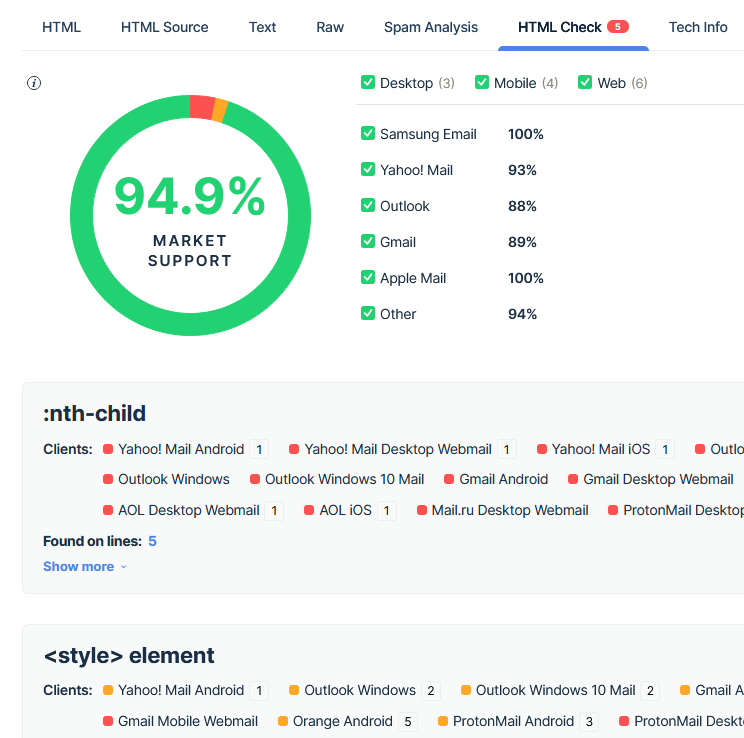
HTML Check
If you have any red dots in the HTML source tab, they are explained on this tab. Here it is telling me that my test email should render correctly on 94.9% of email clients out there, others there could be some styling issues. You can then decide if you want to chaise that last 5% or call this good. I did verify this by using my ProtonMail account as a destination, and the table didn’t look identical to the way does in Gmail. However it was nothing that detracted from the message, had there been a message.
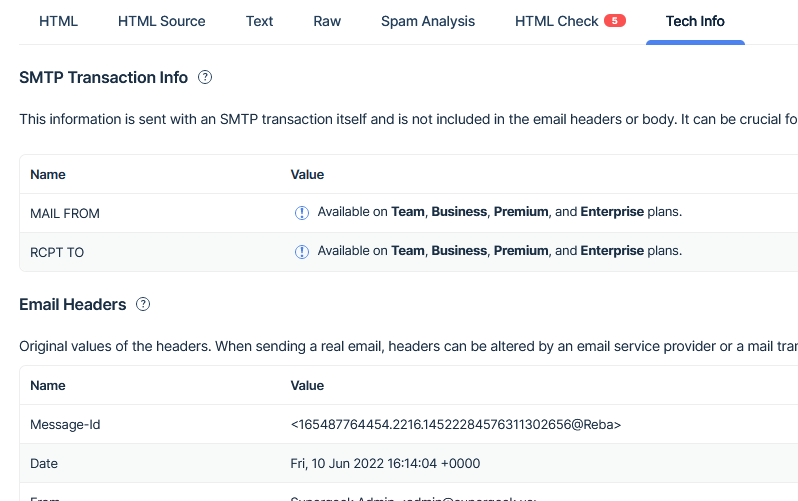
Tech Info
On this last tab you get all the header details nicely broken out for you. Also as you can see certain paid accounts also get some additional data.
Closing
Hope this has proven useful for you. Don’t hesitate to reach out if you have any questions.
In this article I want to deviate from my normal cybersecurity related posts while still staying technical and focus on the python automation topic of using Slack to send notifications from your python scripts.
There are many useful reasons why you’d want to send slack messages to a specific person or a team during the execution of your automation scripts. Anything from error notifications, condition notifications or even just completion notifications. I find these kinds of notification in my automation scripts extremely useful and figured others might as well. While the Slack API guide is very detail and helpful it can be a bit daunting to those of us that aren’t full fledged developers looking to write a major Slack Bot with tons of functionality. When I set out, I certainly felt that way as I am by now means a professional developer, I just put together some python scripts from time to time to automate something and I was just looking for something super simple. All I wanted was to be able to send a message to a specific person or a channel.
The Function
After some time I figured out a way to do this and wrote a little function to accomplish this. This function is just 40 lines, and you are welcome to use it in your code if you want. I have a script that just tests the function on GitHub at https://github.com/siggib007/Utils/blob/master/SlackNotify.py. Just copy the SendNotification function from that script and use it in your python scripts.
You need three things to call that function:
The message you want to send. In the script I truncate long messages so not to run into message length errors on Slack. Plus I found that messages longer than 1000 char on slack aren’t all that useful. I default this truncation to 199 characters, but you can adjust that. I would recommend staying below 500 characters. This shouldn’t be a logging mechanism, more notification that someone should check the logs.
The channel ID, which identifies who should be getting the message, either a person or a channel. I’ll show you how to find this shortly.
The Authentication token, which authorizes your script into the right slack workspace. I’ll explain this better later.
In my test script this is how I call the function with “More Testing” being the message I want to send.:
BTW you’ll see in the script that I am fetching the channel ID and notification token from an environment variable. I’m actually storing this in a Doppler project which allows me to store this and access it in a very secure manner. Naturally only the access token needs to be stored securely, however I choose to store the notification ID as well for this demo to make it easy to switch test cases. For more details on how this works check out my Secrets Management article.
The Channel ID
OK here is how you find the right channel number to send.
A specific user
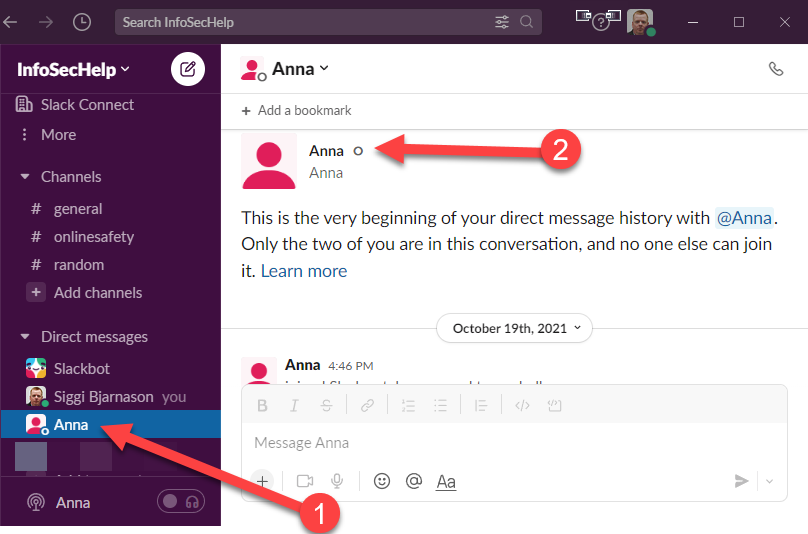
Let’s start with how to find the channel user for a specific person. There is more than one way to approach this, and this is just my favorite way and assumes you are already chatting with this person in slack. The channel ID for each user is in users’ profile in the more menu, if you already know how to get there, just do that, otherwise follow along here.
Start by finding the person in your direct messages list and click on their name in the list as if you were going to manually send them a message. Then click on their name in the message.
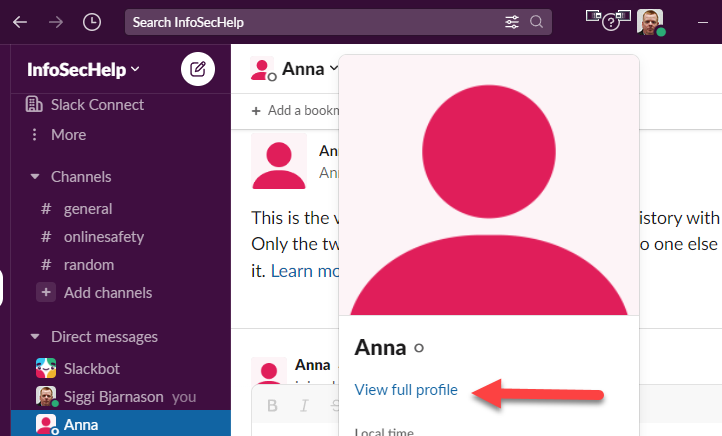
Then click on View Full Profile
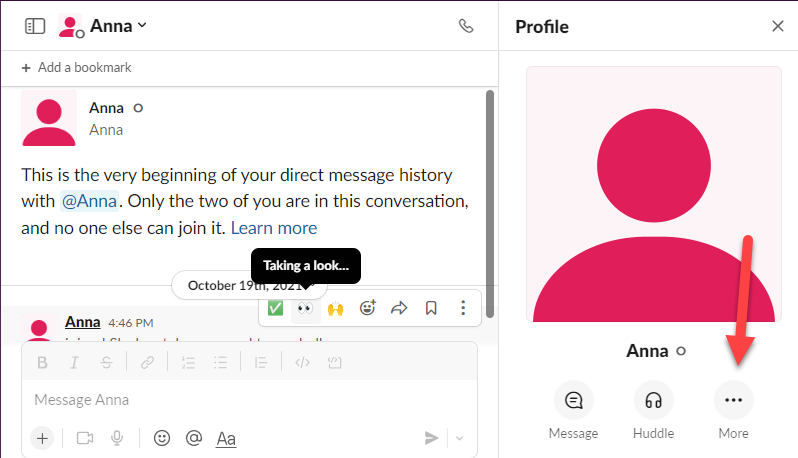
In the profile side bar, click on the “more …” button.
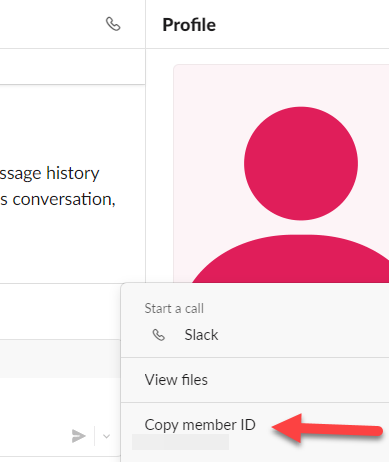
Click “copy member ID” in the menu that comes up
Now you have the channel ID for this person in your clipboard, paste it someplace safe.
A specific Channel
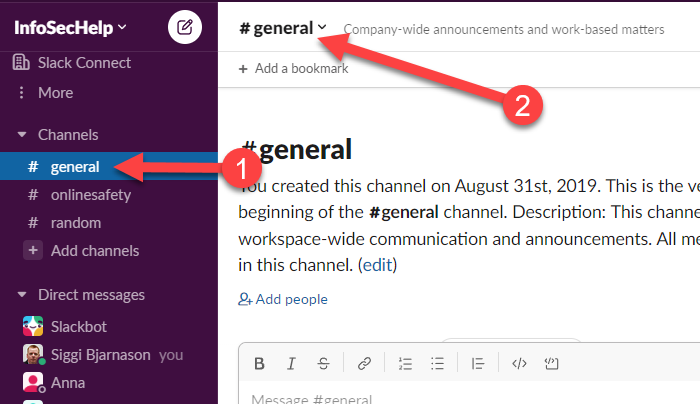
Now for the ID of a specific channel. Start by finding the channel you want to send messages to in your channel list and click on it as if you were going to manually post something in that channel. Then click on the little down arrow (or chevron) next to the channel name the top of the screen.
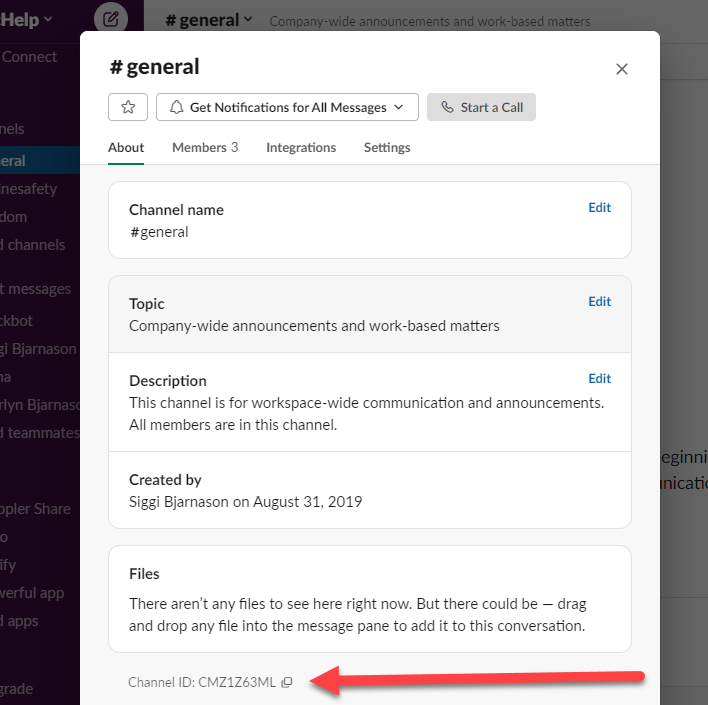
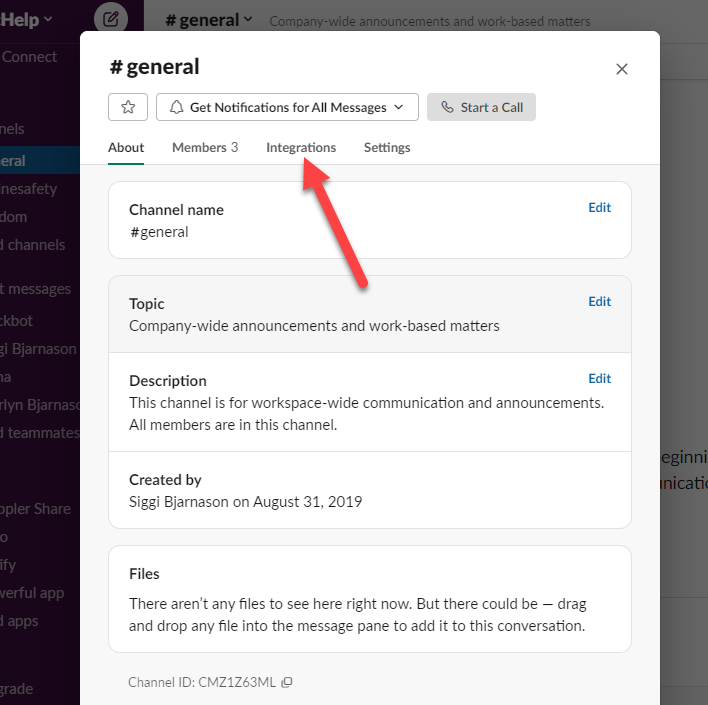
The channel ID is at the bottom of the screen that comes up. There is a little copy icon next to it that will put the channel ID in your clipboard
The Authorization Token
OK now you two thirds of what you need to call the function. The authorization token is the only thing left and this one is a little more complicated.
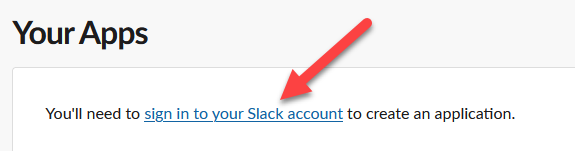
Then sign into the slack workspace where you want to send your messages to. If you have multiple workspaces you want to send automated messages to, you’ll need separate auth tokens for each workspace (also the channel ID is workspace specific), so you’ll just repeat this process for each of them. If you are already logged in for whatever reason you will not see this, so just jump to the next step, and create new app.
Once you are logged in, you should see a “create new app” button.
Click Create New App
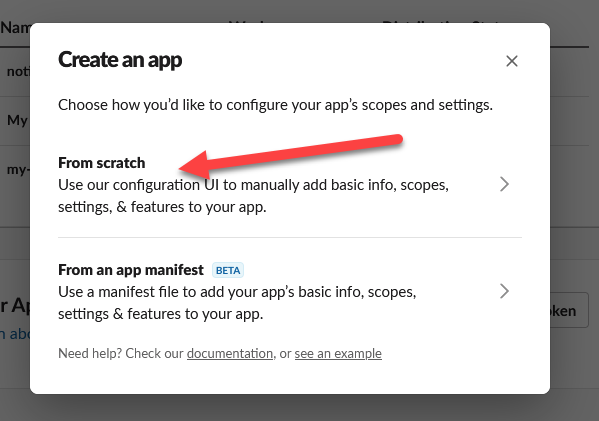
Then click “from scratch”
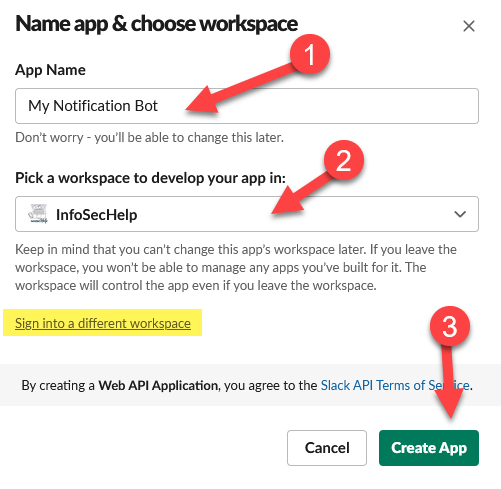
Give the Bot a cool name, I recommend something short that makes it clear what this bot does.
Select the workspace this bot will go into. If the workspace you want isn’t in your list, click on the “sign into a different workspace” link
Click “Create App”
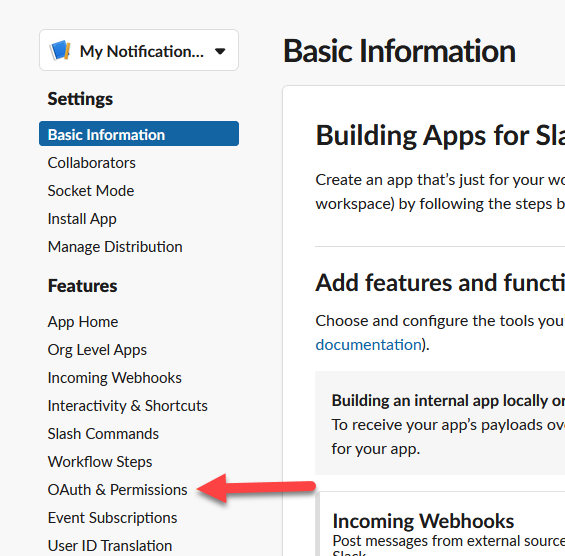
Now on the left under Features, click on “OAuth & Permissions”
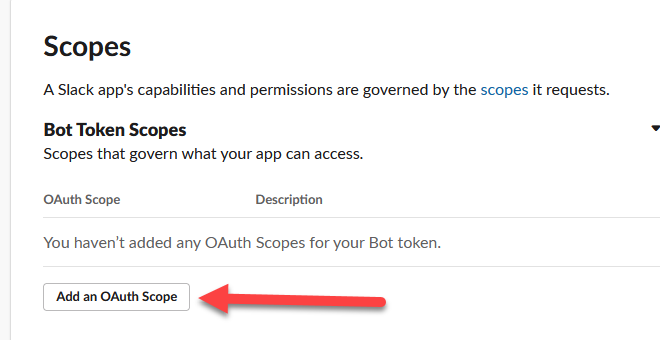
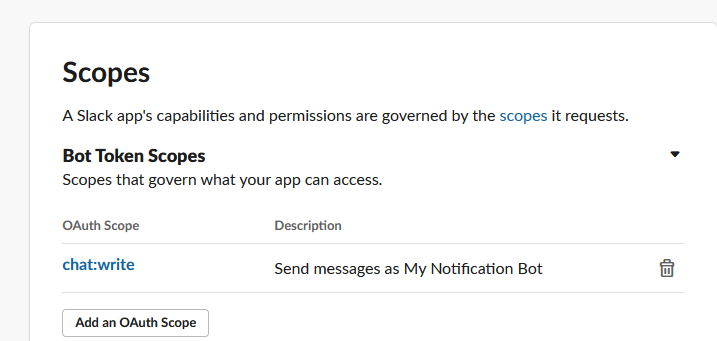
Scroll down the page to the Scopes section and click on “Add an OAuth Scope” under Bot Token Scopes
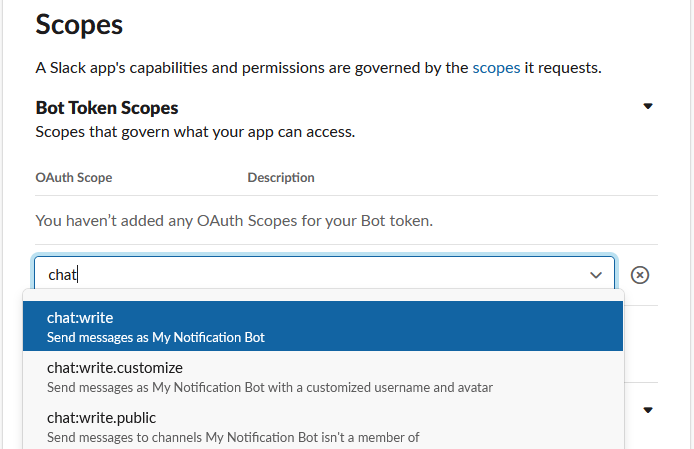
Add “chat:write” scope.
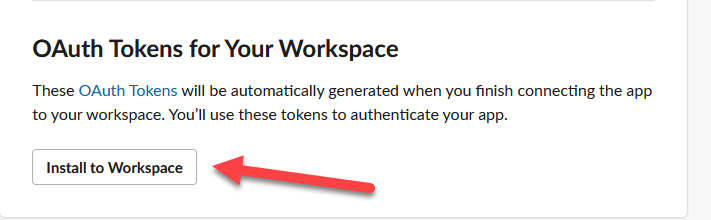
Now scroll back up and click on the “Install to Workspace” and approve the request screen that comes up.
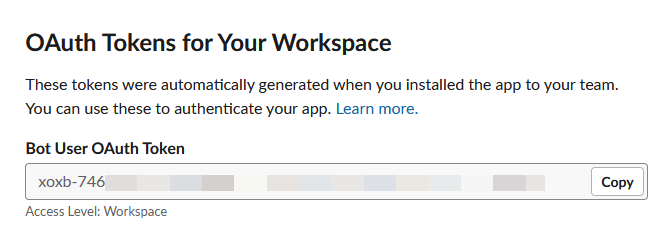
Now your authorization token will be shown where the install button once was.
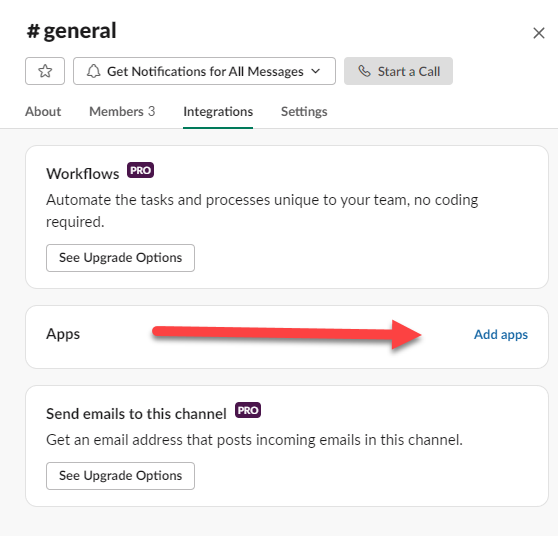
Now you have everything you need to send slack messages from your script, but there is one final task left. You need to add the bot to all the channels you want it to be able to send to. While there are at least couple of different approaches I’m just going to illustrate the one I recommend, which involves adding the bot directly into the channel one by one. Start by going back to the screen where you got the Channel ID and click on integrations
Click on add apps
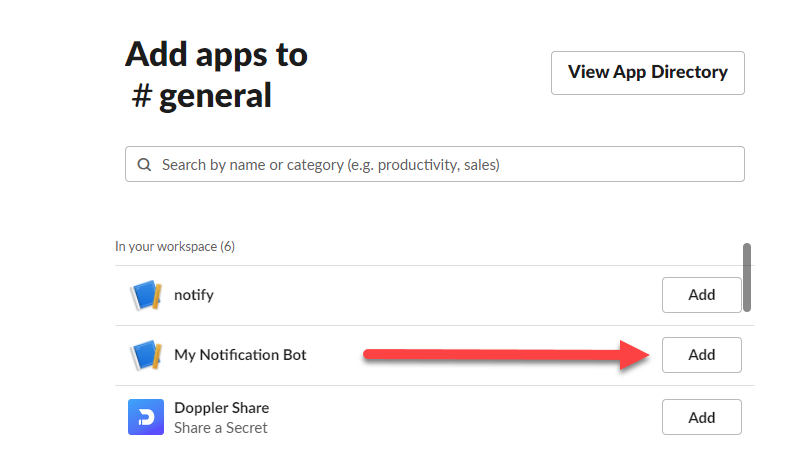
Find the name of your new bot and click Add
You should be all set now. Please feel free to reach out if you have any questions.

 Reading Time: 4 minutes