
 Reading Time: 10 minutes
Table of Contents
Introduction
A while back I wrote another article on secrets management and how all the other offerings in this space were horrible confusing and convoluted with the exception of Doppler. I do stand by that Doppler is exceptionally easy to use and understand. If you are a small dev shop, or just need a simple and easy to use secrets management solution, Doppler is absolutely the go to solution. I also love how you can setup different environment and different configurations and quickly switch between then to test your code with different configurations without doing anything with the code or the IDE, etc., just change the configuration of the Doppler CLI.
BTW if you’re not sure what kind of secrets we are talking about or why there might be need to manage them, check out that previous article as do I go over that there.
I did decide to take a second look at some of the other solution to see what I could figure out, what the level of effort was, the learning curve, feature set, etc. I decided to start with solution offered by AKEYLESS https://www.akeyless.io/.
What I found out is that I must have been in some sort of weird state of mind when I decided that AKEYLESS was confusion and hard to use, because that is not the case at all. It’s actually quite easy to use. It is without a doubt a more feature rich solution and with that comes certain level of complexity, but I think the team at AKEYLESS did an excellent job of simplifying that complexity and hiding it as much as possible.
There are never any one size fits all solution, regardless of what you are talking about, and this is no exception. There are some that will find this overly complex for their needs, and to them I recommend Doppler. There is a strong possibility there are even more folks that the AKEYLESS solution will check more boxes for them and be a better fit that something like Doppler. The thing that I’m personally missing in this that I love in Doppler, such as configuration management, can easily be solved in many other ways. In the end it comes down to what your requirements are, so I highly recommend you check out both options and decide which fits your needs the best.
I’m still testing and learning all the different things that AKEYLESS has to offer, after all there is a lot to explore and learn. That being said I’m impressed by what this thing seems to be able to do, looks like it is even a full featured privileged access management (PAM) solution which is something no security focused enterprise (or even medium sized company) should be without.
Here is what their website says:
Manage Your Secrets. At Infinite Scale. Unified Vault platform built to secure DevOps credentials and access to production resources across hybrid cloud and legacy environments.
https://www.akeyless.io/
I like how they even have a browser plugin to make it easy to fetch your secrets from their vault. They seem to have a much more robust access logs than Doppler does, which is a huge plus.
Their documentation at https://docs.akeyless.io/ is pretty decent, although maybe a bit too high-level in places. For example, their documentation on SAML and oAuth/JWT integrations are very cryptic, I don’t know if even SAML, oAuth and JWT experts understand it, although they probably have a good chance at deciphering it.
One thing I am extremely surprised and disappointed in is that they don’t support MFA, like at all. I find it absolutely unfathomable that such a promising system would purposely destroy their reputation with such blatant disregard for security. When I ask their support about this, I got nothing but gaslighting, double talk and misdirection. Makes me question everything they say about how secure their system is. For any secrets management platform, implementing MFA should be the absolutely first thing they should do, not something they do one day if they have time and resources. Requiring MFA for all email/password accounts for such a sensitive platform would even be a wise idea.
Walk-through
The Web UI
After you sign up and are signed into their web UI you should see something like this
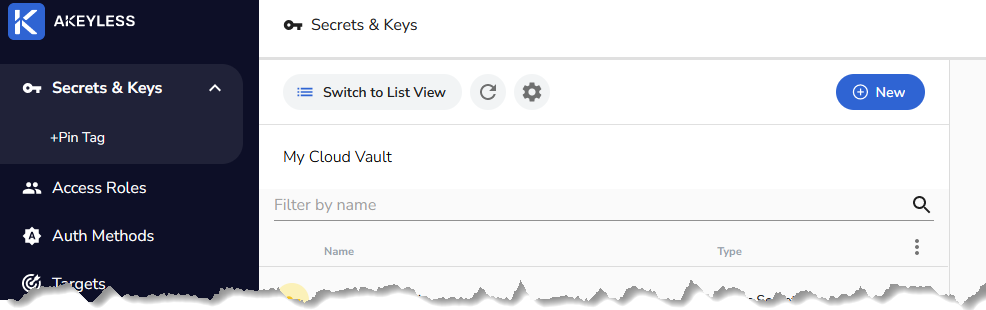
If all you are planning to do is keeping simple static secrets in there you will rarely if ever need anything more than those three functions on the left. In fact you’ll spend 99% of your time in the Secrets & Keys option. You only need the other two if you want to setup API keys or get fancy with your access roles and auth methods. If you are fine with always authenticating via the email and password you setup during the signup, you will never need anything outside Secrets & Keys, which is selected by default and shown selected in this screenshot. So let’s start there by creating a static secret. It is called static secret to separate it from all the other type of secrets you could be saving here. Static secret is a type that rarely changes, and when it does you have to make sure it gets updated here, hence static.
Click on that new button in the upper right corner of that screenshot and select static secret, then you should see something like this:
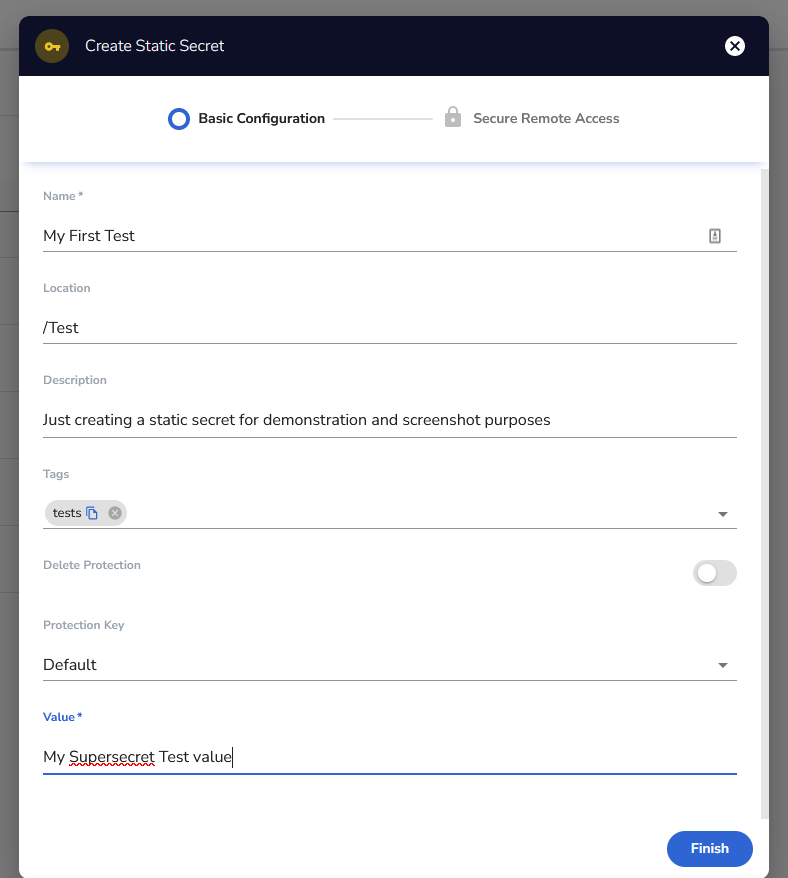
Fill it out per your need and click Finish. You can create multiple encryption keys using wide variety of algorithm, including:
- AES128GCM
- AES256GCM
- AES128SIV
- AES256SIV
- RSA1024
- RSA2048
See https://docs.akeyless.io/docs/encryption-keys for details. If you created different encryption keys you can select the key you want to use to encrypt this secret in the Protection Key field, otherwise just use the default. If you want to use a non-default key but haven’t created one, you want to close out of this screen and go back to the new key and select encryption key then DFC.
AKEYLESS uses folder structure just like the filesystem on Linux. So you get to decide if you want your secret in the root (/) or what sort of folder structure you want. This is what the location is all about. You just type out the path you want for this secret and any missing folders will be automatically created. The rest should be self-explanatory.
Here is what the screen looks like after I’ve created a few secrets and couple of folders.
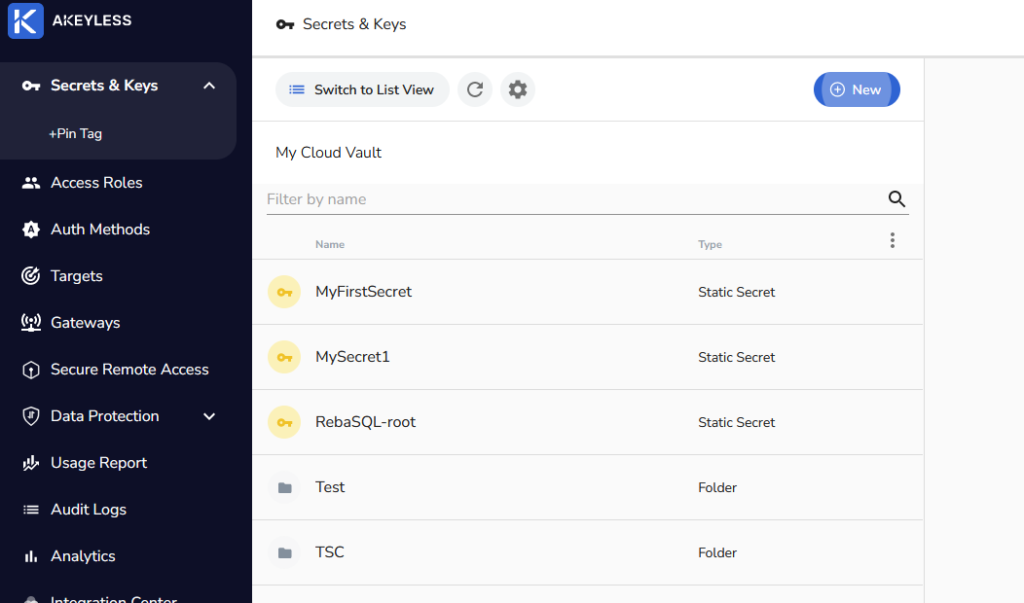
Clicking into any one of those allows you to view the secret value and edit the other fields just like you would expect.
One thing to note is that while the system does provide for secret versioning, it appears to be disabled by default. You may want to turn that on so that if someone erroneously updates a secret you can roll it back. To do so find the gear icon in the screen above, it’s near the top and about center of the screenshot. When you click on that you should get an overlay like this
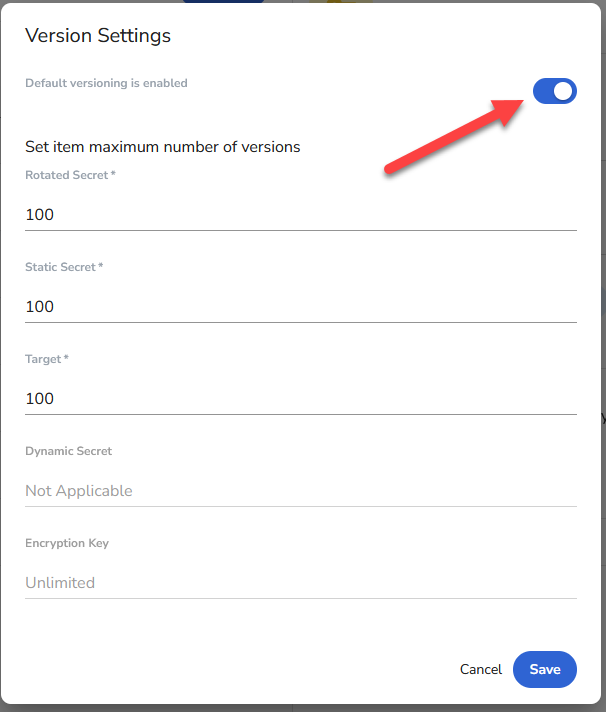
Make sure the toggle near the top is enable as shown here. Then you can adjust the maximum number of versions if you want or just click on save.
The CLI
Their documentation at https://docs.akeyless.io/docs/cli does a decent job stepping you through how to setup and use their CLI client. Reading the CLI reference guide it looks like you can do everything through the CLI you can in the web UI. Here is a small sample of what I figure is going to be the most useful to most. Also note that you always do akeyless -h to get a comprehensive list of available commands, then you can keep getting help by for example do akeyless update-secret-val -h to get details on what the options are for that command. The item name is usually -n or –name and refers to full name of the item, what you would call absolute path in Linux. For example “MySecret1” if it is in the root or “/Test/My First Test” if it is in the test folder. I’ve found that the leading / is optional.
Creating a new static secret
Here is how you create a new static secret from the CLI. It is called static secret because there are all sorts of secrets you could be saving here. Static secret is a type that rarely changes, and when it does you have to make sure it gets updated here, hence static. Thing to note here is that the CLI calls description metadata. When you supply metadata via the CLI it will show up the description field in the UI. Also don’t make the same mistake as I did the first time and forget the quotes around the description. Also the names are case sensitive, something I’ve messed up on as well.
C:\>akeyless create-secret -n AcliTest -v someclivalue -m “This is just a CLI test”
A new secret named AcliTest was successfully created
Viewing the secret value
Here is how you fetch the actual secret being stored
C:\>akeyless get-secret-value -n AcliTest
someclivalue
Updating static secret value
Here is how you would go about changing the actual secret being stored.
C:\>akeyless update-secret-val -n AcliTest -v newtopsecretvalue
The value of secret AcliTest was successfully updated
View it to proof it changed
C:\>akeyless get-secret-value -n AcliTest
Newtopsecretvalue
Updating the item
Here is how you update the item other than the value, for demonstration purposes I’ll update the description. Check out the help or the documentation on all the ways you can update the item with this command.
C:\>akeyless update-item -n AcliTest --new-metadata " This is a new comment/description/metadata "
{
  "updated": true
}
Viewing the item
This command will show you all sorts of details about the item
C:\>akeyless describe-item -n AcliTest
{
  "item_name": "/AcliTest",
  "item_id": 98172705,
  "display_id": "c5u2lju662iz-k6ve21pie9c6",
  "item_type": "STATIC_SECRET",
  "item_sub_type": "generic",
  "item_metadata": "This is a new comment/description/metadata",
  "item_tags": [],
  "item_size": 0,
  "last_version": 1,
  "with_customer_fragment": false,
  "is_enabled": true,
  "public_value": "",
  "certificates": "",
  "protection_key_name": "acc-c5u2lju662iz__account-def-secrets-key__",
  "cert_issuer_signer_key_name": "",
  "client_permissions": [
    "read",
    "list",
    "update",
    "delete",
    "create"
  ],
  "certificate_issue_details": {},
  "item_general_info": {
    "cert_issue_details": {},
    "dynamic_secret_producer_details": {},
    "rotated_secret_details": {},
    "classic_key_details": {},
    "static_secret_info": {}
  },
  "item_accessibility": 0,
  "item_targets_assoc": null
}

C:\>
List items
This command will describe all items, the output of this is very lengthy so I’m going to truncate it here after two lines, the output looks just like the output above except for all items chained together and not just one.
C:\onedrive\Docker\phptest>akeyless list-items
{
  "items": [
    {
      "item_name": "/MyFirstSecret",
      "item_id": 95976266,
       … [output truncated]
Scriptable access
AKEYLESS offers SDKs for several languages, for others you need to use their REST API, check the documentation to see if your favorite language has an SDK. I’ll show you code for both. I’ll start with python SDK, then I’ll show PHP using REST API. Their python API guide can be found here https://docs.akeyless.io/docs/python-sdk-1 and their API reference here https://docs.akeyless.io/reference
Python SDK
My sample script is available in my utilities GitHub repository at https://github.com/siggib007/Utils/blob/master/FetchakeylessSecret.py
The first thing you need to do is install the AKEYLESS library
pip install git+https://github.com/akeylesslabs/akeyless-python.gitThen start the script by importing few things
import akeyless
import os
import sys
Then here is a function that will take a list of secret names and fetch the corresponding secret values from AKEYLESS, and return a dictionary with the answers back to the caller
def FetchSecret(lstSecretNames):
  objConfig = akeyless.Configuration(host = "https://api.akeyless.io")
  objClient = akeyless.ApiClient(objConfig)
  objAPI = akeyless.V2Api(objClient)
  if os.getenv("AKEYLESS_ID") != "" and os.getenv("AKEYLESS_ID") is not None:
    strAccessID = os.getenv("AKEYLESS_ID")
  else:
    return "FATAL ERROR: No access ID provided"

  if os.getenv("AKEYLESS_KEY") != "" and os.getenv("AKEYLESS_KEY") is not None:
    strAccessKey = os.getenv("AKEYLESS_KEY")
  else:
    return "FATAL ERROR: No access key provided"

  objBody = akeyless.Auth(access_id=strAccessID, access_key=strAccessKey)
  objResponse = objAPI.auth(objBody)

  # if auth was successful, there should be a token
  objToken = objResponse.token
  objBody = akeyless.GetSecretValue(
      names=lstSecretNames, token=objToken)
  try:
    objResponse = objAPI.get_secret_value(objBody)
  except akeyless.exceptions.ApiException as err:
    return "Error occured during fetch: {}".format(err)

  return objResponse
Here is how I tested this function. Start by creating a list of secret names
lstSecretNames = []
lstSecretNames.append("MySecret1")
lstSecretNames.append("MySecret2")
lstSecretNames.append("MyFirstSecret")
lstSecretNames.append("/TSC/AnotherTest2")
lstSecretNames.append("/Test/MyPathTest")
Then I call the function with that list
dictSecrets = FetchSecret(lstSecretNames)Then I evaluate the response. I start by making sure I got a dictionary back, if not there was likely an error during processing and the error message is being returned as a string. Once I confirm the response is a dictionary, I assign each secret to a specific variable. In production it might be more efficient to just reference the secret directly from the dictionary, but this is testing so I figured this was more demonstrative. After I assigned each value to each own variable, I print the names, followed by the values. This sort of test is obviously done with bogus test values and not real valuable secrets. If what I am doing here seems weird, you are right, but this is just a weird way to demo this function.
if isinstance(dictSecrets,dict):
  strSecret1 = dictSecrets["MySecret1"]
  strSecret2 = dictSecrets["MyFirstSecret"]
  strSecret3 = dictSecrets["/TSC/AnotherTest2"]
  strSecret4 = dictSecrets["/Test/MyPathTest"]
else:
  print(dictSecrets)
  sys.exit(9)

print ("Fetched values for the following secrets")
i = 1
for strKey in dictSecrets.keys():
  print ("{}:{}".format(i,strKey))
  i += 1

print("\nValues\n1:{}\n2:{}\n3:{}\n4:{}\n".format(strSecret1,strSecret2,strSecret3,strSecret4))
Remember you can download this whole script from my GitHub, here is a link you can just save directly if you don’t want to deal with GitHub download/clone, etc. https://raw.githubusercontent.com/siggib007/Utils/master/FetchakeylessSecret.py
PHP with REST API
This script can be found in my phptest repository at https://github.com/siggib007/phptest/blob/master/AKeylessTest.php
This script has a function that accepts an array (php speak for a list) of secret names and fetches the secret for them. It then returns an associated array (php speak for a dictionary) back to the caller with the name value pairs. When you work with the API you first have to authenticate against the API end point which gives you a token. You then use that key when issuing commands. This is why you see two curl commands in this function.
function FetchKeylessStatic ($arrNames)
  {
    $AccessID = getenv("KEYLESSID");
    $AccessKey = getenv("KEYLESSKEY");
    $APIEndpoint = "https://api.akeyless.io";

    $PostData = array();
    $PostData['access-type'] = 'access_key';
    $PostData['access-id'] = "$AccessID";
    $PostData['access-key'] = "$AccessKey";
    $jsonPostData = json_encode($PostData);

    $Service = "/auth";
    $url = $APIEndpoint.$Service;
    $curl = curl_init();
    curl_setopt($curl, CURLOPT_URL, $url);
    curl_setopt($curl, CURLOPT_POSTFIELDS, $jsonPostData);
    curl_setopt($curl, CURLOPT_RETURNTRANSFER, true);
    curl_setopt($curl, CURLOPT_POST, true);
    curl_setopt($curl, CURLOPT_HTTPHEADER, array('accept: application/json','Content-Type: application/json'));
    $response = curl_exec($curl);
    curl_close($curl);
    $arrResponse = json_decode($response, TRUE);
    $token = $arrResponse["token"];

    $PostData = array();
    $PostData["token"] = $token;
    $PostData["names"] = $arrNames;
    $jsonPostData = json_encode($PostData);

    $Service = "/get-secret-value";
    $url = $APIEndpoint.$Service;
    $curl = curl_init();
    curl_setopt($curl, CURLOPT_URL, $url);
    curl_setopt($curl, CURLOPT_POSTFIELDS, $jsonPostData);
    curl_setopt($curl, CURLOPT_RETURNTRANSFER, true);
    curl_setopt($curl, CURLOPT_POST, true);
    curl_setopt($curl, CURLOPT_HTTPHEADER, array('accept: application/json','Content-Type: application/json'));
    $response = curl_exec($curl);
    curl_close($curl);
    return json_decode($response, TRUE);
  }
Then here is how I call that and process the response. First create the array of names
  $arrname = array();
  $arrname[] = "MySecret1";
  $arrname[] = "MyFirstSecret";
  $arrname[] = "/TSC/AnotherTest2";
  $arrname[] = "/Test/MyPathTest";
Call the function with that array
$arrSecretValues = FetchKeylessStatic($arrname);Process and print out the response. Of course in reality you would never loop the through the secrets like that. You would just access the appropriate entry and use it. Then again this is just demonstrative and testing.
  print "<p>Here are the secret names and corrensponding values</p>\n";
  foreach ($arrSecretValues as $key => $value)
  {
    print "$key: $value <br>\n";
  }
Conclusion
As you see it is fairly simple and easy to use this solution for storing simple static secrets. Whether this is the right solution if that is all you are doing, I’ll let you be the judge of that.
As always feel free to reach out if there are any questions.