I figured I’d do one more article on scriptable emailing and show off my latest work, PHP function that leverages PHPMailer module to send email notifications from your PHP code. This function can be found in a wrapper PHP test page on my GitHub at https://github.com/siggib007/phptest/blob/master/phpmailer.php and you are welcome to use it if you want.
Full support for HTML email body that is RFC compliant, including a text only alternative
Be able to accept a large text block (formatted or not) that gets turned into an email attachment
Be able to accept an absolute path to a file that should be added as an attachment.
Does not trigger spam filters
The Script
Just like the python function, this PHP function accomplishes all these goals, although I only tested the file path thing on a Linux PHP server. As with the python function just grab this file from GitHub and copy the SendHTMLAttach function along with the StripHTML function. Anything outside of those functions is simply wire frame so the function can be tested, and something shows up on the web page.
How to use
Grab the file and place it on your PHP web server. I’m using docker to run my PHP server and if you clone the whole phptest repo you’ll have my docker-compose file and can just run it from there. If you rather not deal with docker and already have a PHP server ready to go just put phpmailer.php on that server. If you don’t want to deal with GitHub either just wget or curl this URL https://raw.githubusercontent.com/siggib007/phptest/master/phpmailer.php directly into your web directory.
You will also need to have PHPMailer installed on your box. The PHPMailer maintainers recommend you use composer to install it, but I don’t like to use composer as I like to keep dependencies to absolute minimum. I typically have zero dependencies, but occasionally I add one or two max. In these cases I manually install the required files. In this case I download https://github.com/PHPMailer/PHPMailer/archive/master.zip as instructed on https://github.com/PHPMailer/PHPMailer. You are also free to grab the PHPMailer directory from my phptest repo. Whichever route you choose just make sure you have the module on your server and the require statements in the function are adjusted so the script can find it.
Also make sure you are including the two use statement at the top of my test script.
Setup the following environment variables. I recommend you use Doppler for that for maximum security. See my article on docker and doppler for details on how to do that.
EMAILUSER: This the username the script should use when logging into the SNMP server
EMAILPWD: The password to use when logging into the SNMP server
EMAILSERVER: The FQDN of the SNMP server
EMAILPORT: The TCP port number that the SNMP connection should use
USESSL: Whether the SNMP server supports full SSL or TLS connections (True or False)
USESTARTTLS: If the server doesn’t support full connection security, can it switch to a secure connection post connection, known as StartTLS. (True or False)
This should also work if you just setup those appropriate environment variables. If you have another way to fetch these information, just make the appropriate changes in the test script. After you grabbed PHPMailer module and setup those variables you should be able to Load the page and have it send an email. Unless you are using MailTrap (see section, Testing with MailTrap, in article Emailing from python3 for details on MailTrap) or similar service, you won’t actually see any email unless you also change variable on line 130 in the script to be a real email address you can check.
Make sure the SMTP server you are sending through has the proper SPF/DMARC records to be authenticated as authorized to send email for the domain you are using in line 135 in variable $FromEmail. Otherwise the email will be considered spam by pretty much every email service out there. For example if you are sending through your Gmail account, this email address needs to be configured as a send-as email in your configuration. If you are using your work email service you may need to check with your email administrators, but it likely needs to be your work email domain. If you are running your own domains and email server or you are the email administrator, you most likely didn’t read anything beyond SPF/DMARC 😀
To use this in your own PHP do the following
copy SendHTMLAttach function along with the StripHTML function into your function library
Setup the above variables either through Secret Manager such as Doppler, environment variables or however you are used to configure such things.
Then call the SendHTMLAttach function with following arguments in this order, to skip an optional argument and include one later you either pass in an empty string or just put the comma.
Message Body in HTML format, as a simple string. Note: A string doesn’t have to have HTML formatting to be a valid HTML string. However <br> is required at the end of a line you want to break. Normal line breaks are not rendered in HTML, only the text only view.
Name and email that email should come from in the form of “Joe User |joe.user@example.com”
Name and email address to send the email to, in the form of “Joe User |joe.user@example.com”
Email Subject, as a simple string
[Optional] Filename you want the attachment, created from the string in next parameter, to have. The script will not create the attachment if you leave this off. It is up to you to make this filename appropriate for the content. If you generate a HTML attachment but name the file MyFile.txt the recipient will by default, just see the actual HTML, not the rendering as one might expect.
[Optional] Email Attachment in the form of a simple string. This would be the content of the attachment file, appropriately formatted for the intended file format. I assume this would be created by your script but could be read in from a file as well. Only text formats are supported, binary attachments have not been tested.
[Optional] List of custom headers to add to the email. Either supply a single header as a simple string in the format “name: value” or as an array of simple strings in that format. For example “X-Testing: This is my test header”.
See how I do this in my script by looking at how I create $arrname in the starting on line 127.
[Optional] Absolute path to a file on the php server you want to include as an attachment.
Here is an example of how you might call the send function assuming all the above have been assigned to appropriate variables.
I figured I’d write another article Secrets management to wrap up my evaluation efforts in this space. As I mentioned in my first article on secrets management I set out on this journey looking a solution that offered easy to use generic secrets management. In that article I also define what secrets management is, what sort of secrets we are talking about and why it’s important to manage your secrets. If you haven’t read my previous articles in this series, I recommend you check all of them out.
Like I said was looking for easy to use generic solution, so anything that specialized in specific language, product or vendor was excluded. So anything that specialized in AWS Keys, Docker secrets or NodeJS secrets for example were excluded from my evaluation. After some initial web research I had the following solutions to evaluate:
In following sections I will summarize what I found.
Solutions
AKEYLESS Secrets Manager
I found this to be a powerful and easy to use solution that will likely fit well larger organizations looking for a complete secrets and key management solution. Smaller orgs or orgs with fewer requirements may find this to be an overkill or simply too expensive. For more details see my article on this solution at https://infosechelp.net/secrets-management-a-key-less-edition/
Vault Project by HashiCorp
HashiCorp is a big name in this space, so I was expecting big things from them, expectations which turned out to be unfounded. Vault is available both as an enterprise edition and open-source community edition. Pricing is a bit unclear to me as it is quoted as $/hr., and I don’t understand how that works. I tried this out and found it extremely complex and confusing. I spent a better part of a day working with this and was able to create few secrets in the web UI using the default root admin token. I did not figure out how to create new accounts, nor could I figure out how to use their CLI option, let alone their API. Like I said only spent a better part of day on this, reading the documentations and messing around with it. If I had spent more time on it, I probably would have figured it all out. After banging my head against the vault for several hours I lost interest in trying to figure it out as I saw no compelling reason anyone would want to deploy this thing. Based on what I saw AKEYLESS Secrets Manager was a far superior product for those looking for large scale fully featured system in this space.
Beyond Trust
Beyond Trust is another big name in this space and you can tell by their web site just how big they think they are. Beyond some fast talking sales slicks their web site had nothing to offer except a “register to learn more” forms all dressed up with generic highfalutin sales talk. There is no pricing information, or self-service demo option, just “give us your phone number so we can subject you to high pressure sales tactics” and I aint playing that game. So since I had no way to get anything useful about their product without subjecting myself to a sales talk, I eliminated them from the process.
Conjur by CyberArk
Here is another big player in this space. Their website had the following claim:
SECRETS MANAGEMENT MADE SIMPLE
A seamless open-source interface to securely authenticate, control and audit non-human access across tools, applications, containers, and cloud environments via robust secrets management.
https://www.conjur.org/
I was not able to validate this claim. In fact I found it to be anything but simple. Even after spending couple of hours on trying to get this to work, I had failed to even create a single secret in it, so I gave up. I was following a “getting started” guide which dutifully stepped me through how to get started and I still failed to store a single secret. Based on that experience I would call this solution convoluted and complex.
Delinea
Another offering that was disqualified because everything leads to a register for a sales call form and as I said before I aint playing that game. Their website claims, “Privileged access just got more accessible” and once more I see nothing to confirm that, hiding behind a sales call does not make things more accessible.
Doppler
This is the first solution I evaluated and the subject of my first blog in this series. This is a fabulous secrets manager for someone that is looking for a simple to use secrets manger. It does one thing, and it does it extremely well. Actually it does two things and does them very well. Doppler is both a secrets and configuration manager. You can store all your project configuration in Doppler, both sensitive and non-sensitive, and organize them into projects, environments, and configurations. Check out the Secrets Management Article for more details.
DotEnv
Turns out this solution focuses on NodeJS, despite their rather grandeur claims on their web site about supporting everything in the world. When I talked to their support folks about how use it for python, the answer was along the lines of “well we are really just focusing on NodeJS right now, we hope to support everything soon.” So therefor I did not evaluate this as it did not meet my initial requirements of being generic.
Conclusion
In conclusion I found only two solutions out there I could validate were easy to use and offered generic support. Those two being Doppler and AKEYLESS.
A while back I wrote another article on secrets management and how all the other offerings in this space were horrible confusing and convoluted with the exception of Doppler. I do stand by that Doppler is exceptionally easy to use and understand. If you are a small dev shop, or just need a simple and easy to use secrets management solution, Doppler is absolutely the go to solution. I also love how you can setup different environment and different configurations and quickly switch between then to test your code with different configurations without doing anything with the code or the IDE, etc., just change the configuration of the Doppler CLI.
BTW if you’re not sure what kind of secrets we are talking about or why there might be need to manage them, check out that previous article as do I go over that there.
I did decide to take a second look at some of the other solution to see what I could figure out, what the level of effort was, the learning curve, feature set, etc. I decided to start with solution offered by AKEYLESS https://www.akeyless.io/.
What I found out is that I must have been in some sort of weird state of mind when I decided that AKEYLESS was confusion and hard to use, because that is not the case at all. It’s actually quite easy to use. It is without a doubt a more feature rich solution and with that comes certain level of complexity, but I think the team at AKEYLESS did an excellent job of simplifying that complexity and hiding it as much as possible.
There are never any one size fits all solution, regardless of what you are talking about, and this is no exception. There are some that will find this overly complex for their needs, and to them I recommend Doppler. There is a strong possibility there are even more folks that the AKEYLESS solution will check more boxes for them and be a better fit that something like Doppler. The thing that I’m personally missing in this that I love in Doppler, such as configuration management, can easily be solved in many other ways. In the end it comes down to what your requirements are, so I highly recommend you check out both options and decide which fits your needs the best.
I’m still testing and learning all the different things that AKEYLESS has to offer, after all there is a lot to explore and learn. That being said I’m impressed by what this thing seems to be able to do, looks like it is even a full featured privileged access management (PAM) solution which is something no security focused enterprise (or even medium sized company) should be without.
Here is what their website says:
Manage Your Secrets. At Infinite Scale. Unified Vault platform built to secure DevOps credentials and access to production resources across hybrid cloud and legacy environments.
https://www.akeyless.io/
I like how they even have a browser plugin to make it easy to fetch your secrets from their vault. They seem to have a much more robust access logs than Doppler does, which is a huge plus.
Their documentation at https://docs.akeyless.io/ is pretty decent, although maybe a bit too high-level in places. For example, their documentation on SAML and oAuth/JWT integrations are very cryptic, I don’t know if even SAML, oAuth and JWT experts understand it, although they probably have a good chance at deciphering it.
One thing I am extremely surprised and disappointed in is that they don’t support MFA, like at all. I find it absolutely unfathomable that such a promising system would purposely destroy their reputation with such blatant disregard for security. When I ask their support about this, I got nothing but gaslighting, double talk and misdirection. Makes me question everything they say about how secure their system is. For any secrets management platform, implementing MFA should be the absolutely first thing they should do, not something they do one day if they have time and resources. Requiring MFA for all email/password accounts for such a sensitive platform would even be a wise idea.
Walk-through
The Web UI
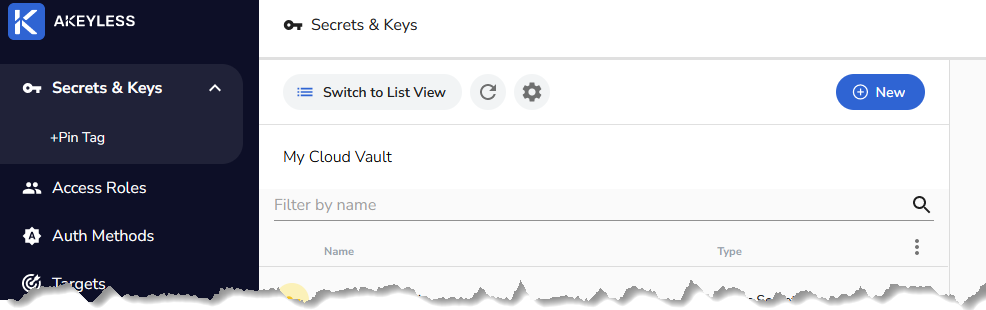
After you sign up and are signed into their web UI you should see something like this
If all you are planning to do is keeping simple static secrets in there you will rarely if ever need anything more than those three functions on the left. In fact you’ll spend 99% of your time in the Secrets & Keys option. You only need the other two if you want to setup API keys or get fancy with your access roles and auth methods. If you are fine with always authenticating via the email and password you setup during the signup, you will never need anything outside Secrets & Keys, which is selected by default and shown selected in this screenshot. So let’s start there by creating a static secret. It is called static secret to separate it from all the other type of secrets you could be saving here. Static secret is a type that rarely changes, and when it does you have to make sure it gets updated here, hence static.
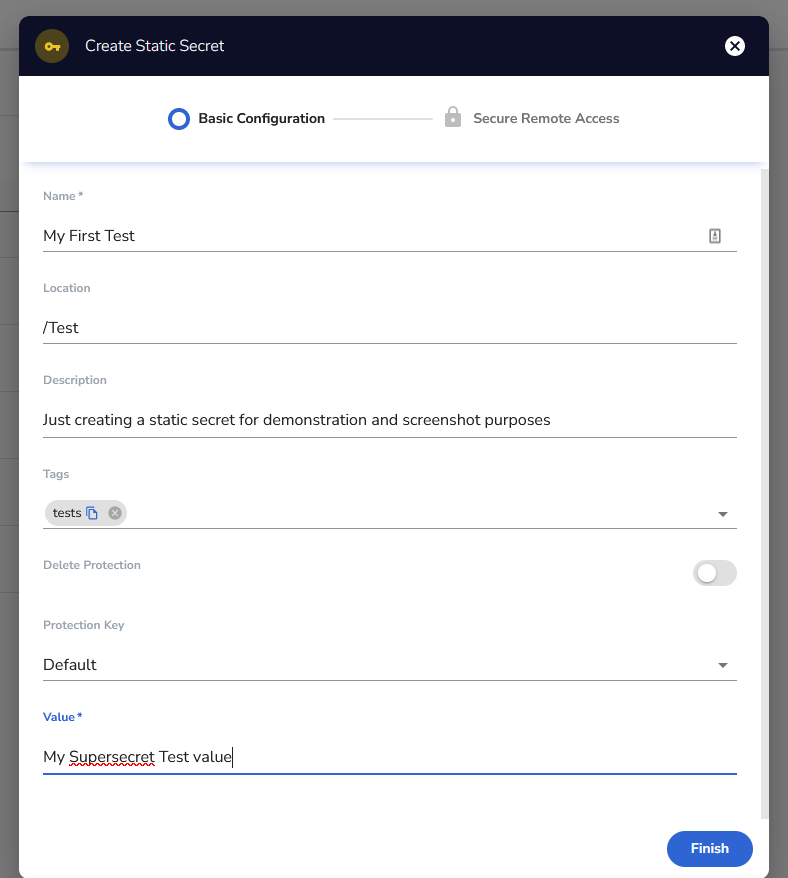
Click on that new button in the upper right corner of that screenshot and select static secret, then you should see something like this:
Fill it out per your need and click Finish. You can create multiple encryption keys using wide variety of algorithm, including:
AES128GCM
AES256GCM
AES128SIV
AES256SIV
RSA1024
RSA2048
See https://docs.akeyless.io/docs/encryption-keys for details. If you created different encryption keys you can select the key you want to use to encrypt this secret in the Protection Key field, otherwise just use the default. If you want to use a non-default key but haven’t created one, you want to close out of this screen and go back to the new key and select encryption key then DFC.
AKEYLESS uses folder structure just like the filesystem on Linux. So you get to decide if you want your secret in the root (/) or what sort of folder structure you want. This is what the location is all about. You just type out the path you want for this secret and any missing folders will be automatically created. The rest should be self-explanatory.
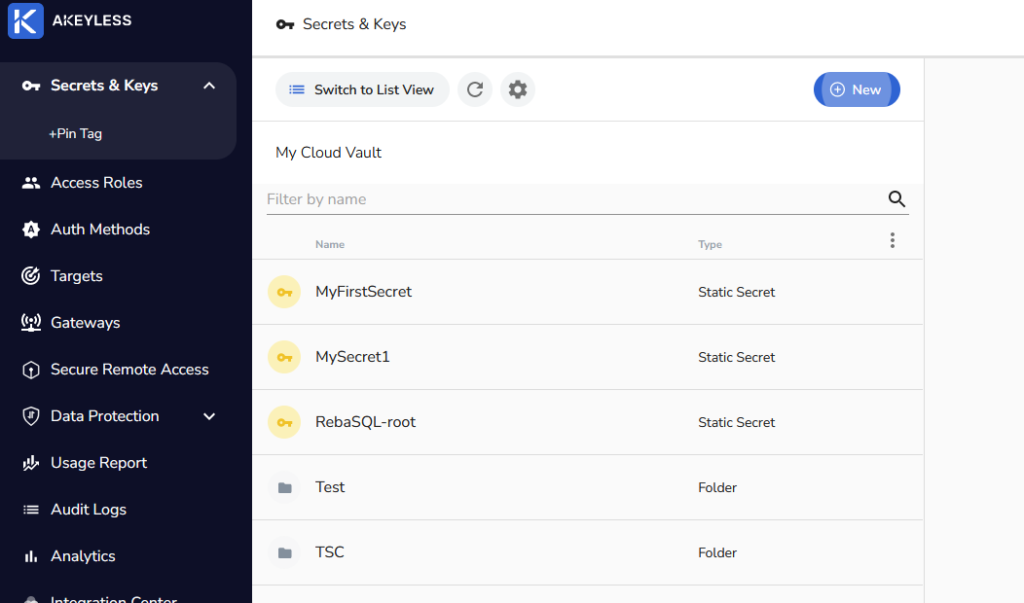
Here is what the screen looks like after I’ve created a few secrets and couple of folders.
Clicking into any one of those allows you to view the secret value and edit the other fields just like you would expect.
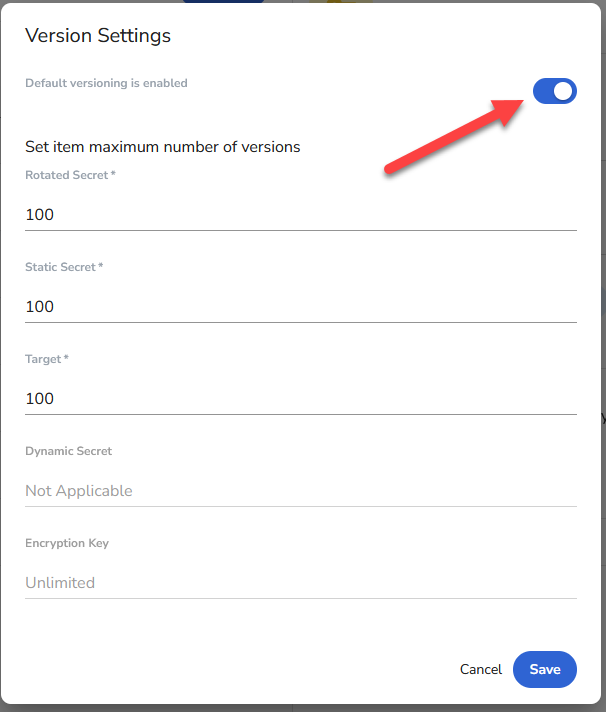
One thing to note is that while the system does provide for secret versioning, it appears to be disabled by default. You may want to turn that on so that if someone erroneously updates a secret you can roll it back. To do so find the gear icon in the screen above, it’s near the top and about center of the screenshot. When you click on that you should get an overlay like this
Make sure the toggle near the top is enable as shown here. Then you can adjust the maximum number of versions if you want or just click on save.
The CLI
Their documentation at https://docs.akeyless.io/docs/cli does a decent job stepping you through how to setup and use their CLI client. Reading the CLI reference guide it looks like you can do everything through the CLI you can in the web UI. Here is a small sample of what I figure is going to be the most useful to most. Also note that you always do akeyless -h to get a comprehensive list of available commands, then you can keep getting help by for example do akeyless update-secret-val -h to get details on what the options are for that command. The item name is usually -n or –name and refers to full name of the item, what you would call absolute path in Linux. For example “MySecret1” if it is in the root or “/Test/My First Test” if it is in the test folder. I’ve found that the leading / is optional.
Creating a new static secret
Here is how you create a new static secret from the CLI. It is called static secret because there are all sorts of secrets you could be saving here. Static secret is a type that rarely changes, and when it does you have to make sure it gets updated here, hence static. Thing to note here is that the CLI calls description metadata. When you supply metadata via the CLI it will show up the description field in the UI. Also don’t make the same mistake as I did the first time and forget the quotes around the description. Also the names are case sensitive, something I’ve messed up on as well.
C:\>akeyless create-secret -n AcliTest -v someclivalue -m “This is just a CLI test”
A new secret named AcliTest was successfully created
Viewing the secret value
Here is how you fetch the actual secret being stored
Here is how you update the item other than the value, for demonstration purposes I’ll update the description. Check out the help or the documentation on all the ways you can update the item with this command.
C:\>akeyless update-item -n AcliTest --new-metadata " This is a new comment/description/metadata "
{
  "updated": true
}
Viewing the item
This command will show you all sorts of details about the item
This command will describe all items, the output of this is very lengthy so I’m going to truncate it here after two lines, the output looks just like the output above except for all items chained together and not just one.
AKEYLESS offers SDKs for several languages, for others you need to use their REST API, check the documentation to see if your favorite language has an SDK. I’ll show you code for both. I’ll start with python SDK, then I’ll show PHP using REST API. Their python API guide can be found here https://docs.akeyless.io/docs/python-sdk-1 and their API reference here https://docs.akeyless.io/reference
Then here is a function that will take a list of secret names and fetch the corresponding secret values from AKEYLESS, and return a dictionary with the answers back to the caller
def FetchSecret(lstSecretNames):
  objConfig = akeyless.Configuration(host = "https://api.akeyless.io")
  objClient = akeyless.ApiClient(objConfig)
  objAPI = akeyless.V2Api(objClient)
  if os.getenv("AKEYLESS_ID") != "" and os.getenv("AKEYLESS_ID") is not None:
    strAccessID = os.getenv("AKEYLESS_ID")
  else:
    return "FATAL ERROR: No access ID provided"

  if os.getenv("AKEYLESS_KEY") != "" and os.getenv("AKEYLESS_KEY") is not None:
    strAccessKey = os.getenv("AKEYLESS_KEY")
  else:
    return "FATAL ERROR: No access key provided"

  objBody = akeyless.Auth(access_id=strAccessID, access_key=strAccessKey)
  objResponse = objAPI.auth(objBody)

  # if auth was successful, there should be a token
  objToken = objResponse.token
  objBody = akeyless.GetSecretValue(
      names=lstSecretNames, token=objToken)
  try:
    objResponse = objAPI.get_secret_value(objBody)
  except akeyless.exceptions.ApiException as err:
    return "Error occured during fetch: {}".format(err)

  return objResponse
Here is how I tested this function. Start by creating a list of secret names
Then I evaluate the response. I start by making sure I got a dictionary back, if not there was likely an error during processing and the error message is being returned as a string. Once I confirm the response is a dictionary, I assign each secret to a specific variable. In production it might be more efficient to just reference the secret directly from the dictionary, but this is testing so I figured this was more demonstrative. After I assigned each value to each own variable, I print the names, followed by the values. This sort of test is obviously done with bogus test values and not real valuable secrets. If what I am doing here seems weird, you are right, but this is just a weird way to demo this function.
if isinstance(dictSecrets,dict):
  strSecret1 = dictSecrets["MySecret1"]
  strSecret2 = dictSecrets["MyFirstSecret"]
  strSecret3 = dictSecrets["/TSC/AnotherTest2"]
  strSecret4 = dictSecrets["/Test/MyPathTest"]
else:
  print(dictSecrets)
  sys.exit(9)

print ("Fetched values for the following secrets")
i = 1
for strKey in dictSecrets.keys():
  print ("{}:{}".format(i,strKey))
  i += 1

print("\nValues\n1:{}\n2:{}\n3:{}\n4:{}\n".format(strSecret1,strSecret2,strSecret3,strSecret4))
This script has a function that accepts an array (php speak for a list) of secret names and fetches the secret for them. It then returns an associated array (php speak for a dictionary) back to the caller with the name value pairs. When you work with the API you first have to authenticate against the API end point which gives you a token. You then use that key when issuing commands. This is why you see two curl commands in this function.
Process and print out the response. Of course in reality you would never loop the through the secrets like that. You would just access the appropriate entry and use it. Then again this is just demonstrative and testing.
  print "<p>Here are the secret names and corrensponding values</p>\n";
  foreach ($arrSecretValues as $key => $value)
  {
    print "$key: $value <br>\n";
  }
Conclusion
As you see it is fairly simple and easy to use this solution for storing simple static secrets. Whether this is the right solution if that is all you are doing, I’ll let you be the judge of that.
As always feel free to reach out if there are any questions.
In this article I want to continue with the non-cybersecurity topic of sending notifications from your python3 scripts. Last time was sending slack messages, in this one I want to cover sending email messages.
Here are the features I wanted:
Configurable To, From and Subject
Configurable custom email headers
Full support for HTML email body that is RFC compliant, including a text only alternative
Be able to accept a large text block (formatted or not) that gets turned into an email attachment
Does not trigger spam filters
The Script
I’m happy to report that I now have a python function that does all that, and you are welcome to use it if you want.
Some of the functions in this script are simply to aid in the testing of the send function, for example the main function is strictly for testing purposes and has no purpose other than generate test data, compose the HTML body, and call the send function. Others like csv2array, array2html and array2MD could have production value but were created just to generate test data.
I highly recommend you have some sort of function for event logging, the SendHTMLEmail function expects a function called LogEntry to handle event logging. For testing purposes LogEntry function in my test script simply writes these messages to the console, you may want to do something more sophisticated.
The one other function in this script you absolutely must have, is the remove_tags function. If you want to run this script unchanged you also need to have a CSV file, in the same directory as the script, called URLResp.csv, which is semicolon separated, not comma separated. The file name and separator can be easily changed at the top of the main function. This CSV file contains the test data for the HTML table the script creates for the test email. The name of this CSV file is also used as the filename for the attachment, you can also easily pass a different file name when you call the SendHTMLEmailfunction in the main test function or whatever function you are calling it from.
Make sure you have the bs4 library installed prior to running this, as the remove_tags script depends on it. If you don’t have it installed execute pip install bs4 from the command prompt or console. You also need to make sure all the includes in my test scripts are in your script.
How to use
As-Is testing
If you simply want to test this script as-is, without changing anything in the script, you need to do the following:
Setup the following environment variables. I recommend you use Doppler for that for maximum security. See my article on Secrets Management for details on how to do that.
EMAILUSER: This the username the script should use when logging into the SNMP server
EMAILPWD: The password to use when logging into the SNMP server
EMAILSERVER: The FQDN of the SNMP server
EMAILPORT: The TCP port number that the SNMP connection should use
USESSL: Whether the SNMP server supports full SSL or TLS connections (True or False)
USESTARTTLS: If the server doesn’t support full connection security, can it switch to a secure connection post connection, known as StartTLS. (True or False)
Execute the script with python3 SendHTMLemail.py
If you are on Windows you need to use python or py, instead of python3. Basically execute this like all your other python scripts.
Unless you are using MailTrap (see next section, Testing with MailTrap) you won’t actually see any email unless you also change line 230 in the script to be a real email address you can check.
Production use
Start by taking care of the first four steps in the section As-Is testing above. As mentioned before, to use this in your production script you need to copy SendHTMLEmail function and the remove_tags function. Additionally you will want to have a LogEntry function that handles event logging the way you want to, or you can copy it from my file and simply write logs to the terminal.
Then your script needs to compose the message body and the attachment if you want to include one. Then you just call the SendHTMLEmail function with the following parameters in this order:
Email Subject, as a simple string
Message Body in HTML format, as a simple string. Note: A string doesn’t have to have HTML formatting to be a valid HTML string. However <br> is required at the end of a line you want to break. Normal line breaks are not rendered in HTML, only the text only view.
Name and email address to send the email to, in the form of “Joe User joe.user@example.com”
Name and email that email should come from in the form of “Joe User joe.user@example.com”.
Make sure the SMTP server you are sending through has the proper SPF/DMARC records to be authenticated as authorized to send email for the domain you are using. Otherwise the email will be considered spam by pretty much every email service out there. For example if you are sending through your Gmail account, this email address needs to be configured as a send-as email in your configuration. If you are using your work email service you may need to check with your email administrators, but it likely needs to be your work email domain. If you are running your own domains and email server or you are the email administrator, you most likely didn’t read anything beyond SPF/DMARC 😀
List of custom headers to add to the email. Each list element should be a simple string in the format of name: value pair. For example “X-Testing: This is my test header”.
See how I do this in my script by looking at how I create lstHeaders in the main function, starting on line 222.
Email Attachment in the form of a simple string. This would be the content of the attachment file, appropriately formatted for the intended file format. I assume this would be created by your script but could be read in from a file as well. Only text formats are supported, binary attachments have not been tested.
Filename you want the attachment to have, the script will not create the attachment if you leave this off. It is up to you to make this filename appropriate for the content. If you generate a HTML attachment but name the file MyFile.txt the recipient will by default, just see the actual HTML, not the rendering as one might expect.
Here is an example of how you might call the send function assuming all the above have been assigned to appropriate variables.
The function will return either the one-word string SUCCESS upon successful execution, or an error message, which you can then process and handle appropriately for your needs. See my script for an example of how I do this, function main starting on line 253.
You should now be in business, feel free to reach out if you have any questions. Now let’s talk about a great way to test that your script is generating an email that looks the way you want and is unlikely to be sent to the spam folder, etc.
Testing with MailTrap
During the development of this script I found a really cool test service that allowed me to confirm that the HTML was well formed, the custom headers were showing up, spam score was low, etc. Yes, I could have used Gmail for this but MailTrap made this task so much easier. It acts as an SMTP server with a nice web UI and while it receives emails just like a SMTP server it doesn’t do any relying. Regardless of what address is specified in the To field then email will be delivered to your MailTrap inbox, where can forward it someplace else if you are a paid user. I’m just a free user so I couldn’t test out that feature, or any of their other premium features. Also MailTrap doesn’t do any SPF/DMARC checks, so you don’t have to worry about your from address either to begin with. What I did is I tested everything else, then I set the from address to actual from address that belongs in my environment and sent through my production email service, with my Gmail account as the to address to confirm that it would pass SPF/DMARC.
Here are some screenshots for you from MailTrap to give you a better sense of what it gives you. Please note that I am in no way tied to them, nor do I get any compensation if you use them. I just like to share tools I find helpful.
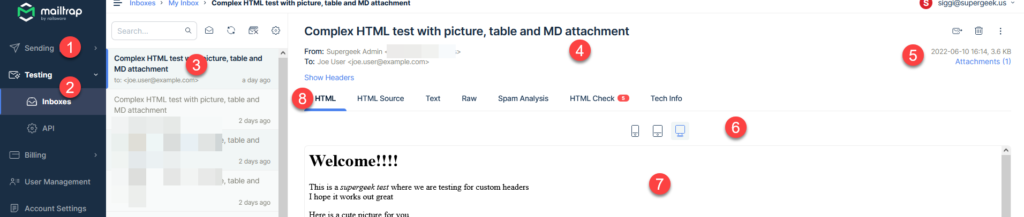
Main screen with HTML rendering
Notes:
Sending: This is a separate product you pay separately for and has nothing to do with email testing. This is intended for those that need to send out mass email marketing campaigns. This really confused me at first, which is why I am calling this out
Testing function is where you will be spending your time, specifically in the inboxes. As a free user you only have one inbox, paid users can have project specific inboxes and lot of other features I haven’t explored or tested.
This is your list of messages that have arrived in your inbox.
This is where all the basics show up: Subject, from, to, etc.
Date and size of the email as well as any attachments in the email
Choose the viewing simulation: cell phone, tablet, or computer
This is the body of your email. This view will change based on the chosen tab by #8. In this view HTML rendering is chosen.
What details you want to see, HTML rendering, HTML source, etc. Will cover this in more detail in a bit
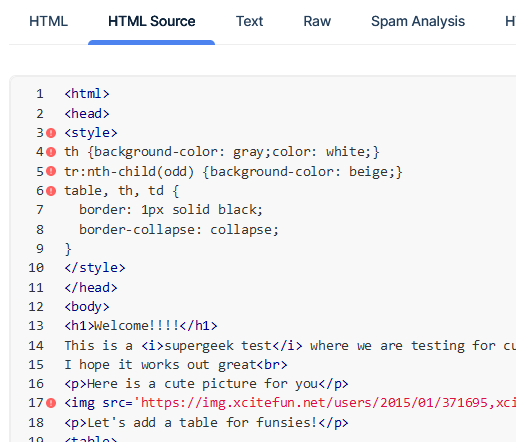
HTML Source
In this tab you can see how the HTML source came through in your email. The red dot next to a line indicates that this may not be correctly interpreted by everyone. Details on the HTML Check tab
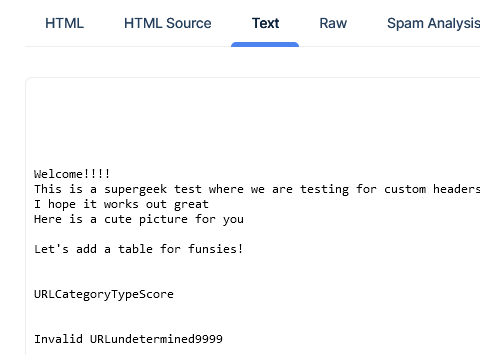
Text screen
If you provided an alternative text only body, which my script does by stripping out all HTML formatting, that text will show up on this tab.
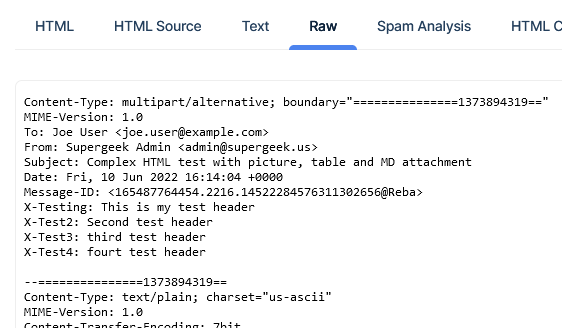
Raw Email
On this tab you can examine the raw email
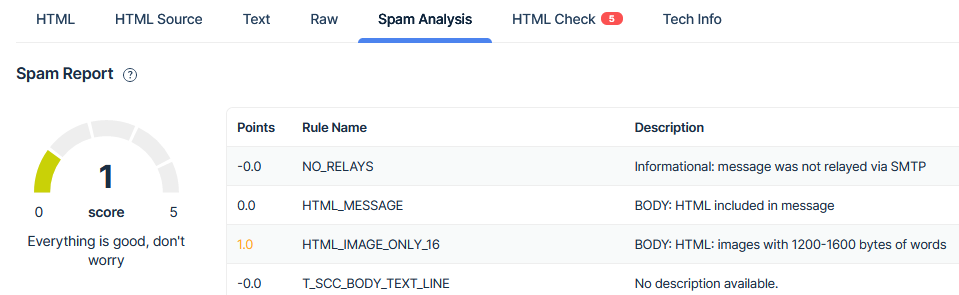
Spam Analysis
Here MailTrap will tell you how your email will be scored by leading spam detection engines. You can see that my test email is getting docked a point for having an unfavorable image to text ratio. You can see on the meter to the left that a score of 1 is nothing to worry about. If you are a perfectionist like me, you might be tempted to tweak your message in an attempt to get zero.
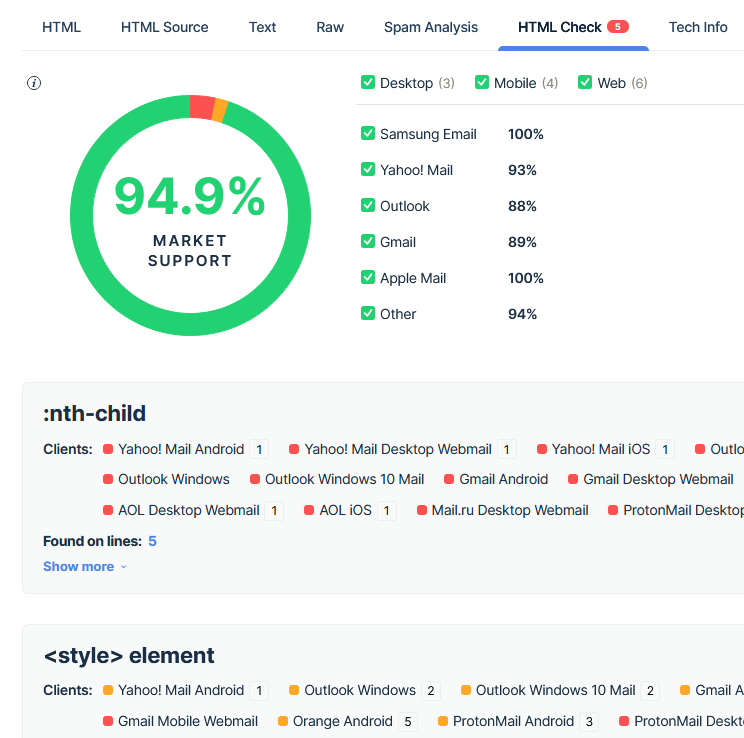
HTML Check
If you have any red dots in the HTML source tab, they are explained on this tab. Here it is telling me that my test email should render correctly on 94.9% of email clients out there, others there could be some styling issues. You can then decide if you want to chaise that last 5% or call this good. I did verify this by using my ProtonMail account as a destination, and the table didn’t look identical to the way does in Gmail. However it was nothing that detracted from the message, had there been a message.
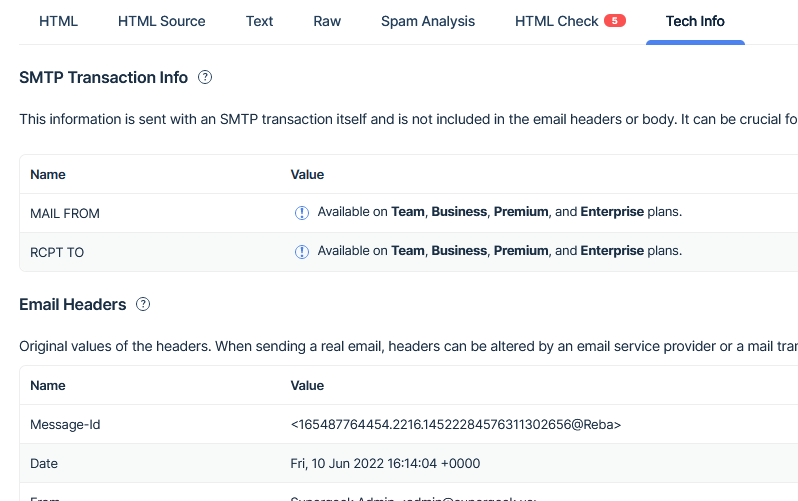
Tech Info
On this last tab you get all the header details nicely broken out for you. Also as you can see certain paid accounts also get some additional data.
Closing
Hope this has proven useful for you. Don’t hesitate to reach out if you have any questions.
In this article I want to deviate from my normal cybersecurity related posts while still staying technical and focus on the python automation topic of using Slack to send notifications from your python scripts.
There are many useful reasons why you’d want to send slack messages to a specific person or a team during the execution of your automation scripts. Anything from error notifications, condition notifications or even just completion notifications. I find these kinds of notification in my automation scripts extremely useful and figured others might as well. While the Slack API guide is very detail and helpful it can be a bit daunting to those of us that aren’t full fledged developers looking to write a major Slack Bot with tons of functionality. When I set out, I certainly felt that way as I am by now means a professional developer, I just put together some python scripts from time to time to automate something and I was just looking for something super simple. All I wanted was to be able to send a message to a specific person or a channel.
The Function
After some time I figured out a way to do this and wrote a little function to accomplish this. This function is just 40 lines, and you are welcome to use it in your code if you want. I have a script that just tests the function on GitHub at https://github.com/siggib007/Utils/blob/master/SlackNotify.py. Just copy the SendNotification function from that script and use it in your python scripts.
You need three things to call that function:
The message you want to send. In the script I truncate long messages so not to run into message length errors on Slack. Plus I found that messages longer than 1000 char on slack aren’t all that useful. I default this truncation to 199 characters, but you can adjust that. I would recommend staying below 500 characters. This shouldn’t be a logging mechanism, more notification that someone should check the logs.
The channel ID, which identifies who should be getting the message, either a person or a channel. I’ll show you how to find this shortly.
The Authentication token, which authorizes your script into the right slack workspace. I’ll explain this better later.
In my test script this is how I call the function with “More Testing” being the message I want to send.:
BTW you’ll see in the script that I am fetching the channel ID and notification token from an environment variable. I’m actually storing this in a Doppler project which allows me to store this and access it in a very secure manner. Naturally only the access token needs to be stored securely, however I choose to store the notification ID as well for this demo to make it easy to switch test cases. For more details on how this works check out my Secrets Management article.
The Channel ID
OK here is how you find the right channel number to send.
A specific user
Let’s start with how to find the channel user for a specific person. There is more than one way to approach this, and this is just my favorite way and assumes you are already chatting with this person in slack. The channel ID for each user is in users’ profile in the more menu, if you already know how to get there, just do that, otherwise follow along here.
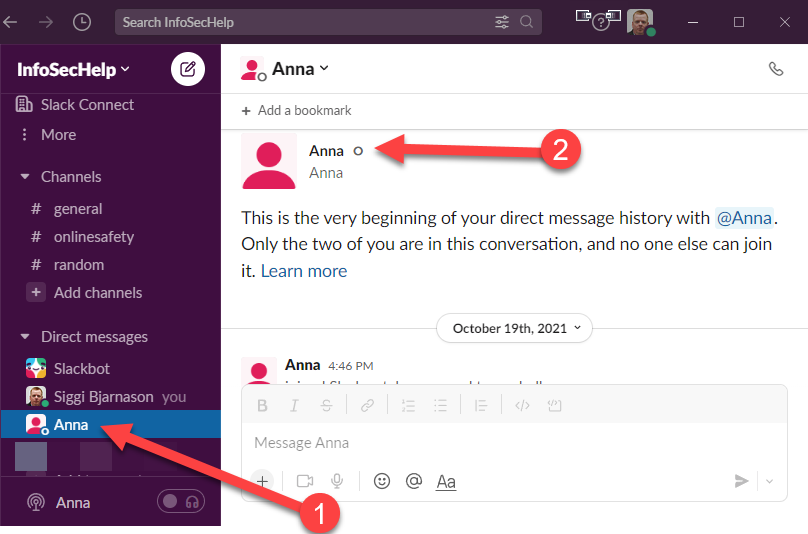
Start by finding the person in your direct messages list and click on their name in the list as if you were going to manually send them a message. Then click on their name in the message.
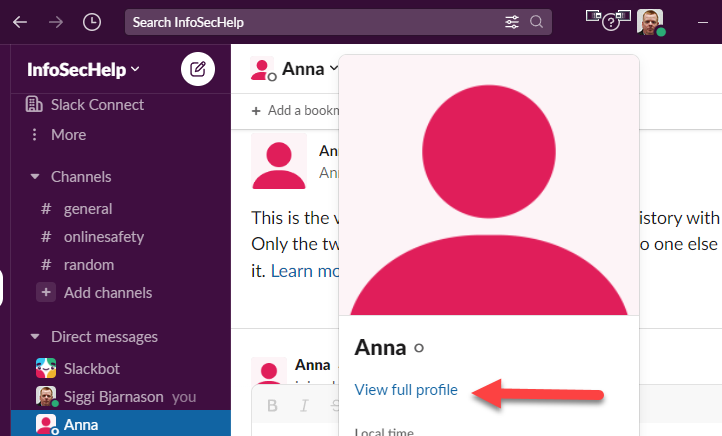
Then click on View Full Profile
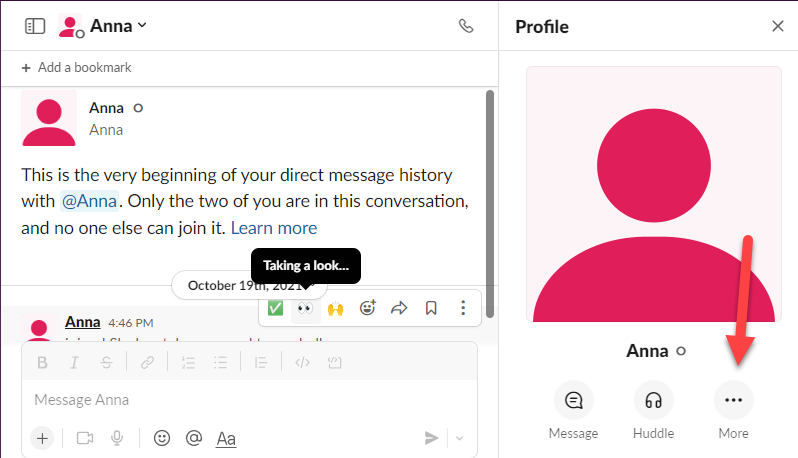
In the profile side bar, click on the “more …” button.
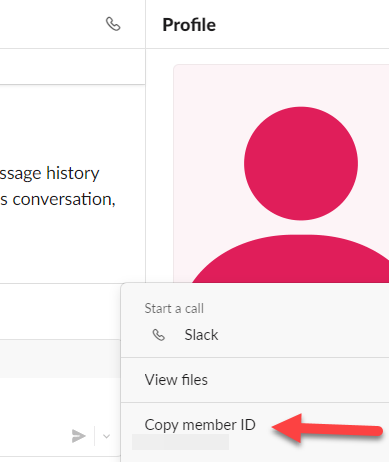
Click “copy member ID” in the menu that comes up
Now you have the channel ID for this person in your clipboard, paste it someplace safe.
A specific Channel
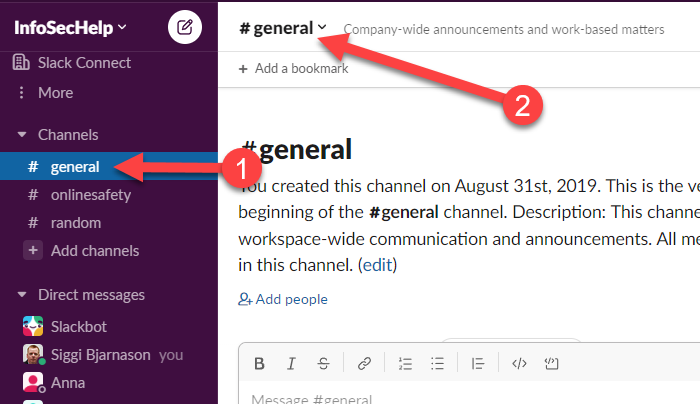
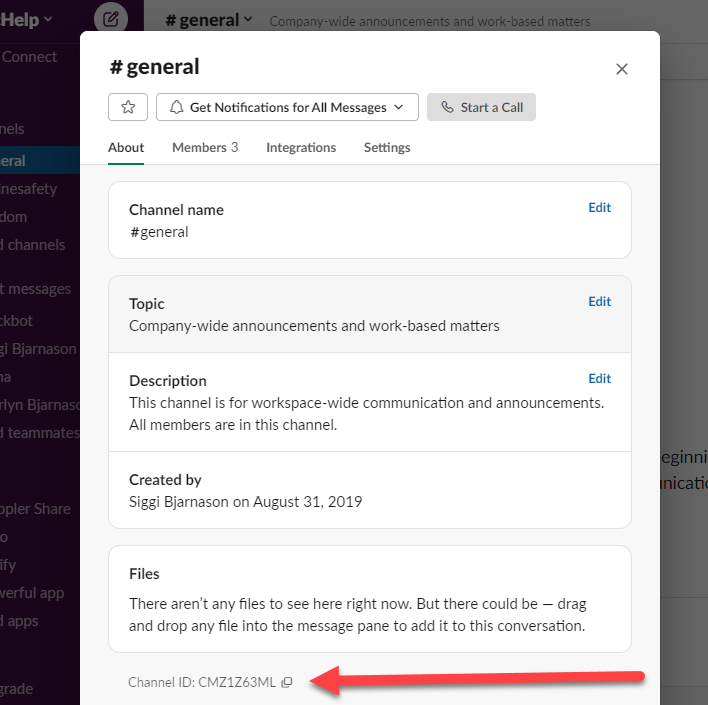
Now for the ID of a specific channel. Start by finding the channel you want to send messages to in your channel list and click on it as if you were going to manually post something in that channel. Then click on the little down arrow (or chevron) next to the channel name the top of the screen.
The channel ID is at the bottom of the screen that comes up. There is a little copy icon next to it that will put the channel ID in your clipboard
The Authorization Token
OK now you two thirds of what you need to call the function. The authorization token is the only thing left and this one is a little more complicated.
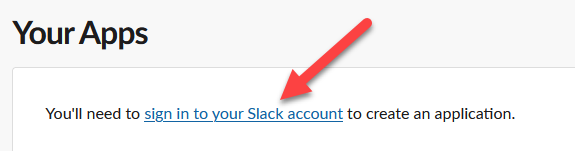
Then sign into the slack workspace where you want to send your messages to. If you have multiple workspaces you want to send automated messages to, you’ll need separate auth tokens for each workspace (also the channel ID is workspace specific), so you’ll just repeat this process for each of them. If you are already logged in for whatever reason you will not see this, so just jump to the next step, and create new app.
Once you are logged in, you should see a “create new app” button.
Click Create New App
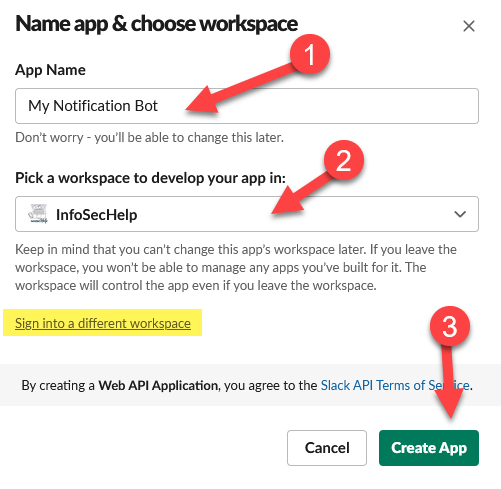
Then click “from scratch”
Give the Bot a cool name, I recommend something short that makes it clear what this bot does.
Select the workspace this bot will go into. If the workspace you want isn’t in your list, click on the “sign into a different workspace” link
Click “Create App”
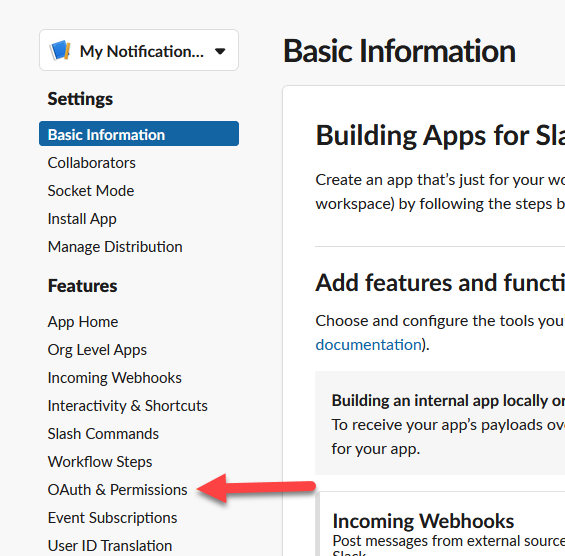
Now on the left under Features, click on “OAuth & Permissions”
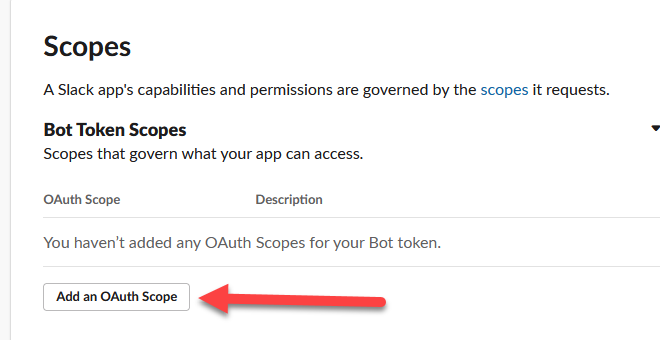
Scroll down the page to the Scopes section and click on “Add an OAuth Scope” under Bot Token Scopes
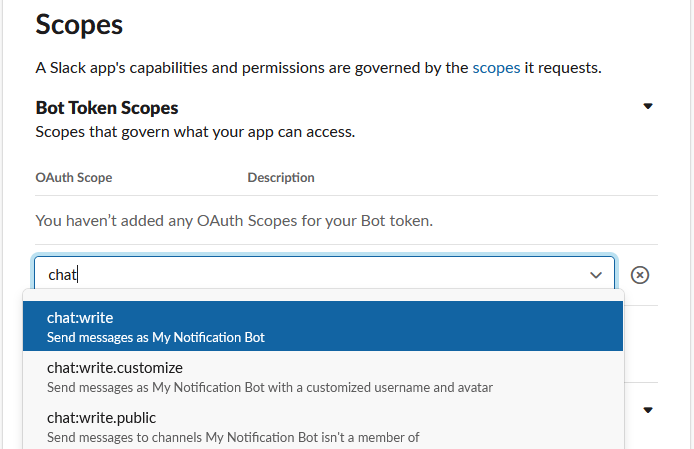
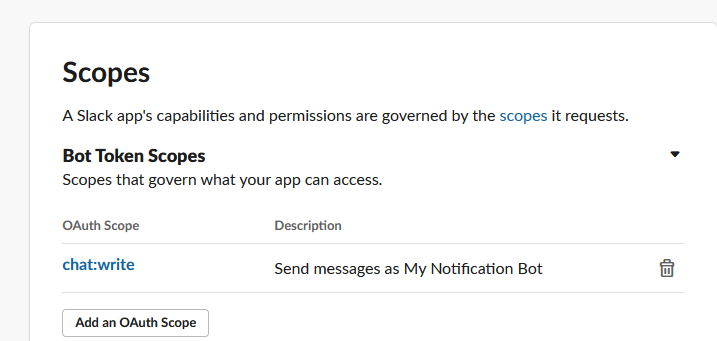
Add “chat:write” scope.
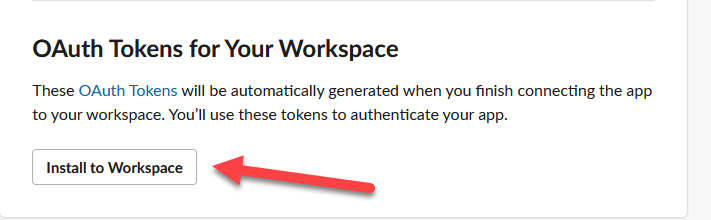
Now scroll back up and click on the “Install to Workspace” and approve the request screen that comes up.
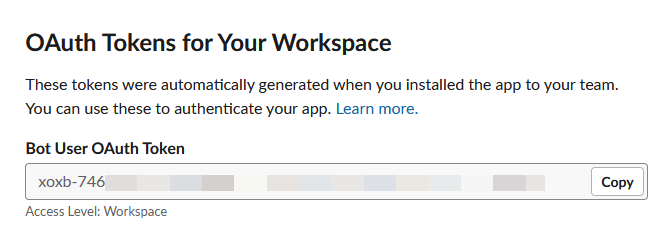
Now your authorization token will be shown where the install button once was.
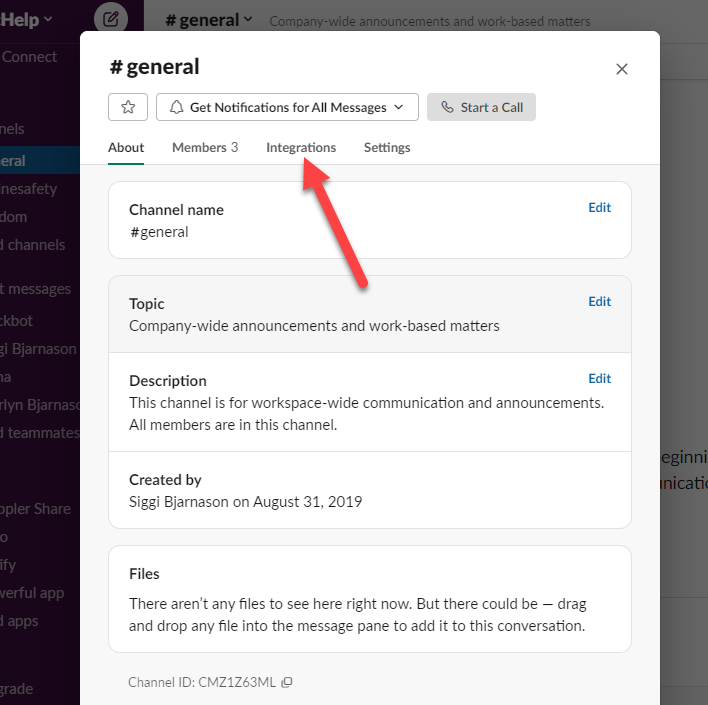
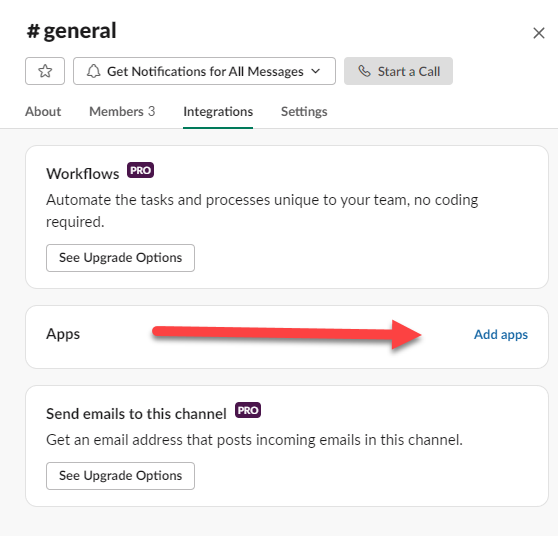
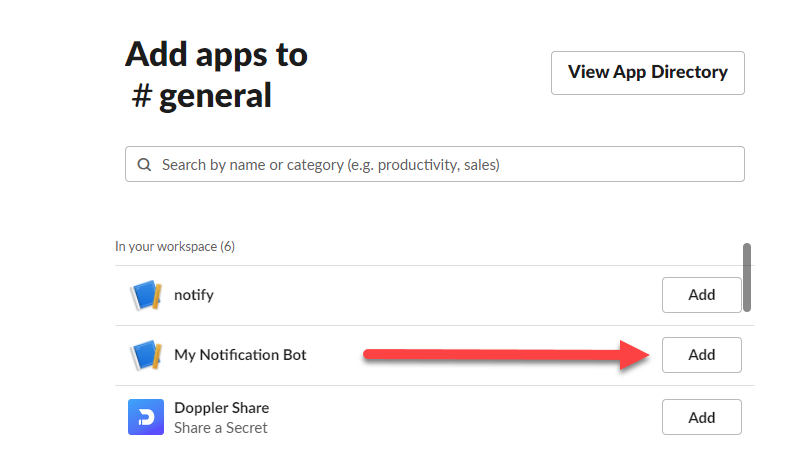
Now you have everything you need to send slack messages from your script, but there is one final task left. You need to add the bot to all the channels you want it to be able to send to. While there are at least couple of different approaches I’m just going to illustrate the one I recommend, which involves adding the bot directly into the channel one by one. Start by going back to the screen where you got the Channel ID and click on integrations
Click on add apps
Find the name of your new bot and click Add
You should be all set now. Please feel free to reach out if you have any questions.
This article is built upon the article on secrets management. I am assuming you either have read it and followed along or you are very familiar with what Doppler is, what the benefits are and how it works. If those assumptions don’t hold true for you, you might want to read the article on secrets management before continuing.
To be explicit I make the following assumption about you, dear reader, as I write this article:
You have a Doppler account and are comfortable working with everything covered in the article on secrets management
You have Doppler CLI installed and logged into your Doppler account, as per the article on secrets management
You are comfortable working in command prompt, aka terminal, of your chosen operating system
Comfortable downloading or cloning GitHub projects
My latest project has been to get more comfortable with Docker, how it works, how to set it up, etc. So I started going through the Docker 101 Getting started course that pops up automatically when you install Docker Desktop for Windows. If you are on a different operating system where the installation of docker doesn’t force this tutorial in your face, just run this command:
docker run -d -p 80:80 docker/getting-started
Some Linux distros might require this command to be run as root or sudo. When I do this on my Ubuntu VM, I have to run it as sudo. If you are new to Docker, as I am, I highly recommend you work through all the exercises in this free training. Once the command completes running you just open a browser to http://localhost/ to access the training.
When I was going through the module on Docker Compose it struck me that having all those secrets in the yml file was not the best way to go from a security perspective. As you recall from the article on secrets management, Doppler integrates with whole bunch of systems, so I figured this was a perfect way to learn how to fix this insecurity by integrating my Doppler account into my Docker project. Turns out it is actually very simple. There are actually a bunch of different approach provided in the Doppler documentation, some that look very intimidating, so at first it looked daunting but I found the simplest option and I’ll walk you through that here. All I had to do though was just tweak the compose yml file a little.
Walk through
To follow along with what I did, follow these steps:
From that project directory import a new project into your doppler account:
doppler import
Tie your local project to the Doppler project you just imported
doppler setup -p docker101 -c dev
For optimal security you might want to set a new database root user password, but since this is just a plaything it isn’t that critical but a good practice either way. The password I have in there is pretty strong though, but it is public so no longer a secret.
doppler secrets set MYSQL_ROOT_PASSWORD [NewSuperStrongAndLongPrivatePassword]
Then simply start the project
doppler run -- docker-compose up -d
As far as the changes I did. Here is what the yml file looks like in the course:
version: "3.8"

services:
  app:
    image: node:12-alpine
    command: sh -c "yarn install && yarn run dev"
    ports:
      - 3000:3000
    working_dir: /app
    volumes:
      - ./:/app
    environment:
      MYSQL_HOST: mysql
      MYSQL_USER: root
      MYSQL_PASSWORD: secret
      MYSQL_DB: todos

  mysql:
    image: mysql:5.7
    volumes:
      - todo-mysql-data:/var/lib/mysql
    environment:
      MYSQL_ROOT_PASSWORD: secret
      MYSQL_DATABASE: todos

volumes:
  todo-mysql-data:
All I did was take the value out of the environment lines and then turn the lines into a proper yml list. So for example take “MYSQL_HOST: mysql” and turn it into “- MYSQL_HOST”
Then all that was needed was call the composer with the doppler run command.
doppler run -- docker-compose up -d
As always feel free to reach out if there are any questions, comments, etc., and I’ll get back to you as soon as I can.
In this article I want to talk about managing your secrets. No, I am not talking about secrets your BFF told you and folks might be gossiping about, such as who is kissing who, who is crushing on who, etc. You are on your own when it comes to managing those secrets. What I am talking about is much more important and that is secrets in the computer world. Not to imply that your BFF secrets are not important or critical, just that computer secrets are even more important.
So what is a computer secret? It is a generic term covering few different things. Most commonly it is a password but might also be a PIN or a key (API Key, crypto key, certificate key, etc). It is something that gives a person or a device access to some sort of a computing or storage device and helps identify who or what is accessing it and whether or how much access to grant it. A computer secret is something that must be kept secret so not to compromise the security of a computer system somewhere. This is why it is critical to never share these types of secrets with anyone, like ever. If you want to learn more about what the US government considers secrets and how they want you to handle those, check out NIST SP 800-63b, just be ready for some very dry technical specification reading and have your favorite stimuli handy (whether that is coffee or something else). Secrets are detailed in section 5 of that document.
While secrets can mean a lot of different things, I am going to focus this blog on managing secrets used while developing scripts, application, and other automation. Look to some other blogs of mine for advice on managing your personal passwords and things of that sorts.
Why Manage your secrets?
So why is managing your secrets important, especially the ones used in your applications and scripting you ask. Well first off, knowing what secrets you have and where they are used should be an obvious benefit. Second, when using a secrets manager you have a single place to maintain your secrets, update them and such. Traditionally these are kept in plain text files, unencrypted for anyone to read, and scattered all over the place. Putting your secrets on a piece of papers, scattered all over the place, just laying around for anyone to read is not very smart. Same goes for computer secrets. With secrets manager they are stored encrypted, so they cannot be casually read, and only decrypted as needed.
If you have to update a secret for whatever reason, finding everywhere it is used, and update it can be a big pain. As mentioned before, with a secrets manager you just update it in one place and everyplace that is using it gets the update right away.
You can audit who is using what secret and from where, as any decent secret manager will have logs that give you that information. This can be important in compliance audits or during an incident response, or even be an indication of compromise. As in “wait I thought Joe was on vacation, so why is Joe’s dev machine fetching secrets?” and other interesting questions like that can be pondered. This is not possible when you store your secrets in configuration files all over the place.
And one of the best reasons, is that if something is fishy you can just quickly revoke Joe’s dev machine access, preventing it from accessing the secrets manager, and its secrets, until you get a chance to talk to Joe. If everything is kosher Joe just quickly re-authenticates to the secrets manager and is back up and running in no time.
And found them to be confusing and complicated, with one exception which is Doppler. Many of the options out there are product or environment specific. They only track AWS secrets, or only Docker secrets, etc. For example DotEnv, despite hyperbolic claims about being universal and simply, is focused on experienced Node.js developers. Others are so complicated and convoluted that they make your head spin, and it takes you a full day just to get it setup and configured. Then several days to figure out how to use it properly.
Some are open source and free, which is great until you realize the added complications that brings. You have to figure where you want to run it from so that it is accessible by everyone and everything that needs access, do you need to dedicate hardware or virtual machine to it, or do you load it on another machine and if so, what impact will that have on the existing application. Dedicating hardware or a virtual machine is rarely free. This brings to mind the old saying “there is no such thing as free lunch.” As you dig into it you realize that FOSS (Free Open-Source Software) is anything but free once you factor in your time and the hardware cost. I did not invest any time into evaluating FOSS options, beyond reading about them on their websites.
The Doppler advantages
What I loved about Doppler is that it is simply, straightforward, and easy to use. It is universal and generic and has integrations into dozens of other systems, both cloud and devops systems. It does not care if you are tracking stuff for AWS, Azure, GCP, Docker, or just your little python scripts. You can read about all their integrations here https://docs.doppler.com/docs/integrations.
I was very skeptical when I read on their website that I could be up and running in four minutes. It did take me probably closer to 10 minutes, but then I can be slow at times. I had my first POC using Postman in maybe 30 minutes and had completely rewritten one of my python scripts to leverage Doppler rather than a configuration file in matter of few hours, which included a learning curve. Someone smarter than me and more up to speed on all the devops lingo can probably do it in half that time if not faster.
Doppler is organized into projects which have environments (dev, staging, production, etc) which have configurations. The way Doppler works and is structured makes it so that I find it a perfect way to store all configuration items, not just the secrets, because their secrets are just a key value pair. This is how I changed my test script, I totally got rid of the configuration file (.ini) and the sub that read and parsed it, and just read it all from Doppler.
And the best part is that for a hobbyist like me, and even if you are a small team of up to five developers and you do not need any of the advanced features, it is totally and completely free, like forever. Second thing I love about that is that their lower tiered pricing is spelled out on their website. I find it so irritating when a company will not give you any ideas what the product cost and you have to subject yourself to a sales call just to find out if the product is even remotely within your budget. I so appreciate companies like Doppler that are transparent about their pricing. Also their free tier is very generous. As a free user you get the following forever:
100 Projects
10 environment per project
50 configs per environment
1000 secrets per config
My take is that if you need more than fifty projects, you should really spring for the teams paid plan. The main thing you give up by being on the free developer plan, are advanced permissions/access controls, alerting, enhanced logging, and priority support. Also higher limits on some things.
They say that if you use this link https://doppler.com/join?invite=E3579D31 to sign up you get $100 account credit. If you are like me and do not see any need for anything beyond the free developer plan that may not matter to you, it certainly is of no use to me. So if you prefer you can also just sign up here https://dashboard.doppler.com/register without that pesky account credit.
I will now walk you through how to experiment with Doppler using my python script. I will attempt to break it down to a basic level so everyone can follow along, no matter what your skill level is. Here are my perquisites and assumptions:
You have created a Doppler account
You have a machine that can access the internet and run a python version 3.x script (hint: check out https://www.python.org/downloads/ if you need to install python on your machine)
If you want to build a new virtual machine, either in the cloud or locally, you have already done that.
You are comfortable with command prompt aka terminal window and running commands there
You are comfortable running python scripts; you do not have to understand them or be able to write them just run them. (Hint: depending on your operating system it can be python3 filename, py filename or simply python filename.
Comfortable downloading files from GitHub and putting them in a project directory.
Script info
The script I am using in this demo uses as really cool API from a company called Cyren, who trace their origins to one of the earliest anti-virus companies. Today they are still in the malware and virus prevention business focusing on the enterprise market. The API I am using for this demo is a rather simple one, you feed it a list of URLs and it classifies the URLs for you. In my demo script I take that classification, give it a score and a type. For example, sites classified as botnet, cryptocurrency, or spam sites, I give them the lowest score possible and type it as a “be alert” because there is a strong chance it is a fraudulent site or even malware laced site. Dating sites I give a medium score and type it as a warning as it may not be business appropriate. Other categories such as Education, Finance and Business I give a high score and type it as good. One could then, in theory, take the output of this script and integrate it with business automation, proxy configuration, etc., to decide whether you allow traffic to/from that site. You can get a free access to this API direct on Cyren’s website. The free account has a lot of limits which do not matter for the sake of the demo. More on that later.
I did my initial experimenting and development on Windows 10, and then I did a POC using a virtual machine (aka compute object) in Dreamhosts public cloud call DreamCompute. They are quite easy to use and inexpensive cloud providers. I spun up an Ubuntu 22.04 1 vCPU, 2GB RAM and 80 GB disk, four days ago and suspended it 2.5 hours later when I was done playing with it and I now owe Dreamhost $1.50 for that. For those more technically curious, DreamCompute is just a private labeled RedHat OpenStack implementation. You can spin up a new machine in about 5 minutes, way faster than doing so in VirtualBox or VMWare on your local box. There is console access in DreamCompute, but the best way to use the servers you spin up there is to connect via SSH. Using DreamCompute is an advanced topic that may seem daunting to beginners. I am not going to go into more details on how this or virtual machines works in this article as it is not required. This is just an explanation of my setup, not any sort of setup requirements. You should be able to use whatever you already have.
You should be able to play along regardless of what operating system you are running. Doppler has a decent documentation at https://docs.doppler.com/docs/install-cli in case you need it. The only complaint I have about it is that it seems to assume all windows system have the scoop package management system already installed which is completely false assumptions.
If you want to follow along on a windows box start by installing scoop from https://scoop.sh/. Also the documentation does not tell you that on windows you have to use scoop to update Doppler on your box, so you need to ignore the “doppler update” command in their instructions. With that in mind you can just use the instructions on https://docs.doppler.com/docs/install-cli for window for installing Doppler CLI on your windows box.
If you want to follow along on a Mac, I am sure you will do fine, but you are on your own to tweak the few things that need tweaking for MacOS as I have no idea how to do this on Mac.
If you want to follow along on Linux grab yourself an Ubuntu (or another Debian flavor) box. If you only have a RedHat/CentOS box, just remember that I am using Debian commands and to change them to the appropriate RedHat commands.
If you want to use this opportunity to play around with DreamCompute and thus be in the exact same environment as I am, head to https://www.dreamhost.com/cloud/computing/ and sign up for an account. Then go to Compute -> Instances and launch a new instance (Ubuntu 22, gp1.supersonic). Again the details of how to do this is beyond the scope of this article.
Regardless of what OS you decide to use make sure you have python 3 installed, if you don’t head to https://www.python.org/downloads/ and get it installed.
Base Setup
OK let us get cooking. If you have not installed the Doppler CLI, do so now following the instructions for your operating system at https://docs.doppler.com/docs/install-cli. If you have any issues with this step, reach out to Doppler support. All I can tell you is I installed it on one Windows 10 machine and three Ubuntu boxes without an issue, which was not self-inflicted at least 😀
Let us start by validating your python install is good, note that is a capital V.
That looks good, something close to that version is good. Most important is that it is at least version 3.x. If this command does not work for you, you need to solve that before continuing.
Next let us validate Doppler version, here it is a lowercase v
That looks good too, the version number does not have to match something equal or great is fine.
Now we need to create a project folder, download two files, and create one file. I created a folder called cyren in my home folder so the absolute path for me is /home/ubuntu/cyren, you create whatever folder you want and name it what you want, just adjust the paths in my examples accordingly.
ubuntu@cyren1:~$ mkdir cyren
ubuntu@cyren1:~$ cd cyren
ubuntu@cyren1:~/cyren$
Now create a text file and throw a bunch of URLs in it, one per line so it looks something like this. Make sure you substitute vi with your favorite editors, many find vi to be intimidating, or pipe it in via stio, or use your favorite method to create a text file. This is where your command line skills are critical.
ubuntu@cyren1:~/cyren$ vi /home/ubuntu/cyren/Infile.txt
ubuntu@cyren1:~/cyren$ more /home/ubuntu/cyren/Infile.txt
slack.com
tinder.com
download.com
intuit.com
facebook.com
pornhub.com
ihop.com

ubuntu@cyren1:~/cyren$
Now download two files from my GitHub, here are direct links
I choose to download it directly into the folder on my box with curl, you choose how you get them there. Here is how I did it, the line wrap of the command here is annoying but unavoidable, you put it all in a single line. Then my output is after it.
  % Total    % Received % Xferd  Average Speed   Time    Time     Time  Current
                                 Dload  Upload   Total   Spent    Left  Speed
100 14055  100 14055    0     0  72016      0 --:--:-- --:--:-- --:--:-- 72076
  % Total    % Received % Xferd  Average Speed   Time    Time     Time  Current
                                 Dload  Upload   Total   Spent    Left  Speed
100  1796  100  1796    0     0   9862      0 --:--:-- --:--:-- --:--:--  9868
ubuntu@cyren1:~/cyren$
Take a quick look at the files that got downloaded and make sure they did not get corrupt, just check to make sure it looks like normal text, not HTML or something completely unreadable. The categories file should be a comma (semicolon actually) separate text file, word1;word2;number. The other file should be a python script, which looks like a normal text file. It should start like this:
ubuntu@test:~/cyren$ more CyrenDopplerEnv.py
'''
Script that reads in a text file of URLs and uses Cyren's API to lookup the URL classification
to determine relative safety of the site.
Creating a Doppler project
The short CLI, just do it for me method
If you don’t want to mess with GUI and just want a simple way to just automatically create the Doppler project download https://raw.githubusercontent.com/siggib007/python/master/Cyren/doppler-template.yaml into your project directory and run doppler import from the CLI. This will create a project named cyren-demo so you will have to adjust commands below to that from mydemo. Also once you have your Cyren API Key, you need to run the following command
doppler secrets set APIKEY="mynewkey" -p cyren-demo -c dev
Replacing mynewkey with the key you got from Cyren.
The educational manual GUI method
For a more education approach you may want to do the GUI approach instead. The project names in the two approaches are different so there is no harm in doing both, just pay attention to which one you put the API key in and use that config. For this approach log into your Doppler dashboard and create a project, branch config, and import the configuration items into one of the configurations, making sure to adjust the paths and filename as necessary depending on what choice to go with. Leave the APIKEY as is for now, we will deal with that next.
Creating a project
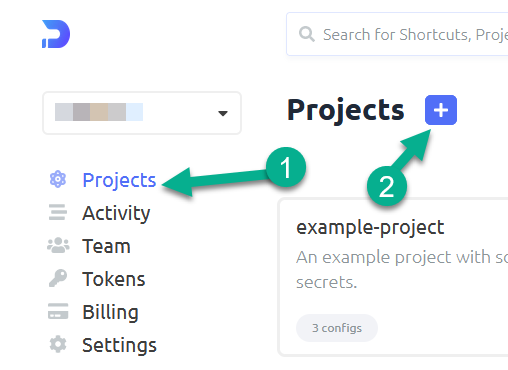
Switch to project screen and click on the + to create a new project
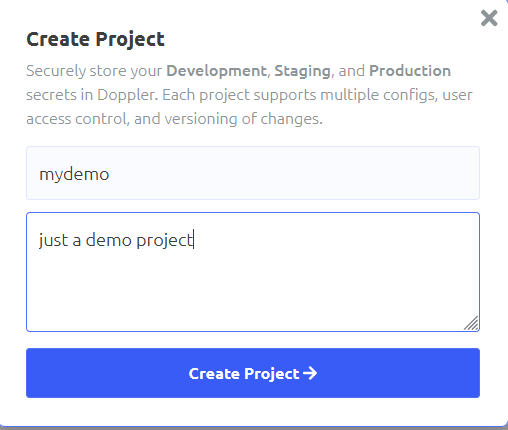
Name the project and give it a description, then click the create button
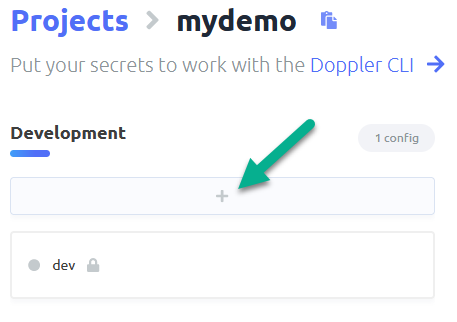
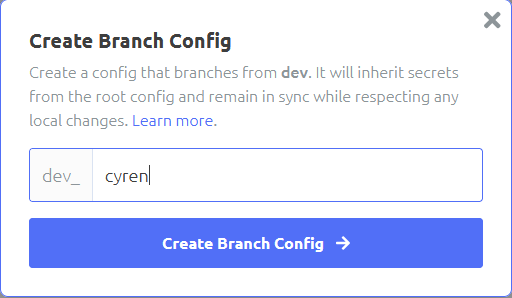
Creating a branch config
Click the plus under an environment of your choosing, I am going with Development
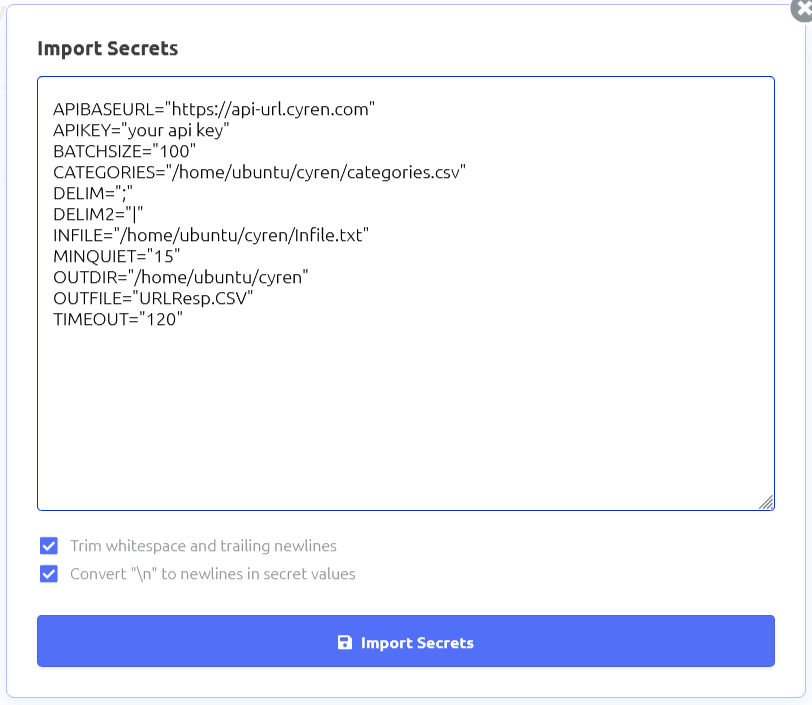
Importing configuration items
Click import secrets and paste the following in:
APIBASEURL=”https://api-url.cyren.com”
APIKEY=”your api key”
BATCHSIZE=”100″
CATEGORIES=”/home/ubuntu/cyren/categories.csv”
DELIM=”;”
DELIM2=”|”
INFILE=”/home/ubuntu/cyren/Infile.txt”
MINQUIET=”15″
OUTDIR=”/home/ubuntu/cyren”
OUTFILE=”URLResp.CSV”
TIMEOUT=”120″
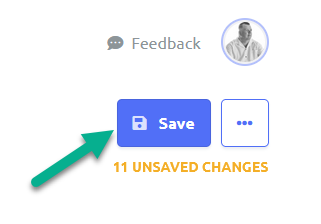
Click on import button, then save the changes using the save button in the upper right corner.
Authenticating the server to the project
Now we need to authenticate your box to the Doppler system. I am connecting to my system via SSH to a server without a GUI, so I do not have a browser, so I hit N on the open in browser question. If you are working locally on your box, you might be able to say yes and have the script open up your browser for you.
ubuntu@cyren1:~/cyren$ doppler login
? Open the authorization page in your browser? No
Complete authorization at https://dashboard.doppler.com/workplace/auth/cli
Your auth code is:
redacted_auth_code_for_web
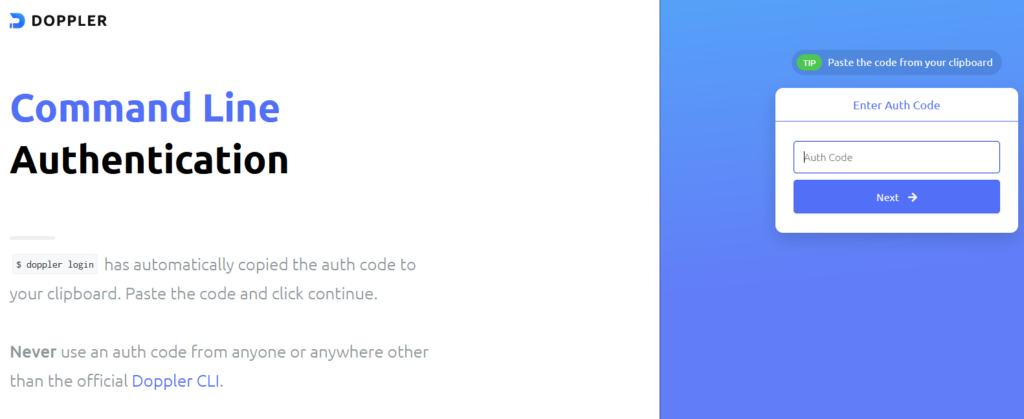
After I hit no, I open up a browser local on my workstation to https://dashboard.doppler.com/workplace/auth/cli and logged in with my doppler account. Then when prompted I pasted in “redacted_auth_code_for_web” and followed the wizard in the browser, then I get the welcome in the console.
Authenticate yourself to the portal
Open your browser to the URL above, authenticate with your Doppler creds.
Provide Auth token
In the next screen paste in the auth code, redacted_auth_code_for_web, in my example, note that your auth code will be different.
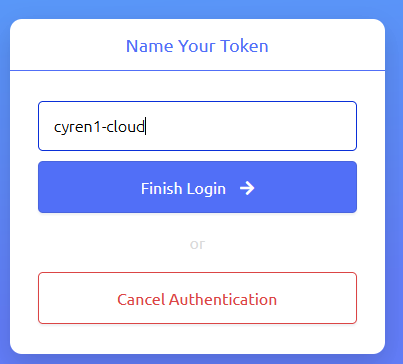
Name the token
Name your token and finish. Now your machine is authenticated to the system.
Project configuration
Next you configure your path to match the project and configuration where you imported the variables. In my case my project name is mydemo (or cyren-demo if you went the CLI route), and I am using the dev_cyren branch from dev environment. So here is what I did:
The last preparation step is to get an API key to the Cyren URL Lookup API. This API is completely free for testers and hobbyist, which is fine for this demo. Just go to https://www.cyren.com/products/url-lookup-api click on “start for free” and fill out the form. While many fields are required, the only field that really matters is the email field, as the system emails you the API key. I leave up to you and your privacy stance as to how honest you are on the other fields. As far as I can tell there is no validation beyond that there is some text in the fields.
Once you get your email with the key, update the APIKEY variable in your configuration. You can do this either via CLI or the GUI.
The CLI method
doppler secrets set APIKEY="mynewkey" -p cyren-demo -c dev
Make sure you actually use the key you got in the email instead of mynewkey.
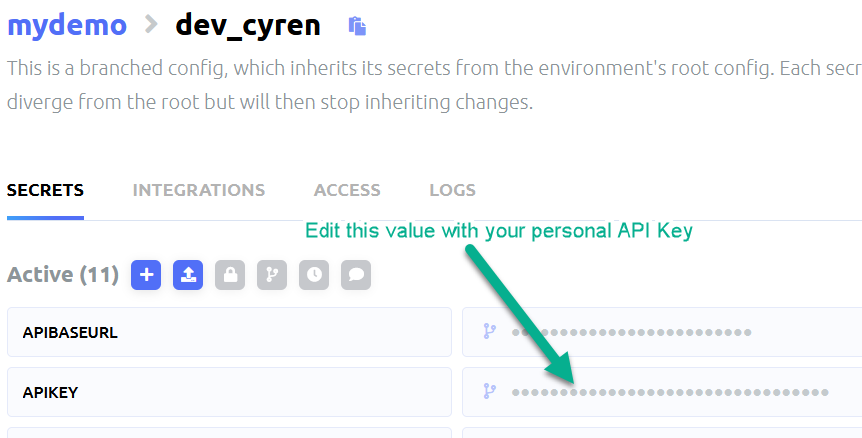
The GUI method
Now we should be ready to run the script.
Running the script
ubuntu@cyren1:~/cyren$ doppler run python3 CyrenDopplerEnv.py
This is a script to classify URLs using Cyren's API. This is running under Python Version 3.10.4
Running from: /home/ubuntu/cyren/CyrenDopplerEnv.py
The time now is Thu May  5 23:07:37 2022
Logs saved to /home/ubuntu/cyren/Logs/CyrenDopplerEnv-2022-05-05-23-07-37.log
Output will be written to /home/ubuntu/cyren/URLResp.CSV
Raw Output will be written to /home/ubuntu/cyren/RawOut.json
It's been 1651792057.4486177 seconds since last API call
Doing a post to URL: https://api-url.cyren.com/api/v1/free/urls-list
with payload of: {'urls': ['vinbudin.is', 'sante.is', 'slack.com', 'tinder.com', 'download.com', 'intuit.com', 'facebook.com', 'pornhub.com', 'ihop.com']}
post executed
call resulted in status code 200
objFileOut closed
Done! Output saved to /home/ubuntu/cyren/URLResp.CSV
ubuntu@cyren1:~/cyren$
If you get error 401 you messed up the APIKEY.
call resulted in status code 401
Error 401. Bad token; invalid JSON
If you get “call resulted in status code 206” it just means that one of the lines in your input file could not be recognized as a valid URL, check the output file to see which one.
The results
The last line of the script output tells you where you can find the output file. This is configured by the OUTDIR and OUTFILE configuration item. Go ahead and change those in Doppler and re-run the script and see the script save the results in a different file or different location.
I am not planning on waxing philosophy in this post, but I do want to discuss ideology or mindset of a successful cybersecurity professional. In my Vulnerability Management post I went over how to structure your vulnerability management program. Here I plan to take a slightly wider angle at an even higher level.
Cybersecurity should be about business enablement. It is our job to understand the needs of the business and work with them to achieve those goals in the most secure way possible. If you are telling the business “No” or trying to prevent them from doing stuff you deem insecure, you are doing it all wrong. Not only are you working against the interest of your employer, but you are working against your own interest. When you try to prevent people from being insecure, you are seen as a block that needs to be worked around. Typically the workaround they choose is even worse than the action you are trying to stop. Once you become seen as a blocker folks will start to focus on avoiding and working around you, which typically makes things even worse. It also demonstrates that you don’t understand the business which can’t be good for your job.
What you should be doing is work with them to come up with a more secure alternative. Don’t mandate anything, it should be a dialog where you are troubleshooting together. This dialog should result in an agreement on the best path forward. It may not be the most secure option, rather a secure enough solution that allows the business to move forward, deliver its objective, with security that meats their risk appetite and fits their threat model. The key here it that there is no universal, or a one size fits all solutions. You have to understand the business model, what they are they trying to accomplish, what their threat model and risk appetite is and come up with solutions that match.
Just because Tenable, Qualys, MITRE, NIST NVD, etc., tell you something is import or critical, doesn’t mean that it is for you. Just because all the blogs are talking about X being bad, doesn’t mean it is bad for you.
This is why it is critical that you know your business, understand what their exposure is, understand their setup, their business priorities and such, and then make your own assessment based on that. It could very well be that something deemed medium priority by the industry might be critical for you and vise versa.
If you are operating on Fear, Uncertainty and Doubt (FUD), you really need to re-evaluate your methods. The sky is falling scare tactic and similar FUD tactics may work in the short term but will quickly lead to mistrust. If you don’t understand the issue and the business well enough to be able to help folks understand why this is an issue for them it is better to do some research and learn how to explain things better than resort to FUD. I find the industry is awash with FUD these days making it even more critical to separate the fact from the fiction and be ready to explain to your leaders what is and isn’t an issue and why.
The goal here is to build trust and both work with the business and get the business to work with you. Draconian rules and regulations do not work. While policies and procedures are extremely important to establishing proper security posture, probably the most important thing actually, they need to make sense for the business and not get in the way of the business delivering on its mission. If they get in the way of the business or are a major hindrance, then folks will not follow it. Policies and procedures that folks ignore or workaround, are worse than nothing as I covered earlier.
I want to close this post by reminding that there is no easy button in cybersecurity. Solutions are aplenty and not difficult, just hard work that few are ready to take on. It is a lot of hard work that for the most part is neither sexy nor glamorous and takes a lot of business knowhow in addition to technical knowhow. If you know your business and your environment and have your hygiene taken care of it is a lot easier. Also remember that no threat model is the same, this is why you can’t just blindly follow some outsider recommendation that doesn’t understand your threat model.
Let us go over what zero trust is. This is the latest buzzword in the infosec/cybersecurity industry these days. This isn’t some tool you can buy to install so that you have zero trust despite what some vendors may want you to think. Yes, there is a system required to be able to reach full zero trust but like with so many other things in cybersecurity this isn’t simply about installing a gadget and now you’ve got zero trust. Vendor may sell you some system or set of systems and then go, BTW you need micro segmentation and catalog of who needs access to what before we can install it. I recommend thinking about this from the other angle, setup network segmentation, figure out your defense strategy, get a detailed catalog of all your system and who needs access to what, then you can think about the additional systems needed.
Zero trust is a philosophy or mindset, not just one thing. This isn’t something revolutionary new thing, rather an evolution of cybersecurity thinking.
It used to be that networks and security posture was designed with implicit trust, for example if you were coming from a specific network, then you were trusted and allowed to go places. If you came from this other place, you were partially trusted, etc. Once you made it past the receptionist you had full access anywhere, etc. Then people realized that this was sub-optimal and started segmenting things down, but there was still a lot of trust involved.
Zero trust is yet another evolution of this thinking. When you adopt zero trust, all your policies, all your design decisions and your entire secure posture has zero trust assumptions. That nothing in your policies, designs or posture has implicit trust built into it. You trust nothing and validate everything.
Many of the aspects of zero trusts have been around for long time, this zero trust concept groups them together and tightens them up under a single concept. This includes old concepts such as network segmentation, the concept of least access and defense in depth, aka layered defense design. Let us look at those concepts before we delve deeper into Zero Trust.
Layered Defense Design
Before layered defense, aka defense in depth came into the picture there was perimeter defense. You would put all your efforts into protecting your perimeter, or edge, of your environment. If someone broke through that they had free rein throughout your entire infrastructure. This was obviously sub-optimal so layered defense came to be. Many have compared this to the layered defense of the accent castles, and I find that very apt.
Take the above picture I found online searching for a good illustration. I can see several layers of defense here. In accent times it was not uncommon to have a large moat around the property, possibly filled with something hazardous like crocodiles, pariahs, etc. Then you have large, tall walls with sharpshooters on top and guard towers ready to stop any that try to scale the walls. Then if you made it across the moat and over the walls you had more security guards to contend with. Once you get past them you have several levels of locked doors to get through before you get to the room with the crown jewels in them. See what I mean by layered defense, once you breach one layer you have many more to content with. If we translate this online security, you start with your border firewall, then you have a DMZ firewall, followed by a segmentation firewall and finally a host-based firewall on the server. Additionally there should be access control lists throughout to restrict traffic. Ideally these firewalls are from different vendors to make things harder for the threat actor, aka criminal, aka hacker. If someone manages to breach your checkpoint firewall, they can’t breach the Fortinet firewall the same way. The name of the game here is the more layers you have the more likely it is that a threat actor can’t get in and if they do manage to get in, it will be slow enough for you to notice and kick them out.
Network Segmentation
This is really just an extension of defense in depth, and it involves splitting your environment into many smaller environments. The saying “don’t put all your eggs in the same basket” is very applicable here. If we go back to the castle analogy, do you think it would be better to have all your valuables in one large room, or split them up into multiple smaller rooms? Obviously, you want to split them into multiple different rooms, each with their own lock. The same applies to your network environment, how you segment is design decision and there is no one right answer. One popular route, high level, is to segment (or group) like things together. For example, one segment is payroll and HR system, billing system in another, common service (email, file shares, DNS, authentication servers, etc) in another, etc. It is always recommended that user systems are in their own segment, possible even one segment per floor per building. You would then control cross segment traffic through some sort of access control device like firewall, router ACL or ZTNA device (defined later). Typically only traffic from a user segment to a non-user segment is allowed, traffic between user segments, or between non-user segment is typically not allowed. There is typically no reason for HR systems to talk to customer billing system, or for one user system to talk to other user segments.
Least Access Principle
This is also sometimes known as role base access. This is based on the concept that no one has access to anything they do not absolutely need in order to do their job. Under this model, for example, the CEO of a company has access to very few systems as that is not required for him do his job. They may have access to some sort of a SharePoint type system or file share, where they can access their reports, plus the company email system. If principle of least access is correctly implemented the C-Suite (CEO, CFO, CTO, etc.) will likely not have access to anything else. Engineers will have access to engineering system but only enough to successfully perform their job, they won’t have access to finance system for example. For large engineering system where there are specific teams have specific responsibilities then their permissions should match that. Say there is a dedicated Linux team and another team responsible for Windows servers and third team responsible for desktops, then the Linux team should only have access to the Linux system and no Windows system, etc. Care must be observed here though not to have such strict rules it impedes work or forces employees into what is known as Shadow IT, where employees find their own workaround the strict policies to get their job done.
Zero Trust
Now let us get back to the concept of zero trust. The first step on your zero-trust journey is to re-examine all your policies and procedures and root out as much of built-in trust as you can. Pay particular attention to your access policies to ensure that least access is being used. You can’t get very far along your zero-trust journey without having a solid inventory of all your system and exactly who needs to have what sort of access to what system. If you don’t want to buy anything new you can get pretty far by segmenting your network, implementing defense in depth and least access. However if you are going to go full on Zero trust you need to implement Zero Trust Network Access (ZTNA) technology throughout your environment. This is a system that grants access to each segment based on the user profile. The user profile dictates exactly which resource that user is allowed to access. This is why that catalog I spoke of earlier is so important. All user traffic if funneled through this ZTNA devices and thus you can’t even establish a network connection to a particular server unless you have explicitly been given permission to access that server. All users would go through the same scrutiny regardless of where they are coming from.
In traditional system, internal users would have network access to all systems and only login credentials would determine if they got into their system or not. If the user was remote, they would first have to pass through a VPN system and get authenticate there before they could connect to anything, but once the VPN OK’d them, they were trusted as internal user. With cloud-based systems, mobile computing (smartphones particularly) the whole internal vs external started to blur and so did the concept of perimeter or border.
With ZTNA every user is treated the same, doesn’t matter if the user is in the office, at home or at a coffee shop. Also doesn’t matter if the application is in a traditional company datacenter or if it is cloud-based. The ZTNA system handles everything the same, you simply authenticate to the ZTNA system, and it connects you to where you need to go, assuming you have permission to go there, regardless of where you are at.
Today I want to write about what makes a good vulnerability management program. I see a lot of confusion out there where folks are thinking that they have a Qualys or Tenable scanning product therefor they have a vulnerability management program. Or they are performing penetration testing once or twice a year, or they are ISO 27001 certified, and the policies mandated under that constitute vulnerability management. This is very misguided thinking that does nothing to secure your company.
There are all sort of buzzwords flying around the industry where the focus is on one or two aspects that are sexy or exciting. Unfortunately, the work to secure your company is neither sexy nor exciting. It is a lot of arduous work. Because of how multifaceted the security problem is, there is no single solution. The more complex your environment is the more complex it is to secure it. You can either pretend nothing is wrong and have faith you will not experience a security incident, or you can put in the work to secure your environment and thus significantly reduce your risk of a security incident.
Unfortunately believing or declaring that you are secure does not make it so. If you do not want to burst your bubble that you are perfectly safe, you may want to stop reading. If you are ready to take on the arduous work to make your company as secure as possible then this article is for you.
If you want to get a sense for how you really stand, vs what you believe, you should check out my security quiz.
This is a large topic and could easily become a huge book, so to keep this blog sized, I will keep this article somewhat high-level. If you have any questions, need clarifications, or specific actionable steps, please reach out to me. Multiple contact options are listed on the contact us page.
So, what is it
Let us start with some definitions, setting expectation and such. First thing to point out, is that there is no tool you can just buy and be done with it and there is no easy button. Setting up a vulnerability management program and securing your system is a sizable undertaking, possible one of the largest undertaking your organization has ever undertaken. I say this not to scare you but to help you not underestimate the effort involved. Also, if you are a hosting provider it is unlikely you will be able to charge for this work. From a customer’s perspective this would be like charging for installing fire prevention system, or physical security system. You still want to do this because it is bad business to have your hosting customers involved in a security incident.
Also, just as with installation of physical security system and fire prevention system, calculating ROI is very challenging. To continue with this analogy, just like physical security system does not guarantee you will not be burglarized, vulnerability management does not guarantee you will be safe. Both offer you increased safety but there is no such thing as perfect safety.
Next thing to point out, is that compliance and security are two completely different things. There is a bit of a symbiotic relationship between the two, but they are separate entities. Work done under one can help the other, but thinking you are secure because you are compliant with some standard is a dangerous thinking. Similarly, just because you have all your security ducks in a row does not mean you are going to pass any specific audit. It is wise to think of these two as separate, distinct and independent.
As I mentioned in the introduction, vulnerability management is not just a one thing. It is combination of many things, such as:
Policies, Procedures, culture, and organizational structure
Asset and configuration Management
Patch Management
Event Log Management
Malware defenses
Risk and threat modeling
Vulnerability cataloging and remediating.
Want to point out again that none of this calls for buying any systems. This can all be done with what you already have. Depending on your staffing and expertise, there might be need to hire external help. There might be some systems that could make some of this easier depending on the size of your organization. The smaller you are, the more likely you can do this all without buying anything. To put another way this needs a lot of man hours but little in terms of purchasing budget. If you do not have enough in-house expertise, or your existing staff simply does not have the cycles to take this on you would need to bring in additional help, whether that be consultants or staff augmentation. Expense from setting this up should be 80% staffing expenses.
It is also worth pointing out that Disaster Recovery Planning (DRP) as well as Business Continuity Planning (BCP) play a pivotal part in securing the business and they are likely intertwined. The team that manages DRP and BCP need to work very closely with the security team, in many cases it might even make sense to have them be the same team. DRP/BCP is however outside the scope of this article.
Now let us dive into each of those aspects and explain in more details.
Policies, Procedures, culture, structure
It surprises many just how important all these pieces are to security of an organization. Sometime policies and procedures are included but it is exceedingly rare to see any thought going into culture and organizational structure, when in fact it should be other way around. If you have a strong security-oriented culture and everyone focuses on security first, polices and procedures are less important. However, policies and procedures that no one pays attention to, or is an afterthought is fairly useless.
Polices
These are documents that outline what needs to be done and when. For example, dictates password length, what should be logged, system access rules, etc. These are high level guides if you will, check lists of sorts of what needs to be paid attention to.
Procedures
Procedures take a policy and specifies how it should be implemented. Often known a Standard Operating Procedure (SOP) or Method of Procedure (MOP). Exactly how this is implemented can be culturally dependent. In some organizations SOP give generic, or templated instructions, where are MOP are more system specific changes.
Culture
As I mentioned before, culture plays a significant role in the overall security of the organization. Sometime this is also called the mentality of the employees. This is something that senior leadership cultivates and is a byproduct of their directions, directives and priorities and is more product of actions than words. Even if senior leaders talk about security being important, if they never allow any time or budget for it and are constantly pressuring to get the latest product or version out the door it is a ship-it culture not a security culture regardless of how much leadership talks about security. It is impossible to maintain a secure posture in a hard-core ship-it culture. If, on the other hand, every employee up and down the food chain thinks about security first and when a security issue is discovered everything stops until it is fixed, that is a security-oriented culture.
Senior leadership builds a security minded culture by insisting that all project plans have a security builtin from the beginning and throughout. Every project pitch should have a “how are we securing this.” Every employee and every manager are scored on how they are securing their project, their environment, etc. Security bugs have priority over functional bugs. Time and money are spent on security training applicable to each specific job as well as documentation. Every employee think “security is my job,” instead “security is someone else’s job.”
Organizational Structure
If you have a strong security culture this is less important. It is still useful to have a person or a team in charge of centralized overview. This person/team would make sure that the organization has what they need to support best security posture, oversee all security related policies, help coordinate risk & threat modeling, catalog vulnerabilities and coordinate remediations. Where this team is placed in the organizational structure is critical to its success.
For best success and effectiveness this person or team should be scoped with securing the whole company. If we return to the analogy to physical security, I have never heard of physical security be scoped to only parts of the company, so why would you only secure parts of your electronic assets.
Since it is scoped for the whole company, it should either be a standalone entity or be placed with other departments that work for the whole company, such as payroll, HR, finance, etc. Placing the security person or team at the bottom of the IT or hosting group is a recipe for disaster where failure is all but certain. This is because of human nature and possibility for conflict of interest. It is quite common for folks to ignore those seen as below them in the pecking order. Also this team can be seen as having an auditor function, and it is not possible for an auditor to be impartial when auditing their own boss. Again, if there is a strong security culture this is not as important, otherwise this is critical. Either way the success of the team is based on where it is placed in the org. If it is successful as just another IT team, it will be ten times more successful outside the IT function.
Most successful security teams are standalone groups that report directly to the CEO and have a strong influence over the head of IT/hosting. In corporate America this is often referred to as a dotted line reporting, where a team has more than one reporting responsibility. The head of a security team that reports directly to the CEO is often called Chef Information Security Officer (CISO) or Chief Security Officer (CSO). Title of this person is not as important as the function and the job of this person. What is most critical is that they are outside the divisions that have ownership over the systems and products being secured. So, if it does not make sense for your org to have this be a standalone function that reports directly to the CEO, then make it an administrative function that is in the same division as HR, accounting, and the like.
One other thing we need to touch on here, which I alluded to before and that is to keep compliance away from security. Here I am going to say that titles matter. The person in charge of all the compliance stuff, ISO27001, PCI-DSS, etc., should be called Compliance officer, and the person in charge of security should be called security officer. Even if you are small enough to have one person serve both roles, make it clear that they are two distinct roles, maybe even go as far as saying they have two 50% roles. In this case it might make sense to title this person Compliance and security officer. This is to reinforce that security and compliance are two separate things and reduce the risk of confusing the too. As stated before, confusing compliance and security risks reducing your overall security.
Asset and Configuration Management
This is underpinning and foundation for all security efforts. Simply put if you do not know what you have, you have no chance of securing it. This involves having detailed record of everything in the environment. Your finance department will hopefully have a part of this for account reasons (depreciation and stuff like that). This can be a good base for these purposes, but you need to go a lot deeper than what they need. For example, finance record will typically contain information about what we call financial owner, which is who purchased the system and who bears fiscal responsibility for the system. For security purposes we also need something we call operational owner. This tells us who is responsible for day-to-day operation of the system, specifically who is responsible for fixing it if it breaks, who patches it, etc. Fiscal owner and operational owner could be the same group, but usually it is not, so it should be tracked as two owners even if it is the same. You might also find make and model information in the financial records, but I would not expect to find much beyond that.
A good asset management system has the following pieces of information about each system.
Asset Name
Make and Model
Physical location of the device
Owner information (both financial and operational)
Operating system and version
Every IP address of the system, whether that is one or hundreds.
For a really great system you need to go a lot deeper and upgrade to what is often referred to as Configuration Management Database (CMDB). This is simply an asset management system on steroids. In a great CMDB you capture every little detail about each system. No detail is too small for a great CMDB. This is also one of the tie ins to a strong BCP/DRP. Here are just some of the things that need to go into a CMDB.
Serial number of the asset
Asset Type (server, network gear, ADC, firewall, etc)
Installed hardware components. The more detailed the better
What hard drives are installed (Size, make, model, Serial number)
What NIC’s are installed (make, model, interface type, MAC address, etc) which IPs live on which NIC.
Video cards make, model and capabilities
Processor and memory
Installed software components
Any software components installed on top of the OS?
For Servers think about:
Database software such as MySQL, Microsoft SQL, etc.
Web server software like TomCat, Apache httpd, IIS, etc
Middleware software like WebLogic
Other components or framework like dotNet, PHP, python, log4J, etc.
For desktops think about:
Office
Adobe
Browsers
Collaboration tools such as Slack and Teams
Developer environments
System criticality indicator on a scale, either numeric or (1-10, 1-5, etc) or word list (High, medium, Low, etc)
Dependency map. What assets depends on this asset and what assets does it depend on. It would be very unusual for an enterprise server to be truly standalone.
Lifecycle state (pre-prod, production, decom, etc). This is an informational only and should not play into scoping, etc.
When I say each system, I am talking anything in your network (if it generates traffic or accepts connections it needs to be tracked), this should include cloud assets as well. This could prove tricky considering the ephemeral nature of the cloud and might require integration into the cloud providers control panels.
If you are small enough you should be able to track this in a spreadsheet. If you are bigger you might need to invest in a commercial or open-source asset management system suitable to your organization. Either way you will find that some sort of discovery engine and other automation can greatly help with this effort. These are widely available both as commercial products and free open-source products. There are also number of frameworks and packets available to enable you write your own discovery tool to suite your needs. The only way to obtain 100% accuracy is to use some sort of a discovery, as that can catch the system that Joe user installed without documenting anything and other cases like that. Many years ago I wrote a quick and dirty discovery system in Perl because my employer didn’t have any asset management and was going to fail an audit unless they produced something. So I know it is possible to do this with nothing but your existing staff.
You can not count on automation to do the work for you as I have never seen any automation that can provide dependency map, system criticality, lifecycle state, physical location, ownership, etc. As stated, before spending money on commercial product is optional, a lot of time implementing, collecting, and recording is required either way.
In the end you should be able to answer the following questions at a moment’s notice with 100% accuracy:
For any given IP address, specify who owns it, what it is (make/model/type), what OS and what software is installed.
Produce a list of all system running particular OS, particular application, or a particular framework/package.
Produce a list of all system of particular type, make or model.
Produce a list of all system with a specified NIC or other hardware component.
Another part of this that is often overlooked is change management. Part of this is always knowing what changed when, both for security and incident management purposes as well keeping the asset management up to date and correct. If you spend hundreds of man hours building the perfect CMDB but you never update it, then it will very quickly become obsolete and useless, and all that time is wasted. The CMDB should be updated with each change to the environment and event logs (see further section) should be leveraged to ensure change management policies are being followed, as well periodic discovery scans.
Patch Management
It could be argued that this is really just a subsection of Policy and Procedure, but it so critical that I felt it was needed to call out separately.
This is about having a solid policy and procedure around who is responsible for keeping all the system patched and up to date on a regular basis. How frequently things are patched and by whom. I would advocate for patching things at least monthly if not more frequently. There are a lot of security incidents that can be traced back to outdated systems. Experian US Credit reporting agency experience a huge breach in September of 2017 which is largely attributed to negligence in keeping their system patched.
Like all aspect of vulnerability management this depends on excellent asset management, because if there is a system in your network that is not being maintained properly because that one guy that installed it and did not document it has left the company, it could be leveraged by cyber criminals (also known as threat actors) to compromise your whole company.
Proper prioritizing is a key aspect of any good patch management program, this prioritization is often built on top of the critically field in the CMDB. It is critical that your patch management program can get through patching all your system in a timely manner. If there is a sense of falling behind in your patching, the patch management program needs to be re-evaluated.
Also note that there are often cases where system cannot be patched, in these cases you need to have compensating control that limit the exposure and risk of the system. See the section on Risk and threat model for more details.
Event Log Management
This is your monitoring system. You can equate it to video monitoring system in a physical security system. If you are not monitoring your event log you are completely blind to what is going on in your environment and will not have a clue if a security incident is taking place. Some call this blissful ignorance; others call this the Ostrich method. I call this willful stupidity and what you do not know will hurt you.
This is a complex topic and there is no way to do it justice in a blog article. Here are some of the things to make sure you are capturing:
All authentication event (both successful and failures, all types such as local, interactive and network)
Who talks to who
Where the traffic egressing to
What applications are being used, how and when.
Here again is where strong CMDB is critical. It is critically important to know what applications are in use in your environment as well as how they are used and when. Knowing this will allow you know when something is a miss, which is usually an indicator of compromise or a threat actor in your network.
This will likely generate a large flow of data, and rather than trying to watch each event, establish a baseline and trends. Then when things deviate from norm, that is when you investigate. Also look for weird patterns and absence of data. System suddenly stopped sending logs, or is only sending 10% of normal volume, investigate. System suddenly went months out of sync, which is weird so investigate.
These can all be accomplished with free open-source system and some in house development. This is one area where spending more on system can save you on man hours. However, do not be fooled to think that some fancy SIEM system will eliminate the need to spend a bunch of man hours. Yes, it will reduce it, maybe even significantly, but you still need to spend a lot of time and effort tuning the off the shelf system to your environment and to your needs. If you develop your own, you create it based on your needs, off the shelve products need to be customized to your needs. Either case there is significant effort required for tuning.
Malware defenses
This one is a bit contested as this has become a lot less of an issue than it once was and there is heavy debate about how useful it is vs how easy it is circumvent. Most security experts are still advocating heavily for strong malware defenses, and I am one of them. Malware is a term that includes a lot of malicious software, such as viruses. I have a separate article that explains the concept of malware in more details. Suffice it say this is something you want to keep out of your environment for multiple reasons. Having strong anti-malware software, such as F-Secure, Crowdstrike, Sentinel One, etc., installed and configured properly is a critical aspect of your vulnerability management program. Investing in the EDR/XDR functionality of your chosen anti-malware vendor is usually a worthwhile investment for most organizations as it aids with the visibility issue. One just needs to be careful not to become overly reliant on any one tool as that can give one tunnel vision.
Risk and threat modeling
I have a separate blog on this as well, but I will cover it briefly here as well for sake of completeness. First, we should cover the relationship between Risk, threats, and vulnerabilities. This is a simple multiplication formula where risk is vulnerability times threat. Let us do another analogy for this. We are all vulnerable to gunshots, so if someone wanted to shoot us, we would have a big problem. So, if someone were to threaten to shoot us, we would have a substantial risk. How big of risk would depend on how credible and big the threat is. So, let us talk a bit about how to evaluate your risks
Figure 1: Threat Venn Diagram
This diagram illustrates the connection between opportunity, means and motive to threat. Crime fiction aficionados may recognize some of these words. This is because crime and threat are the same thing, simply different time point. Threat is a crime that has not happened yet but might be happening. As any crime fiction aficionados knows you need three things for crime or threat to be present. The criminal or threat actor needs opportunity, intent (aka motive) and capabilities (aka means). If we return to our shooting scenario, if someone wants to shoot you, they have intent but if they do not have access to a gun (and know how to use it) and they cannot get close enough to you to shoot you (this will depend on how good of a marksman they are) there really is no threat. On the other side, someone that is an excellent expert shooter could be right next to you all day carrying a gun but if they have no desire to shoot you then there really is no threat either. These could all change at any time, so this is a very fluid thing and not a fixed or static thing.
Let us look at a different scenario from the physical world. Let us say someone threatens to extort you over something. They send you their proofs to demonstrate their point and threaten to release it to both social media and traditional media unless you do as they say. You validate that the threat is real, they have the means, motive, and opportunity to do as they threat. However, the material they are threatening to release is insignificant to you and you really could not care less if they sent it to the entire world. Therefor you are not vulnerable to their threat. Even thought the threat when represented numerically might be a high number, the vulnerability is approaching zero so the multiplication of the two is near zero. So, your risk is minimal.
One thing to keep in mind here is that you can never say that either risk or vulnerability is absolutely zero, therefor risk can never be totally zero. Best case scenario is to have minimal risk, there is no such as no risk anymore than there is no absolute security.
The concept of risk and threat modeling is all about going through the exercise of cataloging all the possible threats your business could face, scoring them and lining them up with your vulnerability catalogue (more on this in next section) to find out what your overall risk profile is. This is typically well above the risk appetite set by senior leadership, so you set out to remediate either the vulnerabilities or the risks. This is best done in close coordination with your risk management team or whoever is responsible for you BCP/DRP. Also, as with the other sections having a solid asset management is crucial, because if you have unknown system in your environment, you have unknown risk which can be fatal.
The resulting risk catalogue is a very fluid thing and should be refreshed frequently.
As you work to remediate various issue there a lot of ways to accomplish this. You can reduce the vulnerability, this is often accomplished via patching, or you can minimize the threat by reducing the opportunity or capability to exploit the vulnerability. This is known as compensating controls. Two of the most common means for this is to turn off services that are not in use or use some sort of access control to limit the access to the service that is vulnerable, usually through the use of firewall. In the interest of keeping this blog from getting even longer I will leave the discussion of compensating control to another time.
Vulnerability cataloging and remediating
This is part that many folks think is all they need. I put this last in the article on purpose as this should be the last thing you do in your journey to a solid vulnerability management program. This is because it is always best to build the house after you finish the foundation and all the utilities, power, plumbing, etc. is ready to go. Ever see a house builder start on the house before they finish the foundation and try to retrofit plumbing and utilities midway through or after the house is up? Trying to build your vulnerability management program by starting with this step will work equally badly.
This part involves having some sort of catalogue of all the vulnerabilities across all your systems. The most popular way to accomplish this is to purchase a vulnerability scanner from either the Qualys or the Tenable company. However, you can also accomplish this via the home-grown way. Either way you need to have a powerful asset management as the foundation, especially if you try to go the home-grown route. Both Qualys and Tenable Vulnerability scanners have a powerful discovery engine as the core of their products. Qualys will even sell you an Asset Management solution on top of their Vulnerability Scanner. I have seen way too many organizations try to use these products as a shortcut to overcome lack of asset management and it has always ended in a big struggle. Their scanners will tell you what you have in your environment, but they cannot tell you where it is, who owns it, how critical it is, etc., which are all critical in remediating them. Spinning your wheels for hours trying to figure out owner info, etc., is maddening, especially when those hours could be used remediating more issues. Their scanners can log into your asset and perform a brief inventory on them, assuming you know what credentials are required on what systems. I have seen many instances of this being insurmountable challenge.
If you have a strong CMDB already built, that you have validated with some sort of discovery engine is valid, you can save money on Qualys or Tenable products assuming you are willing to invest in some internal dev efforts. All you need to do is create automation that compares your CMDB to the NVD and to the guidelines published by the like of CIS, OWASP and more. This will give you a rudimentary list of all the things you need to address or remediate. This will not be as detailed as the data you get out of Tenable or Qualys vulnerability scanners, but should be sufficient. On the plus side you might get heads up quicker from your home-grown tool of new issues that are important to you as it takes time for the big vendors to write detection logic for new vulnerabilities.
All vulnerabilities in the world are collated by an institution in USA funded by the US Government. This institution is called National Institute of Standard and Technology (NIST) and it deals with all standards, processes, and procedures for the US Government. For more accurate description check out https://www.nist.gov/about-nist. They compile all the vulnerabilities discovered into something called the National Vulnerability Database (NVD) where each vulnerability gets assigned an identifier called CVE. The whole cybersecurity industry operates on the NVD, and the CVEs are what we use to identify what we are talking about. By integrating your CMDB into the NVD you can get notification the moment a new CVE is published for something you are using. I recommend doing this even if you have a vulnerability scanner from Tenable or Qualys as this will give you heads up days or weeks before those products can scan for it. I have a python script that interacts with the NVD API for this purpose, and I would be happy to share it with anyone who wants to use it as the bases for these efforts.
Once you have your vulnerability catalog you need to work with your management and the business risk team to prioritize the remediation of these vulnerabilities. Depending on the product used you may have multiple datapoints indicating severity of the issue. These are very generic and may not be applicable to your environment. You need to work through the list and establish your own prioritization, decide what you are going to patch, where you have compensating controls, etc. Having a CMDB that tells you how critical a system is, who owns it, where it is, etc., will make this process much easier.
One last point on this: Goals, and metric around eliminating all (or even most) vulnerabilities are very unrealistic goals especially for larger orgs. If you examined the pace of new CVEs being released, you will understand why.
As I said in the beginning, if you have any question, need clarification, or help scoping out the problem please do not hesitate to reach out. My contact info is on the contact us page.
Penetration testing
One final note of caution, until you have your vulnerability management program in place and have remediated all your most critical issues (however you choose to define that) do not waste your money on penetration test, unless of course it is required for compliance reasons. I know it is the cool thing to do these days because all the cool kids are doing it, but it is unlikely to give you any added value until you have cleaned up your house a little. They will end up costing you several tens of thousand dollars (or euros), money better spent on other things I have called out here.

 Reading Time: 4 minutes