
 Reading Time: 8 minutes
Introduction
In this article I want to continue with the non-cybersecurity topic of sending notifications from your python3 scripts. Last time was sending slack messages, in this one I want to cover sending email messages.
Here are the features I wanted:
- Configurable To, From and Subject
- Configurable custom email headers
- Full support for HTML email body that is RFC compliant, including a text only alternative
- Be able to accept a large text block (formatted or not) that gets turned into an email attachment
- Does not trigger spam filters
The Script
I’m happy to report that I now have a python function that does all that, and you are welcome to use it if you want.
Just grab it from my GitHub at https://github.com/siggib007/Utils/blob/master/SendHTMLemail.py and copy the SendHTMLEmail function along with any of the support function that are useful for you.
Some of the functions in this script are simply to aid in the testing of the send function, for example the main function is strictly for testing purposes and has no purpose other than generate test data, compose the HTML body, and call the send function. Others like csv2array, array2html and array2MD could have production value but were created just to generate test data.
I highly recommend you have some sort of function for event logging, the SendHTMLEmail function expects a function called LogEntry to handle event logging. For testing purposes LogEntry function in my test script simply writes these messages to the console, you may want to do something more sophisticated.
The one other function in this script you absolutely must have, is the remove_tags function. If you want to run this script unchanged you also need to have a CSV file, in the same directory as the script, called URLResp.csv, which is semicolon separated, not comma separated. The file name and separator can be easily changed at the top of the main function. This CSV file contains the test data for the HTML table the script creates for the test email. The name of this CSV file is also used as the filename for the attachment, you can also easily pass a different file name when you call the SendHTMLEmailfunction in the main test function or whatever function you are calling it from.
Make sure you have the bs4 library installed prior to running this, as the remove_tags script depends on it. If you don’t have it installed execute pip install bs4 from the command prompt or console. You also need to make sure all the includes in my test scripts are in your script.
How to use
As-Is testing
If you simply want to test this script as-is, without changing anything in the script, you need to do the following:
- Download the script from https://github.com/siggib007/Utils/blob/master/SendHTMLemail.py into a local directory. Here is a link you can just save directly, https://raw.githubusercontent.com/siggib007/Utils/master/SendHTMLemail.py
- Place any CSV file that is semicolon separate in the same directory and name it URLResp.csv
- Alternatively you can download the CSV I used in my testing here https://raw.githubusercontent.com/siggib007/Utils/master/URLResp.csv
- Have the BS4 library installed
pip install bs4
- Setup the following environment variables. I recommend you use Doppler for that for maximum security. See my article on Secrets Management for details on how to do that.
- EMAILUSER: This the username the script should use when logging into the SNMP server
- EMAILPWD: The password to use when logging into the SNMP server
- EMAILSERVER: The FQDN of the SNMP server
- EMAILPORT: The TCP port number that the SNMP connection should use
- USESSL: Whether the SNMP server supports full SSL or TLS connections (True or False)
- USESTARTTLS: If the server doesn’t support full connection security, can it switch to a secure connection post connection, known as StartTLS. (True or False)
- Execute the script with
python3 SendHTMLemail.py- If you are on Windows you need to use python or py, instead of python3. Basically execute this like all your other python scripts.
- Unless you are using MailTrap (see next section, Testing with MailTrap) you won’t actually see any email unless you also change line 230 in the script to be a real email address you can check.
Production use
Start by taking care of the first four steps in the section As-Is testing above. As mentioned before, to use this in your production script you need to copy SendHTMLEmail function and the remove_tags function. Additionally you will want to have a LogEntry function that handles event logging the way you want to, or you can copy it from my file and simply write logs to the terminal.
Then your script needs to compose the message body and the attachment if you want to include one. Then you just call the SendHTMLEmail function with the following parameters in this order:
- Email Subject, as a simple string
- Message Body in HTML format, as a simple string. Note: A string doesn’t have to have HTML formatting to be a valid HTML string. However <br> is required at the end of a line you want to break. Normal line breaks are not rendered in HTML, only the text only view.
- Name and email address to send the email to, in the form of “Joe User joe.user@example.com”
- Name and email that email should come from in the form of “Joe User joe.user@example.com”.
- Make sure the SMTP server you are sending through has the proper SPF/DMARC records to be authenticated as authorized to send email for the domain you are using. Otherwise the email will be considered spam by pretty much every email service out there. For example if you are sending through your Gmail account, this email address needs to be configured as a send-as email in your configuration. If you are using your work email service you may need to check with your email administrators, but it likely needs to be your work email domain. If you are running your own domains and email server or you are the email administrator, you most likely didn’t read anything beyond SPF/DMARC 😀
- List of custom headers to add to the email. Each list element should be a simple string in the format of name: value pair. For example “X-Testing: This is my test header”.
- See how I do this in my script by looking at how I create
lstHeadersin the main function, starting on line 222.
- See how I do this in my script by looking at how I create
- Email Attachment in the form of a simple string. This would be the content of the attachment file, appropriately formatted for the intended file format. I assume this would be created by your script but could be read in from a file as well. Only text formats are supported, binary attachments have not been tested.
- Filename you want the attachment to have, the script will not create the attachment if you leave this off. It is up to you to make this filename appropriate for the content. If you generate a HTML attachment but name the file MyFile.txt the recipient will by default, just see the actual HTML, not the rendering as one might expect.
Here is an example of how you might call the send function assuming all the above have been assigned to appropriate variables.
strReturn = SendHTMLEmail (strSubject, strBody, strTo, strFrom, lstHeaders, strAttachment, strAttachName)The function will return either the one-word string SUCCESS upon successful execution, or an error message, which you can then process and handle appropriately for your needs. See my script for an example of how I do this, function main starting on line 253.
You should now be in business, feel free to reach out if you have any questions. Now let’s talk about a great way to test that your script is generating an email that looks the way you want and is unlikely to be sent to the spam folder, etc.
Testing with MailTrap
During the development of this script I found a really cool test service that allowed me to confirm that the HTML was well formed, the custom headers were showing up, spam score was low, etc. Yes, I could have used Gmail for this but MailTrap made this task so much easier. It acts as an SMTP server with a nice web UI and while it receives emails just like a SMTP server it doesn’t do any relying. Regardless of what address is specified in the To field then email will be delivered to your MailTrap inbox, where can forward it someplace else if you are a paid user. I’m just a free user so I couldn’t test out that feature, or any of their other premium features. Also MailTrap doesn’t do any SPF/DMARC checks, so you don’t have to worry about your from address either to begin with. What I did is I tested everything else, then I set the from address to actual from address that belongs in my environment and sent through my production email service, with my Gmail account as the to address to confirm that it would pass SPF/DMARC.
Here are some screenshots for you from MailTrap to give you a better sense of what it gives you. Please note that I am in no way tied to them, nor do I get any compensation if you use them. I just like to share tools I find helpful.
Main screen with HTML rendering
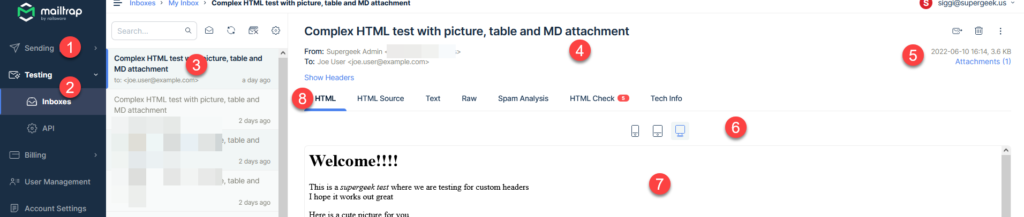
Notes:
- Sending: This is a separate product you pay separately for and has nothing to do with email testing. This is intended for those that need to send out mass email marketing campaigns. This really confused me at first, which is why I am calling this out
- Testing function is where you will be spending your time, specifically in the inboxes. As a free user you only have one inbox, paid users can have project specific inboxes and lot of other features I haven’t explored or tested.
- This is your list of messages that have arrived in your inbox.
- This is where all the basics show up: Subject, from, to, etc.
- Date and size of the email as well as any attachments in the email
- Choose the viewing simulation: cell phone, tablet, or computer
- This is the body of your email. This view will change based on the chosen tab by #8. In this view HTML rendering is chosen.
- What details you want to see, HTML rendering, HTML source, etc. Will cover this in more detail in a bit
HTML Source
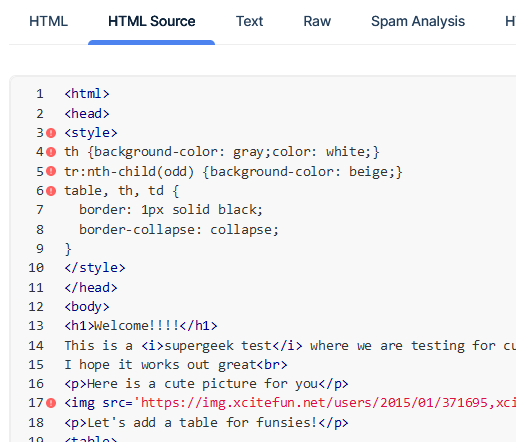
In this tab you can see how the HTML source came through in your email. The red dot next to a line indicates that this may not be correctly interpreted by everyone. Details on the HTML Check tab
Text screen
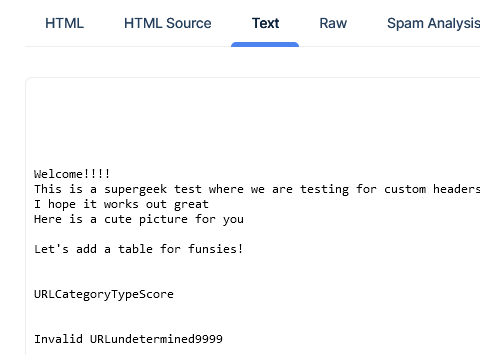
If you provided an alternative text only body, which my script does by stripping out all HTML formatting, that text will show up on this tab.
Raw Email
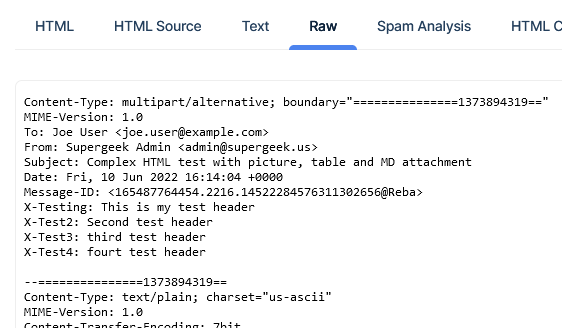
On this tab you can examine the raw email
Spam Analysis
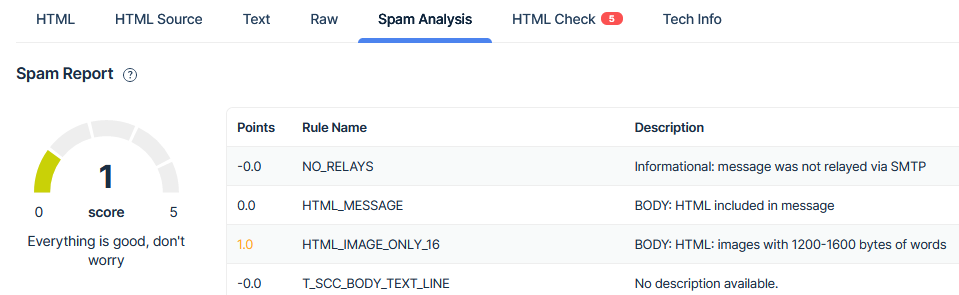
Here MailTrap will tell you how your email will be scored by leading spam detection engines. You can see that my test email is getting docked a point for having an unfavorable image to text ratio. You can see on the meter to the left that a score of 1 is nothing to worry about. If you are a perfectionist like me, you might be tempted to tweak your message in an attempt to get zero.
HTML Check
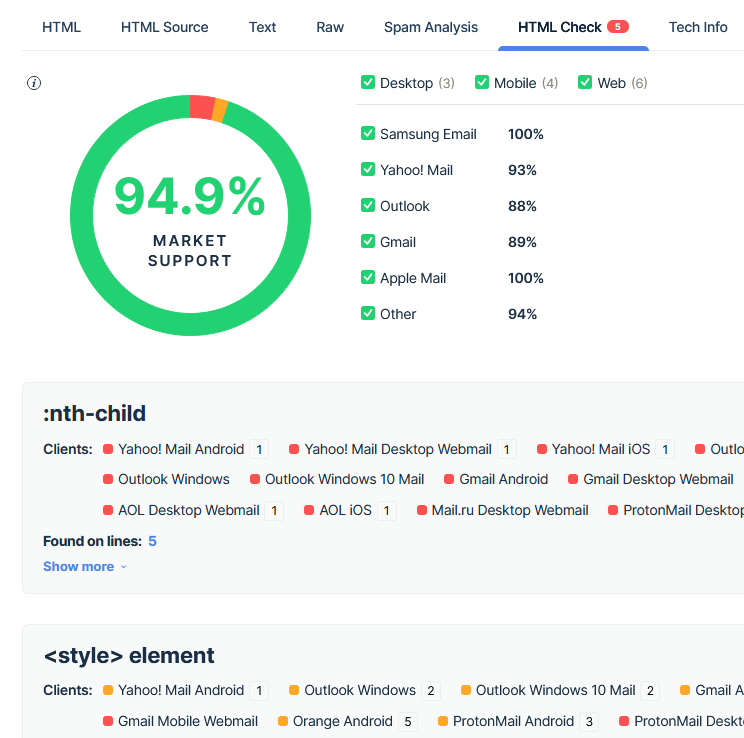
If you have any red dots in the HTML source tab, they are explained on this tab. Here it is telling me that my test email should render correctly on 94.9% of email clients out there, others there could be some styling issues. You can then decide if you want to chaise that last 5% or call this good. I did verify this by using my ProtonMail account as a destination, and the table didn’t look identical to the way does in Gmail. However it was nothing that detracted from the message, had there been a message.
Tech Info
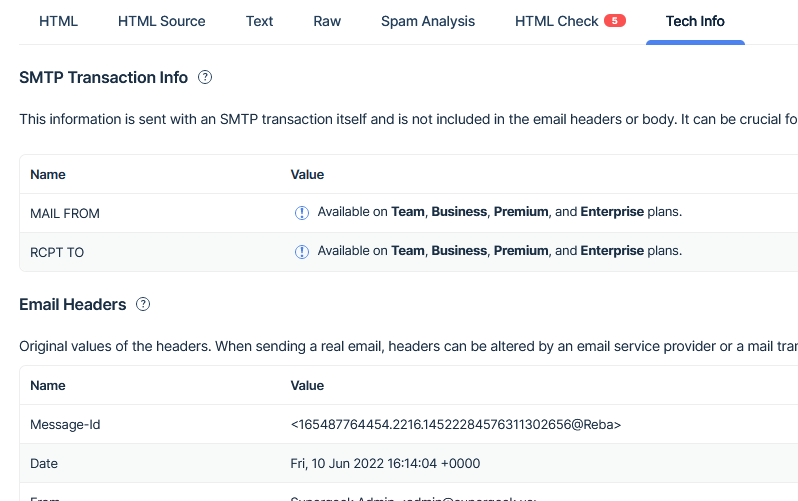
On this last tab you get all the header details nicely broken out for you. Also as you can see certain paid accounts also get some additional data.
Closing
Hope this has proven useful for you. Don’t hesitate to reach out if you have any questions.