
 Reading Time: 14 minutes
Table of Contents
Introduction
In this article I want to talk about managing your secrets. No, I am not talking about secrets your BFF told you and folks might be gossiping about, such as who is kissing who, who is crushing on who, etc. You are on your own when it comes to managing those secrets. What I am talking about is much more important and that is secrets in the computer world. Not to imply that your BFF secrets are not important or critical, just that computer secrets are even more important.
So what is a computer secret? It is a generic term covering few different things. Most commonly it is a password but might also be a PIN or a key (API Key, crypto key, certificate key, etc). It is something that gives a person or a device access to some sort of a computing or storage device and helps identify who or what is accessing it and whether or how much access to grant it. A computer secret is something that must be kept secret so not to compromise the security of a computer system somewhere. This is why it is critical to never share these types of secrets with anyone, like ever. If you want to learn more about what the US government considers secrets and how they want you to handle those, check out NIST SP 800-63b, just be ready for some very dry technical specification reading and have your favorite stimuli handy (whether that is coffee or something else). Secrets are detailed in section 5 of that document.
While secrets can mean a lot of different things, I am going to focus this blog on managing secrets used while developing scripts, application, and other automation. Look to some other blogs of mine for advice on managing your personal passwords and things of that sorts.
Why Manage your secrets?
So why is managing your secrets important, especially the ones used in your applications and scripting you ask. Well first off, knowing what secrets you have and where they are used should be an obvious benefit. Second, when using a secrets manager you have a single place to maintain your secrets, update them and such. Traditionally these are kept in plain text files, unencrypted for anyone to read, and scattered all over the place. Putting your secrets on a piece of papers, scattered all over the place, just laying around for anyone to read is not very smart. Same goes for computer secrets. With secrets manager they are stored encrypted, so they cannot be casually read, and only decrypted as needed.
If you have to update a secret for whatever reason, finding everywhere it is used, and update it can be a big pain. As mentioned before, with a secrets manager you just update it in one place and everyplace that is using it gets the update right away.
You can audit who is using what secret and from where, as any decent secret manager will have logs that give you that information. This can be important in compliance audits or during an incident response, or even be an indication of compromise. As in “wait I thought Joe was on vacation, so why is Joe’s dev machine fetching secrets?” and other interesting questions like that can be pondered. This is not possible when you store your secrets in configuration files all over the place.
And one of the best reasons, is that if something is fishy you can just quickly revoke Joe’s dev machine access, preventing it from accessing the secrets manager, and its secrets, until you get a chance to talk to Joe. If everything is kosher Joe just quickly re-authenticates to the secrets manager and is back up and running in no time.
Options
There are a lot of great options out there and there is great write-up on it at https://gist.github.com/maxvt/bb49a6c7243163b8120625fc8ae3f3cd but I want to take a slightly different tack.
I took a look at the following solutions
- https://www.akeyless.io/product-secrets-management/
- https://www.vaultproject.io/
- https://www.beyondtrust.com/devops
- https://www.conjur.org/
- https://delinea.com/
- https://www.doppler.com/
- https://dotenv.org/
And found them to be confusing and complicated, with one exception which is Doppler. Many of the options out there are product or environment specific. They only track AWS secrets, or only Docker secrets, etc. For example DotEnv, despite hyperbolic claims about being universal and simply, is focused on experienced Node.js developers. Others are so complicated and convoluted that they make your head spin, and it takes you a full day just to get it setup and configured. Then several days to figure out how to use it properly.
Some are open source and free, which is great until you realize the added complications that brings. You have to figure where you want to run it from so that it is accessible by everyone and everything that needs access, do you need to dedicate hardware or virtual machine to it, or do you load it on another machine and if so, what impact will that have on the existing application. Dedicating hardware or a virtual machine is rarely free. This brings to mind the old saying “there is no such thing as free lunch.” As you dig into it you realize that FOSS (Free Open-Source Software) is anything but free once you factor in your time and the hardware cost. I did not invest any time into evaluating FOSS options, beyond reading about them on their websites.
The Doppler advantages
What I loved about Doppler is that it is simply, straightforward, and easy to use. It is universal and generic and has integrations into dozens of other systems, both cloud and devops systems. It does not care if you are tracking stuff for AWS, Azure, GCP, Docker, or just your little python scripts. You can read about all their integrations here https://docs.doppler.com/docs/integrations.
I was very skeptical when I read on their website that I could be up and running in four minutes. It did take me probably closer to 10 minutes, but then I can be slow at times. I had my first POC using Postman in maybe 30 minutes and had completely rewritten one of my python scripts to leverage Doppler rather than a configuration file in matter of few hours, which included a learning curve. Someone smarter than me and more up to speed on all the devops lingo can probably do it in half that time if not faster.
Doppler is organized into projects which have environments (dev, staging, production, etc) which have configurations. The way Doppler works and is structured makes it so that I find it a perfect way to store all configuration items, not just the secrets, because their secrets are just a key value pair. This is how I changed my test script, I totally got rid of the configuration file (.ini) and the sub that read and parsed it, and just read it all from Doppler.
And the best part is that for a hobbyist like me, and even if you are a small team of up to five developers and you do not need any of the advanced features, it is totally and completely free, like forever. Second thing I love about that is that their lower tiered pricing is spelled out on their website. I find it so irritating when a company will not give you any ideas what the product cost and you have to subject yourself to a sales call just to find out if the product is even remotely within your budget. I so appreciate companies like Doppler that are transparent about their pricing. Also their free tier is very generous. As a free user you get the following forever:
- 100 Projects
- 10 environment per project
- 50 configs per environment
- 1000 secrets per config
My take is that if you need more than fifty projects, you should really spring for the teams paid plan. The main thing you give up by being on the free developer plan, are advanced permissions/access controls, alerting, enhanced logging, and priority support. Also higher limits on some things.
You can read more about their pricing at https://www.doppler.com/pricing and limits at https://docs.doppler.com/docs/platform-limits.
They say that if you use this link https://doppler.com/join?invite=E3579D31 to sign up you get $100 account credit. If you are like me and do not see any need for anything beyond the free developer plan that may not matter to you, it certainly is of no use to me. So if you prefer you can also just sign up here https://dashboard.doppler.com/register without that pesky account credit.
If you have question about just how secure it is, check out https://www.doppler.com/security.
Walk-through
Intro
I will now walk you through how to experiment with Doppler using my python script. I will attempt to break it down to a basic level so everyone can follow along, no matter what your skill level is. Here are my perquisites and assumptions:
- You have created a Doppler account
- You have a machine that can access the internet and run a python version 3.x script (hint: check out https://www.python.org/downloads/ if you need to install python on your machine)
- If you want to build a new virtual machine, either in the cloud or locally, you have already done that.
- You are comfortable with command prompt aka terminal window and running commands there
- You are comfortable running python scripts; you do not have to understand them or be able to write them just run them. (Hint: depending on your operating system it can be python3 filename, py filename or simply python filename.
- Comfortable downloading files from GitHub and putting them in a project directory.
Script info
The script I am using in this demo uses as really cool API from a company called Cyren, who trace their origins to one of the earliest anti-virus companies. Today they are still in the malware and virus prevention business focusing on the enterprise market. The API I am using for this demo is a rather simple one, you feed it a list of URLs and it classifies the URLs for you. In my demo script I take that classification, give it a score and a type. For example, sites classified as botnet, cryptocurrency, or spam sites, I give them the lowest score possible and type it as a “be alert” because there is a strong chance it is a fraudulent site or even malware laced site. Dating sites I give a medium score and type it as a warning as it may not be business appropriate. Other categories such as Education, Finance and Business I give a high score and type it as good. One could then, in theory, take the output of this script and integrate it with business automation, proxy configuration, etc., to decide whether you allow traffic to/from that site. You can get a free access to this API direct on Cyren’s website. The free account has a lot of limits which do not matter for the sake of the demo. More on that later.
The script and supporting files can be found on my GitHub under https://github.com/siggib007/python/tree/master/Cyren
My Setup
I did my initial experimenting and development on Windows 10, and then I did a POC using a virtual machine (aka compute object) in Dreamhosts public cloud call DreamCompute. They are quite easy to use and inexpensive cloud providers. I spun up an Ubuntu 22.04 1 vCPU, 2GB RAM and 80 GB disk, four days ago and suspended it 2.5 hours later when I was done playing with it and I now owe Dreamhost $1.50 for that. For those more technically curious, DreamCompute is just a private labeled RedHat OpenStack implementation. You can spin up a new machine in about 5 minutes, way faster than doing so in VirtualBox or VMWare on your local box. There is console access in DreamCompute, but the best way to use the servers you spin up there is to connect via SSH. Using DreamCompute is an advanced topic that may seem daunting to beginners. I am not going to go into more details on how this or virtual machines works in this article as it is not required. This is just an explanation of my setup, not any sort of setup requirements. You should be able to use whatever you already have.
You should be able to play along regardless of what operating system you are running. Doppler has a decent documentation at https://docs.doppler.com/docs/install-cli in case you need it. The only complaint I have about it is that it seems to assume all windows system have the scoop package management system already installed which is completely false assumptions.
If you want to follow along on a windows box start by installing scoop from https://scoop.sh/. Also the documentation does not tell you that on windows you have to use scoop to update Doppler on your box, so you need to ignore the “doppler update” command in their instructions. With that in mind you can just use the instructions on https://docs.doppler.com/docs/install-cli for window for installing Doppler CLI on your windows box.
If you want to follow along on a Mac, I am sure you will do fine, but you are on your own to tweak the few things that need tweaking for MacOS as I have no idea how to do this on Mac.
If you want to follow along on Linux grab yourself an Ubuntu (or another Debian flavor) box. If you only have a RedHat/CentOS box, just remember that I am using Debian commands and to change them to the appropriate RedHat commands.
If you want to use this opportunity to play around with DreamCompute and thus be in the exact same environment as I am, head to https://www.dreamhost.com/cloud/computing/ and sign up for an account. Then go to Compute -> Instances and launch a new instance (Ubuntu 22, gp1.supersonic). Again the details of how to do this is beyond the scope of this article.
Regardless of what OS you decide to use make sure you have python 3 installed, if you don’t head to https://www.python.org/downloads/ and get it installed.
Base Setup
OK let us get cooking. If you have not installed the Doppler CLI, do so now following the instructions for your operating system at https://docs.doppler.com/docs/install-cli. If you have any issues with this step, reach out to Doppler support. All I can tell you is I installed it on one Windows 10 machine and three Ubuntu boxes without an issue, which was not self-inflicted at least 😀
Let us start by validating your python install is good, note that is a capital V.
ubuntu@cyren1:~/$ python3 -V
Python 3.10.4
ubuntu@cyren1:~/$
That looks good, something close to that version is good. Most important is that it is at least version 3.x. If this command does not work for you, you need to solve that before continuing.
Next let us validate Doppler version, here it is a lowercase v
ubuntu@cyren1:~/$ doppler -v
v3.39.1
ubuntu@cyren1:~/$
That looks good too, the version number does not have to match something equal or great is fine.
Now we need to create a project folder, download two files, and create one file. I created a folder called cyren in my home folder so the absolute path for me is /home/ubuntu/cyren, you create whatever folder you want and name it what you want, just adjust the paths in my examples accordingly.
ubuntu@cyren1:~$ mkdir cyren
ubuntu@cyren1:~$ cd cyren
ubuntu@cyren1:~/cyren$
Now create a text file and throw a bunch of URLs in it, one per line so it looks something like this. Make sure you substitute vi with your favorite editors, many find vi to be intimidating, or pipe it in via stio, or use your favorite method to create a text file. This is where your command line skills are critical.
ubuntu@cyren1:~/cyren$ vi /home/ubuntu/cyren/Infile.txt
ubuntu@cyren1:~/cyren$ more /home/ubuntu/cyren/Infile.txt
slack.com
tinder.com
download.com
intuit.com
facebook.com
pornhub.com
ihop.com

ubuntu@cyren1:~/cyren$
Now download two files from my GitHub, here are direct links
- https://raw.githubusercontent.com/siggib007/python/master/Cyren/CyrenDopplerEnv.py
- https://raw.githubusercontent.com/siggib007/python/master/Cyren/categories.csv
I choose to download it directly into the folder on my box with curl, you choose how you get them there. Here is how I did it, the line wrap of the command here is annoying but unavoidable, you put it all in a single line. Then my output is after it.
ubuntu@cyren1:~/cyren$ curl https://raw.githubusercontent.com/siggib007/python/master/Cyren/CyrenDopplerEnv.py -o CyrenDopplerEnv.py % Total % Received % Xferd Average Speed Time Time Time Current
Dload Upload Total Spent Left Speed
100 14055 100 14055 0 0 72016 0 --:--:-- --:--:-- --:--:-- 72076ubuntu@cyren1:~/cyren$ curl https://raw.githubusercontent.com/siggib007/python/master/Cyren/categories.csv -o categories.csv % Total % Received % Xferd Average Speed Time Time Time Current
Dload Upload Total Spent Left Speed
100 1796 100 1796 0 0 9862 0 --:--:-- --:--:-- --:--:-- 9868
ubuntu@cyren1:~/cyren$Take a quick look at the files that got downloaded and make sure they did not get corrupt, just check to make sure it looks like normal text, not HTML or something completely unreadable. The categories file should be a comma (semicolon actually) separate text file, word1;word2;number. The other file should be a python script, which looks like a normal text file. It should start like this:
ubuntu@test:~/cyren$ more CyrenDopplerEnv.py
'''
Script that reads in a text file of URLs and uses Cyren's API to lookup the URL classification
to determine relative safety of the site.
Creating a Doppler project
The short CLI, just do it for me method
If you don’t want to mess with GUI and just want a simple way to just automatically create the Doppler project download https://raw.githubusercontent.com/siggib007/python/master/Cyren/doppler-template.yaml into your project directory and run doppler import from the CLI. This will create a project named cyren-demo so you will have to adjust commands below to that from mydemo. Also once you have your Cyren API Key, you need to run the following command
doppler secrets set APIKEY="mynewkey" -p cyren-demo -c devReplacing mynewkey with the key you got from Cyren.
The educational manual GUI method
For a more education approach you may want to do the GUI approach instead. The project names in the two approaches are different so there is no harm in doing both, just pay attention to which one you put the API key in and use that config. For this approach log into your Doppler dashboard and create a project, branch config, and import the configuration items into one of the configurations, making sure to adjust the paths and filename as necessary depending on what choice to go with. Leave the APIKEY as is for now, we will deal with that next.
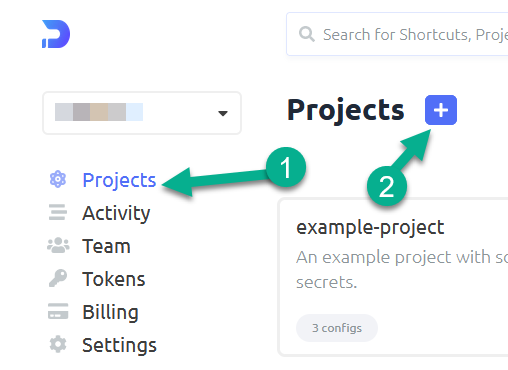
Creating a project
Switch to project screen and click on the + to create a new project
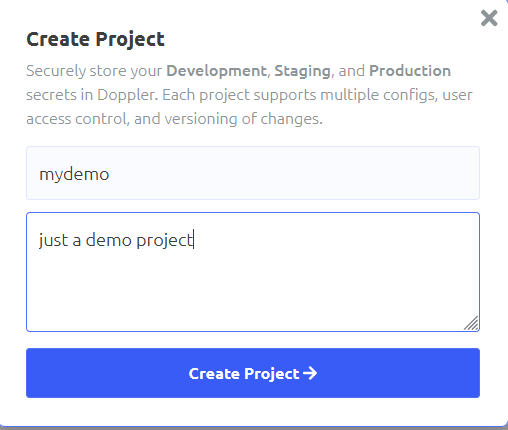
Name the project and give it a description, then click the create button
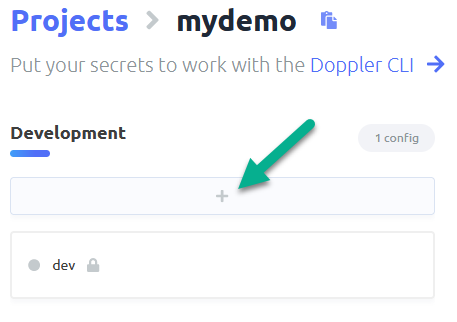
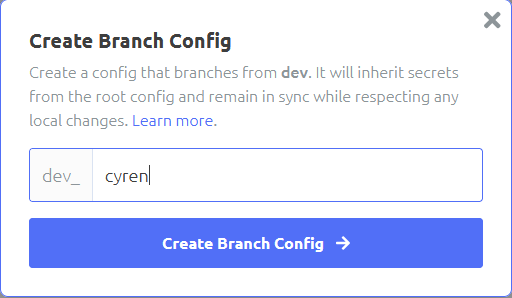
Creating a branch config
Click the plus under an environment of your choosing, I am going with Development
Importing configuration items
Click import secrets and paste the following in:
APIBASEURL=”https://api-url.cyren.com”
APIKEY=”your api key”
BATCHSIZE=”100″
CATEGORIES=”/home/ubuntu/cyren/categories.csv”
DELIM=”;”
DELIM2=”|”
INFILE=”/home/ubuntu/cyren/Infile.txt”
MINQUIET=”15″
OUTDIR=”/home/ubuntu/cyren”
OUTFILE=”URLResp.CSV”
TIMEOUT=”120″

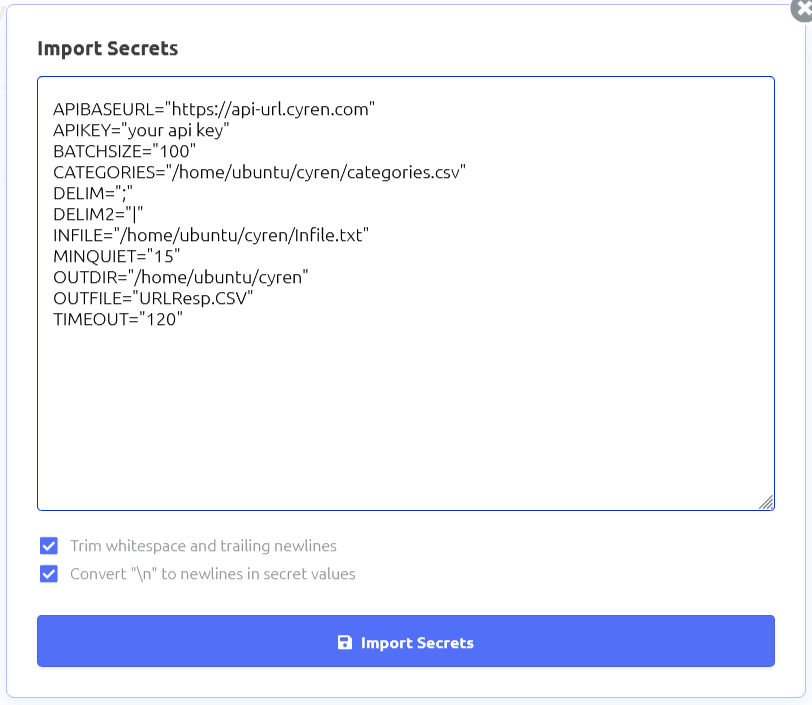
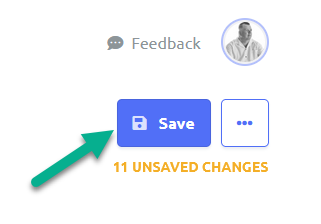
Click on import button, then save the changes using the save button in the upper right corner.
Authenticating the server to the project
Now we need to authenticate your box to the Doppler system. I am connecting to my system via SSH to a server without a GUI, so I do not have a browser, so I hit N on the open in browser question. If you are working locally on your box, you might be able to say yes and have the script open up your browser for you.
ubuntu@cyren1:~/cyren$ doppler login
? Open the authorization page in your browser? No
Complete authorization at https://dashboard.doppler.com/workplace/auth/cli
Your auth code is:
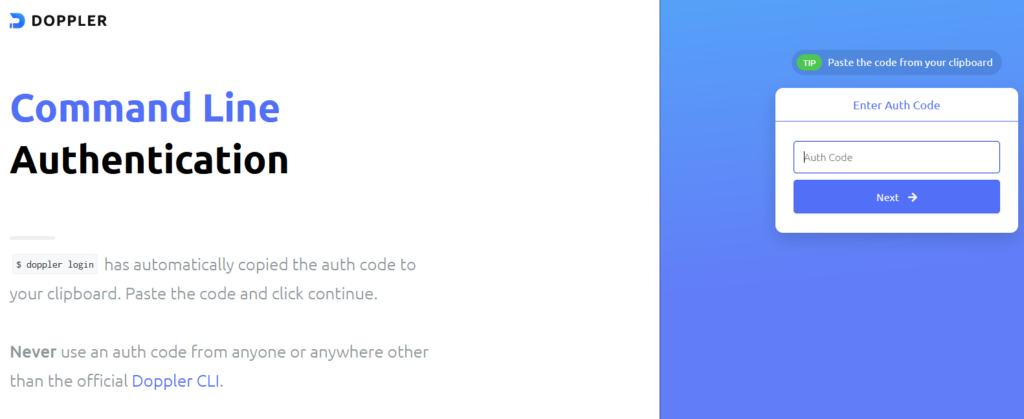
redacted_auth_code_for_webAfter I hit no, I open up a browser local on my workstation to https://dashboard.doppler.com/workplace/auth/cli and logged in with my doppler account. Then when prompted I pasted in “redacted_auth_code_for_web” and followed the wizard in the browser, then I get the welcome in the console.
Authenticate yourself to the portal
Open your browser to the URL above, authenticate with your Doppler creds.

Provide Auth token
In the next screen paste in the auth code, redacted_auth_code_for_web, in my example, note that your auth code will be different.
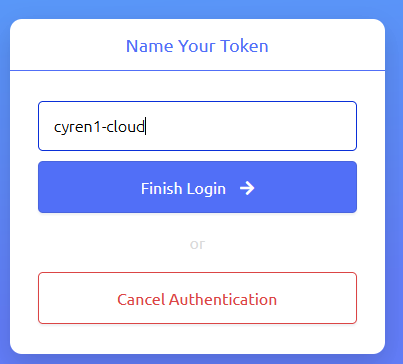
Name the token
Name your token and finish. Now your machine is authenticated to the system.
Project configuration
Next you configure your path to match the project and configuration where you imported the variables. In my case my project name is mydemo (or cyren-demo if you went the CLI route), and I am using the dev_cyren branch from dev environment. So here is what I did:
ubuntu@cyren1:~/cyren$ doppler setup -p mydemo -c dev_cyren
┌─────────┬───────────┬────────────────────┐
│ NAME    │ VALUE     │ SCOPE              │
├─────────┼───────────┼────────────────────┤
│ config  │ dev_cyren │ /home/ubuntu/cyren │
│ project │ mydemo    │ /home/ubuntu/cyren │
└─────────┴───────────┴────────────────────┘
ubuntu@cyren1:~/cyren$
Create Cyren API key
The last preparation step is to get an API key to the Cyren URL Lookup API. This API is completely free for testers and hobbyist, which is fine for this demo. Just go to https://www.cyren.com/products/url-lookup-api click on “start for free” and fill out the form. While many fields are required, the only field that really matters is the email field, as the system emails you the API key. I leave up to you and your privacy stance as to how honest you are on the other fields. As far as I can tell there is no validation beyond that there is some text in the fields.
Once you get your email with the key, update the APIKEY variable in your configuration. You can do this either via CLI or the GUI.
The CLI method
doppler secrets set APIKEY="mynewkey" -p cyren-demo -c devMake sure you actually use the key you got in the email instead of mynewkey.
The GUI method
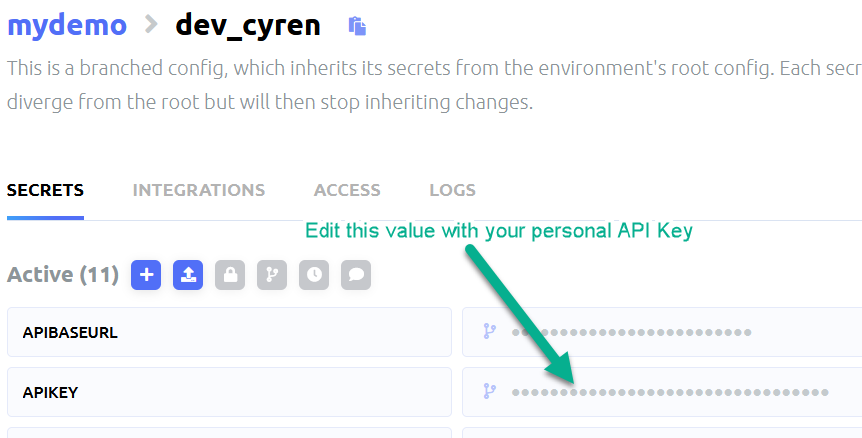
Now we should be ready to run the script.
Running the script
ubuntu@cyren1:~/cyren$ doppler run python3 CyrenDopplerEnv.py
This is a script to classify URLs using Cyren's API. This is running under Python Version 3.10.4
Running from: /home/ubuntu/cyren/CyrenDopplerEnv.py
The time now is Thu May  5 23:07:37 2022
Logs saved to /home/ubuntu/cyren/Logs/CyrenDopplerEnv-2022-05-05-23-07-37.log
Output will be written to /home/ubuntu/cyren/URLResp.CSV
Raw Output will be written to /home/ubuntu/cyren/RawOut.json
It's been 1651792057.4486177 seconds since last API call
Doing a post to URL: https://api-url.cyren.com/api/v1/free/urls-list
with payload of: {'urls': ['vinbudin.is', 'sante.is', 'slack.com', 'tinder.com', 'download.com', 'intuit.com', 'facebook.com', 'pornhub.com', 'ihop.com']}
post executed
call resulted in status code 200
objFileOut closed
Done! Output saved to /home/ubuntu/cyren/URLResp.CSV
ubuntu@cyren1:~/cyren$
If you get error 401 you messed up the APIKEY.
call resulted in status code 401
Error 401. Bad token; invalid JSON
If you get “call resulted in status code 206” it just means that one of the lines in your input file could not be recognized as a valid URL, check the output file to see which one.
The results
The last line of the script output tells you where you can find the output file. This is configured by the OUTDIR and OUTFILE configuration item. Go ahead and change those in Doppler and re-run the script and see the script save the results in a different file or different location.